Ever wanted a dessert that’s sweet, nutty, and utterly irresistible?
This pecan pie brings gooey, caramel-like filling together with toasted pecans in a crisp, buttery crust.
Each bite is rich, crunchy, and deeply satisfying. Baking pecan pie at home may seem intimidating, but it’s surprisingly straightforward, making it a perfect choice for holidays or special occasions.
The natural sweetness of the pecans balances beautifully with the smooth, syrupy filling, creating a dessert that’s timeless and unforgettable.
Serve it warm or at room temperature, and it’s sure to become a favorite for family and friends.
Ready to bake? Let’s get started!
Why You’ll Love This Recipe
What makes pecan pie irresistible is the contrast between toasted nuts and a caramelized filling that sets with a slight chew.
What Makes Them Special
- Toasted pecans add depth and slight bitterness
- Syrup-based filling bakes into a glossy, chewy center
- Crisp top layer forms during baking
- Slices hold firmly once cooled
- Sweet-salty balance keeps it from tasting cloying”
Save This Pin for Later to Your Pinterest Board

🔥 If you love rich, nutty, caramelized fillings, these recipes offer similar depth and texture:
How to Get Your Pecan Pie Just Right
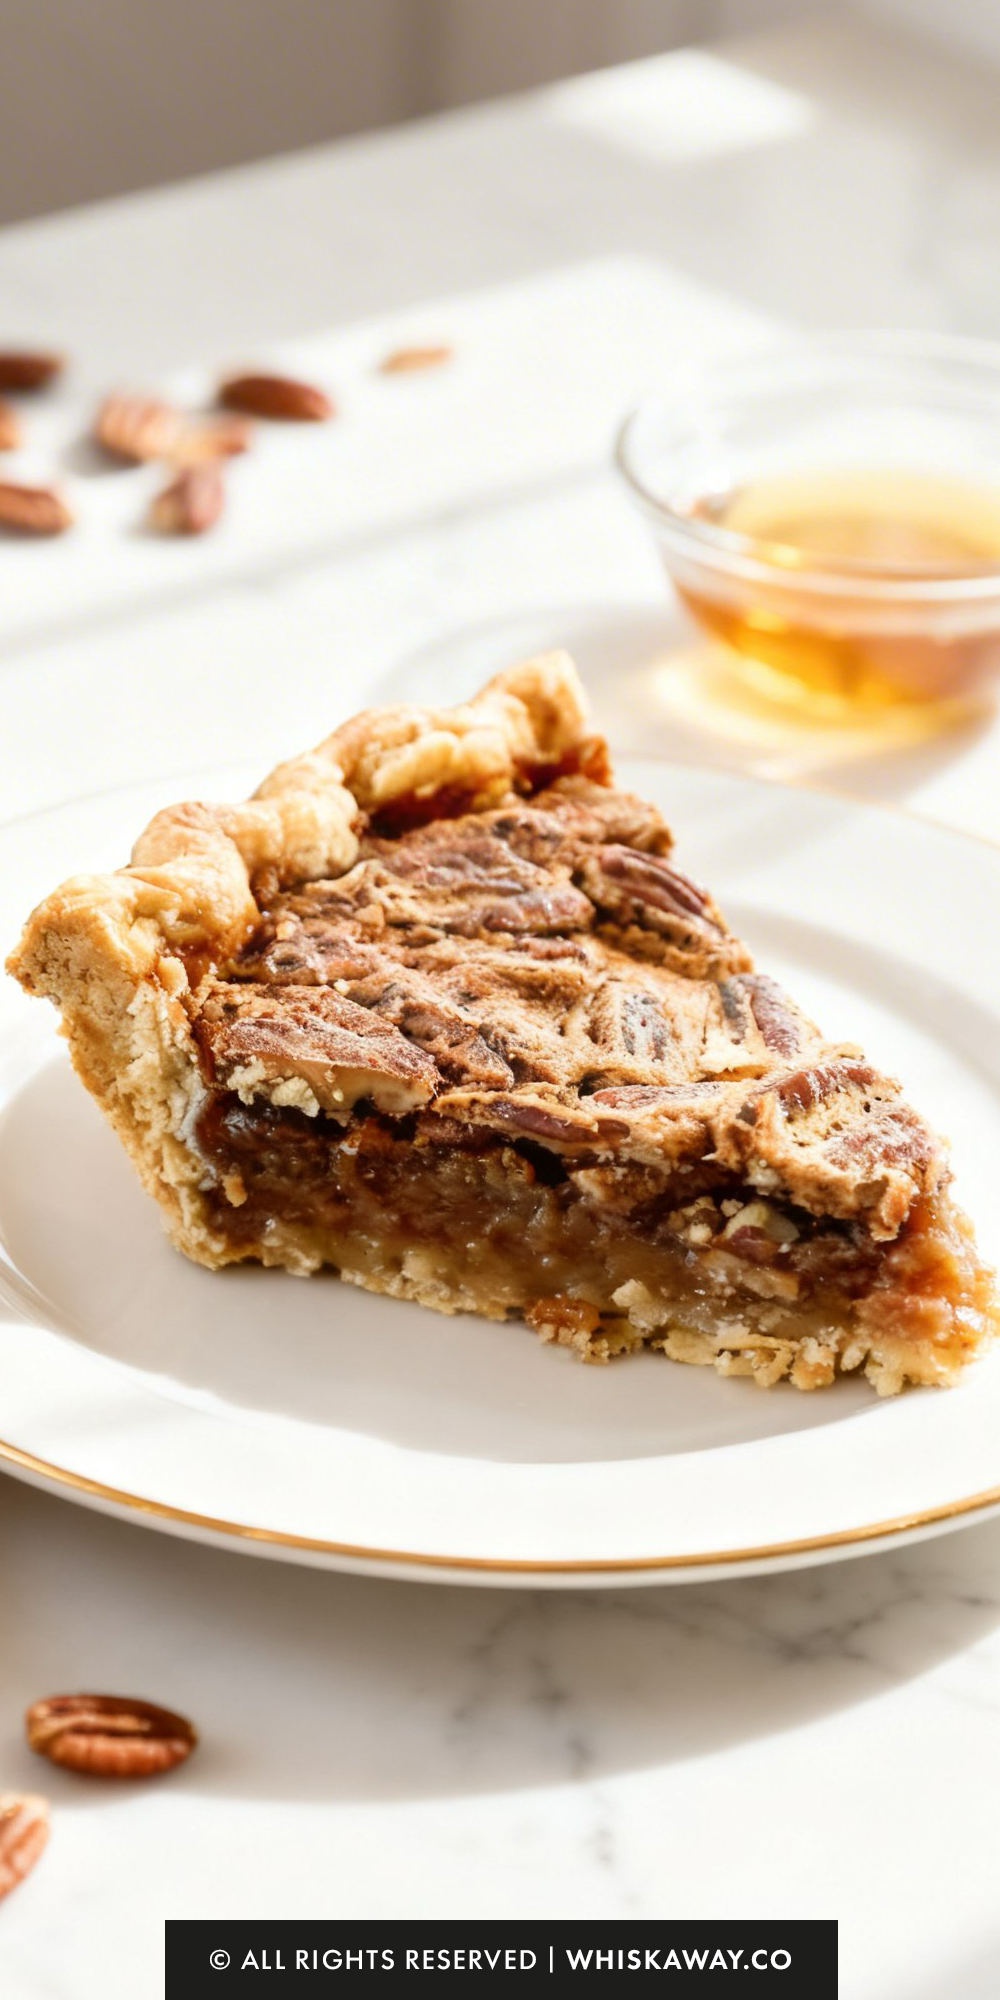
Pecan pie is a masterpiece of textures; crunchy nuts on top of a gooey, custard-like center.
However, because it is a sugar-dense custard, it can be tricky to bake without it becoming either a soup or a brick. Here is how to achieve that professional “clean-slice” finish every time.
1. Mastering the “Set”
The most common struggle with pecan pie is knowing exactly when to pull it out of the oven.
Give the pie a gentle nudge while it’s still in the oven. The edges should be stable and firm, but the center should have a slight, springy wobble (think firm Jell-O).
As the pie finishes baking, the filling will often puff up slightly like a dome. This is a sign that the eggs have cooked and created a stable structure. It will settle back down as it cools.
If the center ripples like water when you move the pan, it’s not ready. Give it another 5–10 minutes.
2. Flavor & Texture Secrets
Before adding the pecans to the batter, toast them in a dry pan over medium heat for 3–5 minutes until fragrant. This brings out the essential oils and ensures the nuts stay crunchy even after sitting in the syrup.
Cold eggs can cause the melted butter in your filling to seize or clump. Use room temperature eggs to ensure a perfectly smooth, emulsified custard.
Don’t skip the salt! Pecan pie is incredibly sweet. That half-teaspoon of salt is what balances the sugar and allows the nutty flavor of the pecans to actually shine through.
3. The Crust Shield Technique
Because this pie has a long bake time (about an hour total), the edges of your crust are at high risk of burning before the center sets.
If you don’t have a dedicated silicone pie shield, the foil tent mentioned in the instructions is your best friend.
Make sure the foil is greased so it doesn’t stick to the sugar on top, and check the crust every 15 minutes after the initial temperature drop.
4. Common Mistakes to Avoid
Slicing While Warm: This is the #1 mistake. Pecan pie is a “carry-over” dessert.
It continues to set as it cools. If you cut it while it’s even slightly warm, the filling will run all over the plate. It needs at least 4 hours (or ideally overnight) to reach the correct consistency.
Over-beating the Eggs: When mixing the filling, whisk the eggs until just combined.
If you beat them too vigorously, you’ll incorporate too much air, which can cause the pie to puff up excessively and then crack as it cools.
Using a Shallow Dish: This recipe is designed for a deep-dish pie plate.
If you use a standard shallow plate, the filling will overflow, creating a sticky mess on your oven floor and leaving you with an uneven ratio of pecans to syrup.
Baking Tips for This Recipe
- Toast pecans for 5–7 minutes before adding to the filling to enhance flavor.
- Stir filling gently to avoid incorporating air bubbles that rise and create cracks.
- Shield crust edges halfway through baking to prevent over-browning.
- Bake until the center has a slight wobble but isn’t liquid. It firms as it cools.
- Cool completely before slicing — the filling sets during cooling.
Variation Tips
While a classic Pecan Pie is hard to beat, its buttery, caramel-like base is incredibly receptive to new flavors.
Here are a few ways to elevate or adapt the recipe to suit your taste.
1. The “Bourbon & Chocolate” Upgrade
This is the most popular twist on the classic, often called “Derby Style.”
Stir 2 tablespoons of dark Bourbon and ½ cup of semi-sweet chocolate chips into the filling before pouring it into the crust.
The Bourbon cuts through the intense sweetness with an oaky warmth, while the chocolate creates a rich, fudge-like layer at the bottom.
2. Salted Caramel & Maple
For a deeper, more complex sugar profile:
- Replace the light corn syrup with pure maple syrup (Grade A Dark Color works best for flavor).
Once the pie is out of the oven, sprinkle a generous pinch of flaky sea salt (like Maldon) over the top while the sugar is still slightly tacky.
3. Brown Butter Infusion
If you want to lean into the “nutty” profile without adding more nuts:
- Instead of simply melting the butter, cook it in a small saucepan over medium heat until it foams and turns a deep amber color with a toasted aroma.
This adds a savory, toasted depth to the filling that balances the corn syrup.
4. The “Kitchen Sink” Nut Mix
Don’t feel restricted to just pecans!
Use a 1 ½ cup blend of pecans, walnuts, and coarsely chopped hazelnuts.
The different sizes and textures of the nuts make every bite a little different.
5. Dietary Adaptations
Gluten-Free:
The Crust: Use your favorite Gluten-Free pie crust recipe or a store-bought GF frozen shell.
The Filling: The filling itself is naturally gluten-free! Just double-check that your vanilla extract and corn syrup are certified GF.
Refined Sugar-Free (Alternative):
You can replace the light corn syrup with brown rice syrup or honey.
Note: Honey will significantly change the flavor profile and make the pie taste more floral; it also tends to brown faster, so keep that foil tent ready!
Dairy-Free:
Use a high-quality vegan butter stick (like Miyoko’s) or refined coconut oil in the filling.
The texture remains almost identical, with a very slight hint of coconut if using oil.
How to Properly Store Your Pecan Pie
A Pecan Pie is essentially a sugar-dense custard. Because of its high sugar and fat content, it holds up remarkably well, but since it is packed with eggs, it needs a little more care than a standard fruit pie.
Here is how to keep that crust flaky and the filling perfectly gooey.
1. Room Temperature Storage
You can keep a freshly baked pecan pie on the counter for about 2 hours after it has cooled.
While high-sugar pies are more shelf-stable than others, homemade recipes contain a high ratio of eggs.
To be safe and keep the filling from becoming overly soft, it is best to move it to the fridge once it reaches room temperature.
2. Refrigeration (The Best Method)
Duration: 3 to 4 days.
Once the pie is completely cool, wrap it tightly in plastic wrap or aluminum foil. You want to prevent the “fridge smell” from being absorbed by the fats in the butter and pecans.
Serving Tip: Pecan pie is delicious cold, but if you prefer that classic “melt-in-your-mouth” texture, let a slice sit at room temperature for about 20 minutes before eating.
3. Freezing for the Long Haul
Pecan pie is one of the best-behaving pies in the freezer because the filling doesn’t have a high water content that turns into ice crystals.
Duration: Up to 3 months.
Wrap the fully cooled pie (or individual slices) in a double layer of plastic wrap, followed by a heavy-duty layer of aluminum foil. This prevents freezer burn.
Never thaw a pecan pie on the counter. Move it to the refrigerator 24 hours before you plan to serve it. This slow thaw prevents the crust from becoming soggy.
4. How to Reheat Without Ruining It
If you want that “just-out-of-the-oven” experience, skip the microwave. The microwave will turn your crust into a gummy mess and make the syrup boiling hot.
Preheat your oven to 300°F (150°C). Place the pie (or a slice) on a baking sheet and tent it loosely with foil to protect the nuts.
Heat for 10 to 15 minutes. This is just enough to warm the center and re-crisp the buttery crust without further cooking the eggs.
5. Storage Mistakes to Avoid
The Condensation Trap: Never wrap your pie while it is even slightly warm. Trapped steam will condense on the underside of the plastic, dripping back onto your beautiful pecans and turning the top of your pie into a sticky, wet mess.
The “Odor Sponge”: Pecans are high in oil, and oil absorbs smells. If you have cut onions or garlic in your fridge, ensure your pie is wrapped like Fort Knox.
Slicing Before Cooling: If you slice the pie to store it while it’s still warm, the filling will migrate and the crust will lose its crispness. Always wait for the “Full Chill” before portioning for storage.
FAQs
Why is my pecan pie runny even after baking for an hour?
The two biggest culprits are under-baking or cutting it too soon. Pecan pie is a “carry-over” baker, meaning the center continues to firm up as it cools. If you slice it while it’s still warm, the filling will flow like lava. For a clean slice, you must let it cool for at least 4 hours—or better yet, overnight. If it’s still runny after cooling, the eggs likely didn’t reach a high enough temperature to set the custard.
Can I substitute the light corn syrup with something else?
Yes, but it will change the flavor and texture. You can use dark corn syrup for a deeper molasses taste, or pure maple syrup for a more complex flavor. Keep in mind that maple syrup is thinner than corn syrup, so your pie might be slightly softer. Avoid using honey as a 1:1 swap, as it can be overly sweet and may brown the top of your pie too quickly.
How do I know for sure when the pie is done?
Use the “Wobble Test.” Give the pie a gentle nudge; the edges should be stable and set, but the center should have a slight, springy jiggle (similar to firm gelatin). If the center ripples like a liquid “splash,” it needs more time. Also, look for the “dome”—the filling will usually puff up slightly when the eggs are fully cooked.
Do I really need to refrigerate pecan pie?
Yes. Because pecan pie is a custard-based filling containing several eggs, it is a perishable item. While the high sugar content helps preserve it, food safety guidelines recommend refrigerating the pie once it has completely cooled. It can stay at room temperature for about two hours for serving, but should live in the fridge otherwise.
Can I make this pie a few days in advance?
Absolutely! Pecan pie is actually the ultimate make-ahead dessert. The flavors deepen and the texture becomes more stable after a day in the refrigerator. You can bake it up to 3 days before your event. Just keep it wrapped tightly in the fridge and pull it out 30 minutes before serving to take the chill off, or warm it briefly in a low oven.
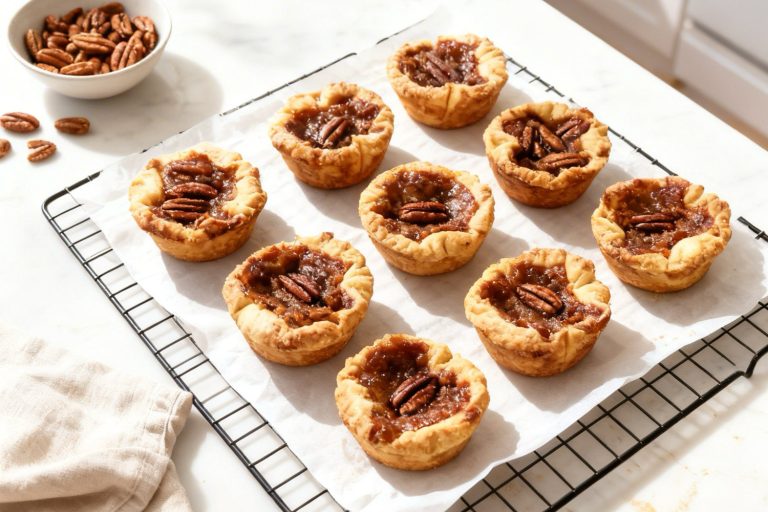
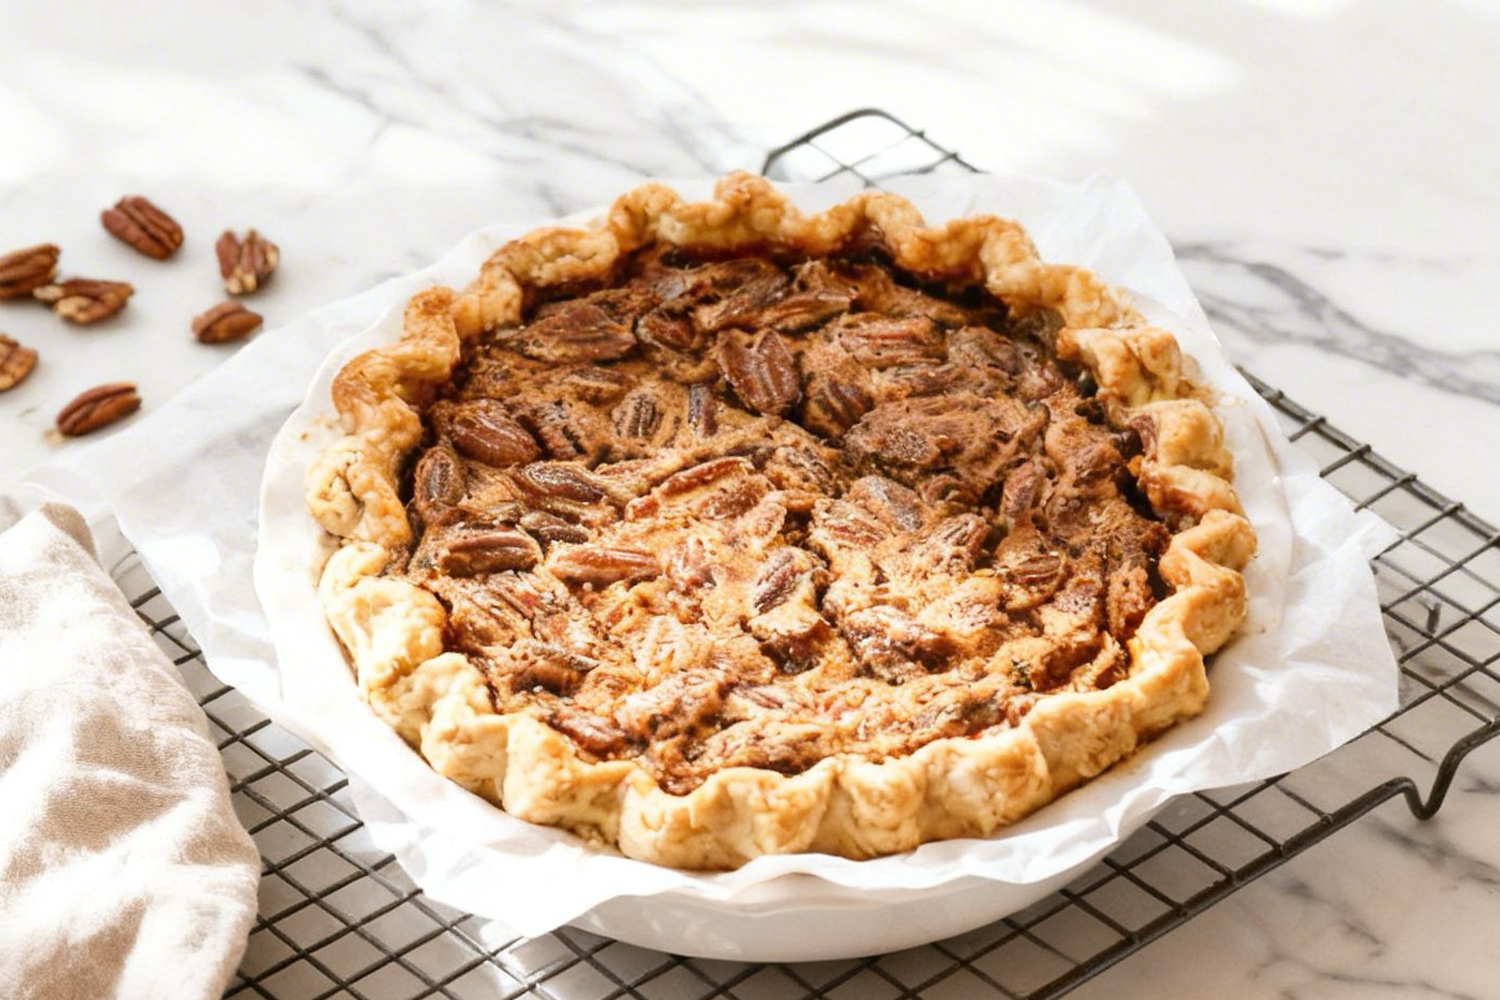
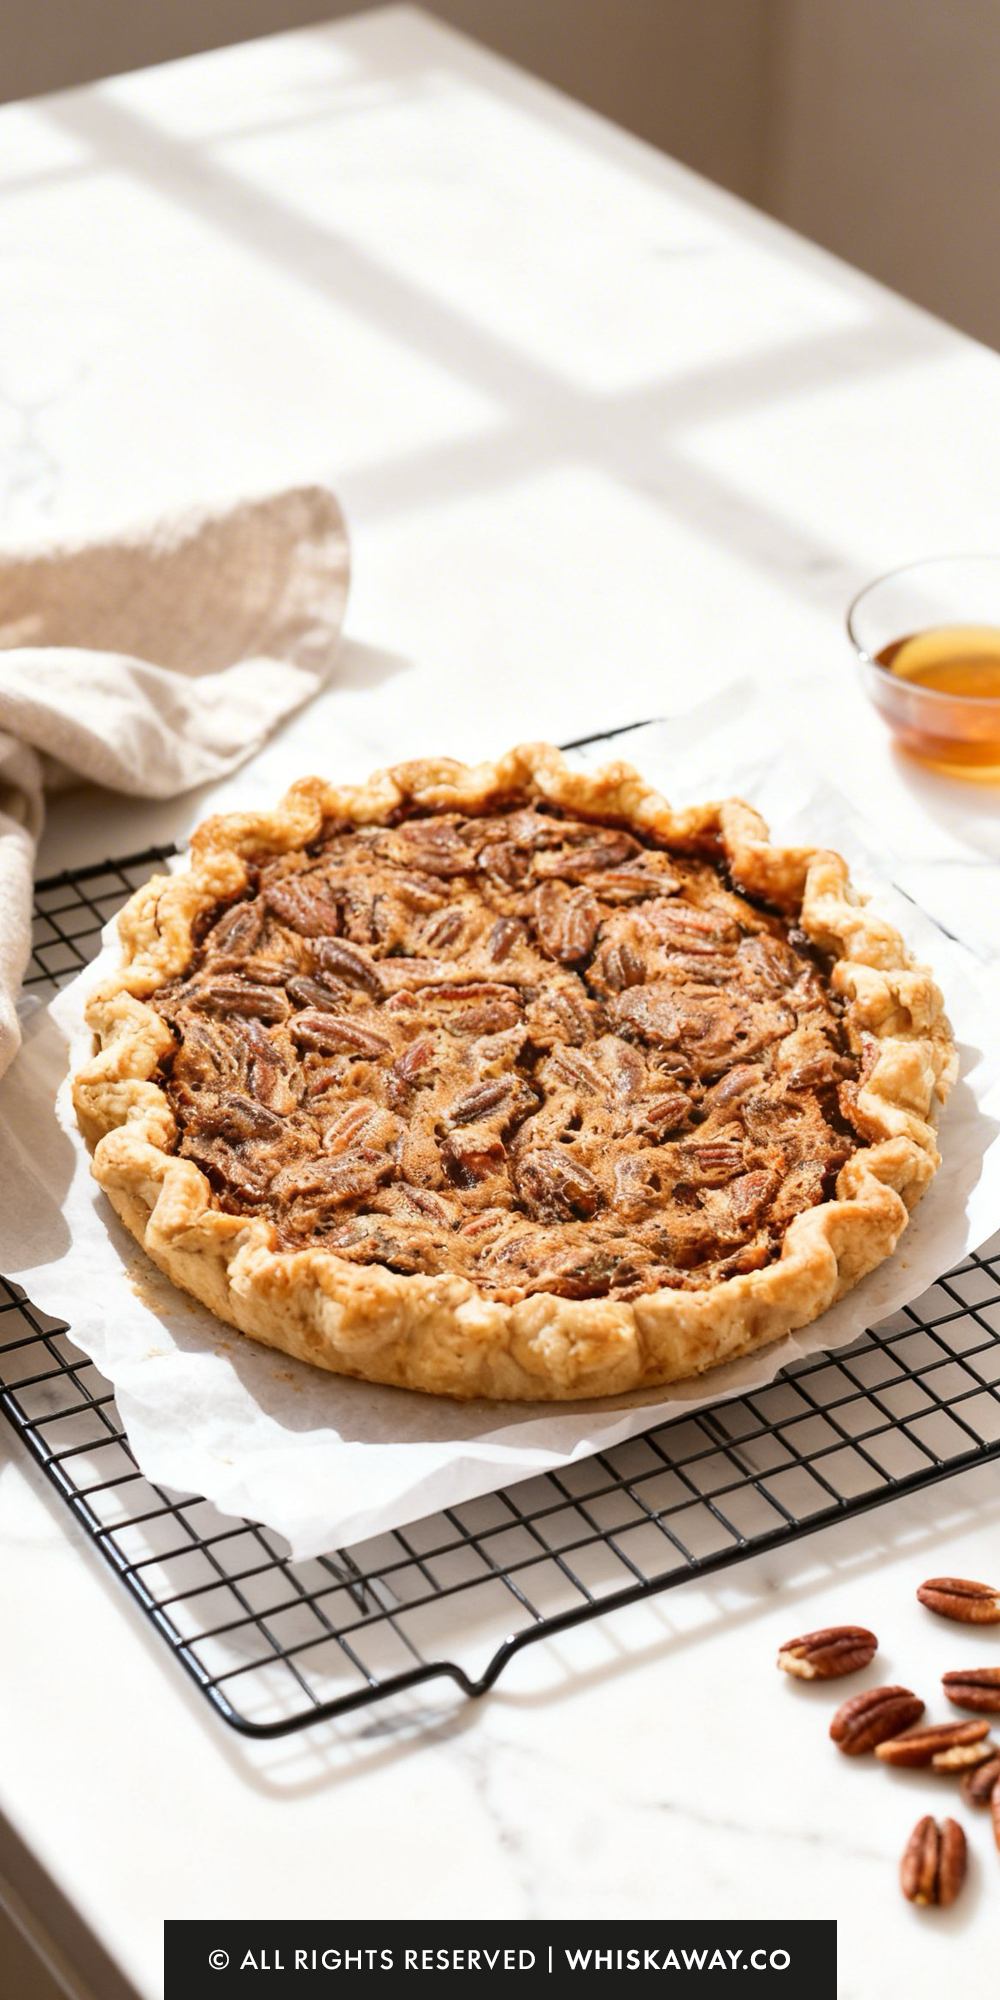
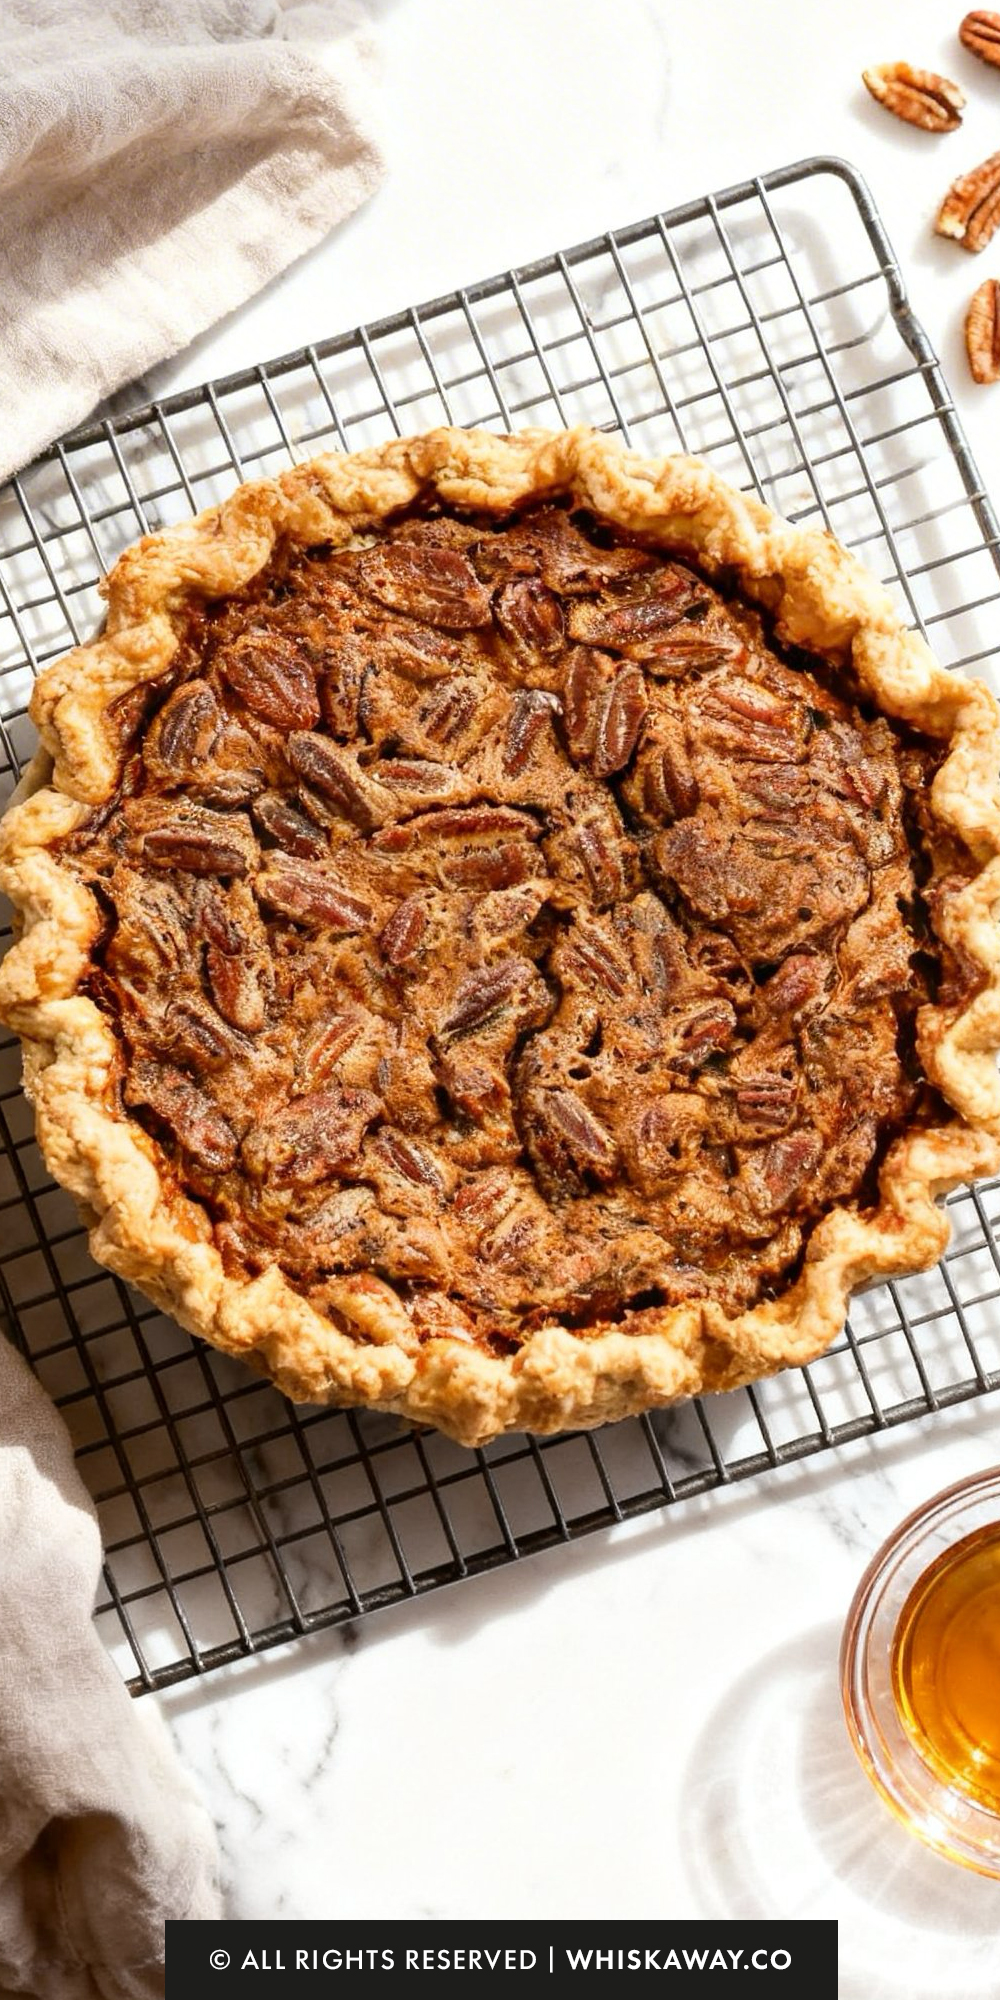
Pecan Pie
12
Slices15
minutes50
minutesThis pecan pie is rich, gooey, and packed with toasted pecans.
Ingredients
1 1/2 cups pecan halves (can chop the pecans or leave whole)
1 Homemade pie crust, unbaked
1 cup light corn syrup
1 cup granulated sugar
3 large eggs
1/3 cup salted butter, softened or melted
3 Tablespoons light brown sugar
3/4 teaspoon vanilla extract
1/2 teaspoon salt
Directions
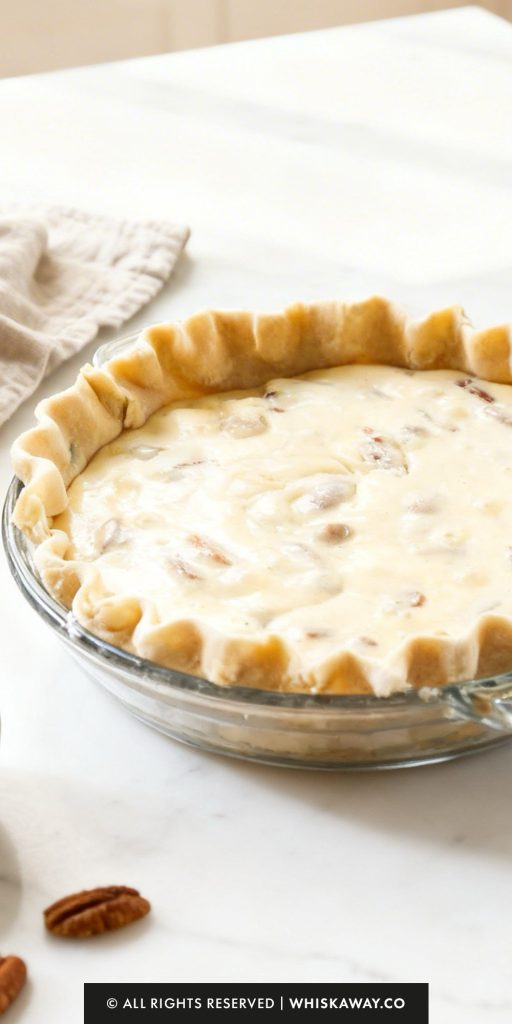
- Line a deep-dish pie plate with your prepared dough, crimping the edges as desired. Place the crust in the refrigerator to keep it cold and firm while you focus on the filling.
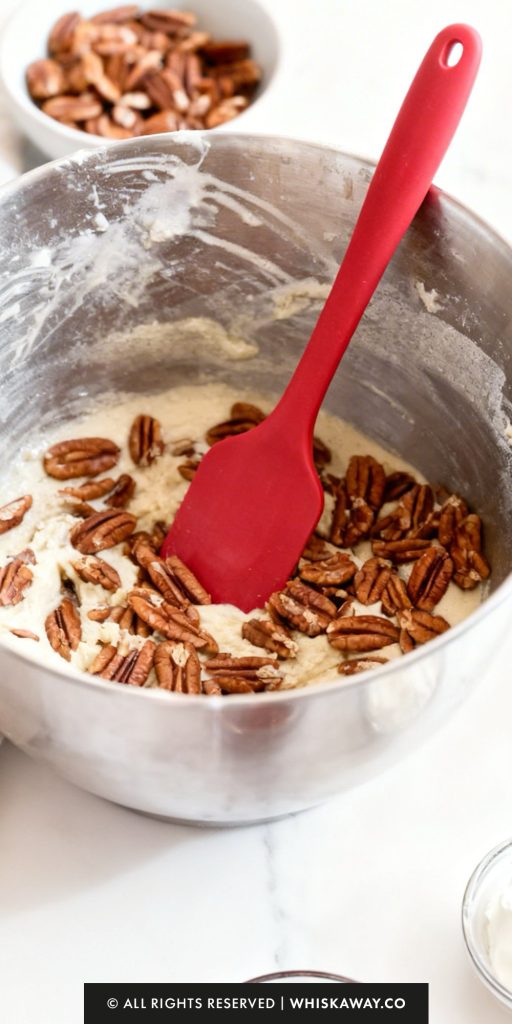
- In a large mixing bowl, beat together the granulated sugar, brown sugar, salt, corn syrup, and the butter (either melted or softened). Once the mixture is combined and smooth, whisk in the eggs and vanilla extract until fully incorporated.
- Set aside a handful of pecan halves to use as a garnish. Stir the rest of the pecans into the syrupy batter, then pour the mixture into your chilled, unbaked pie shell. Arrange the reserved pecans on top to fill any gaps for a professional look. Use a small spoon to gently coat these top pecans with a bit of the filling to protect them from drying out in the oven.
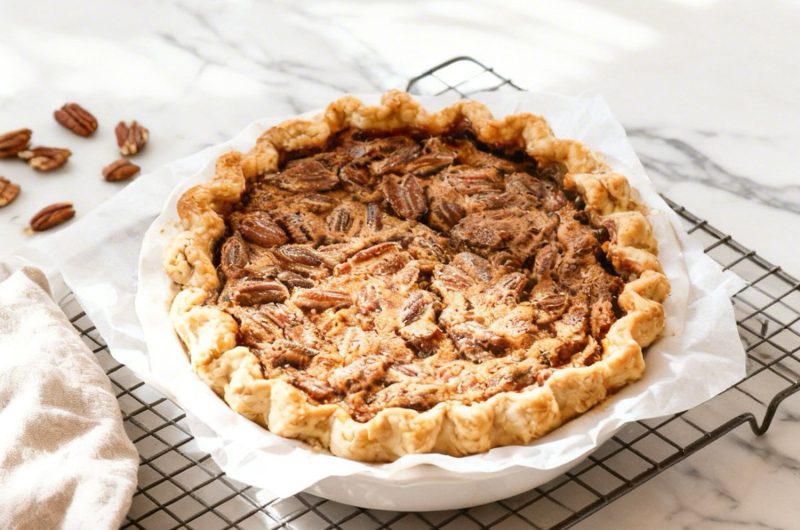
- Place the pie in the oven at 425°F for the initial 10 minutes. Afterward, turn the temperature down to 350°F and continue baking for approximately 50 minutes.
- Keep an eye on the pie about halfway through the baking time. To prevent the crust from getting too dark, loosely drape a piece of greased aluminum foil over the top. Make sure to "tent" the foil high so it doesn't make contact with the sticky filling.
- To see if the pie is ready, give the pan a gentle nudge. The center should have a slight, stable wobble but should not look liquid or splashy. If it still appears very jiggly, let it bake for another 5 to 10 minutes. When in doubt, it is safer to bake it slightly longer to ensure the center creates a clean slice.
- The pie must cool completely at room temperature for several hours to allow the filling to reach its final consistency. For the best results, you can also store it in the refrigerator for 1 to 3 days before serving.