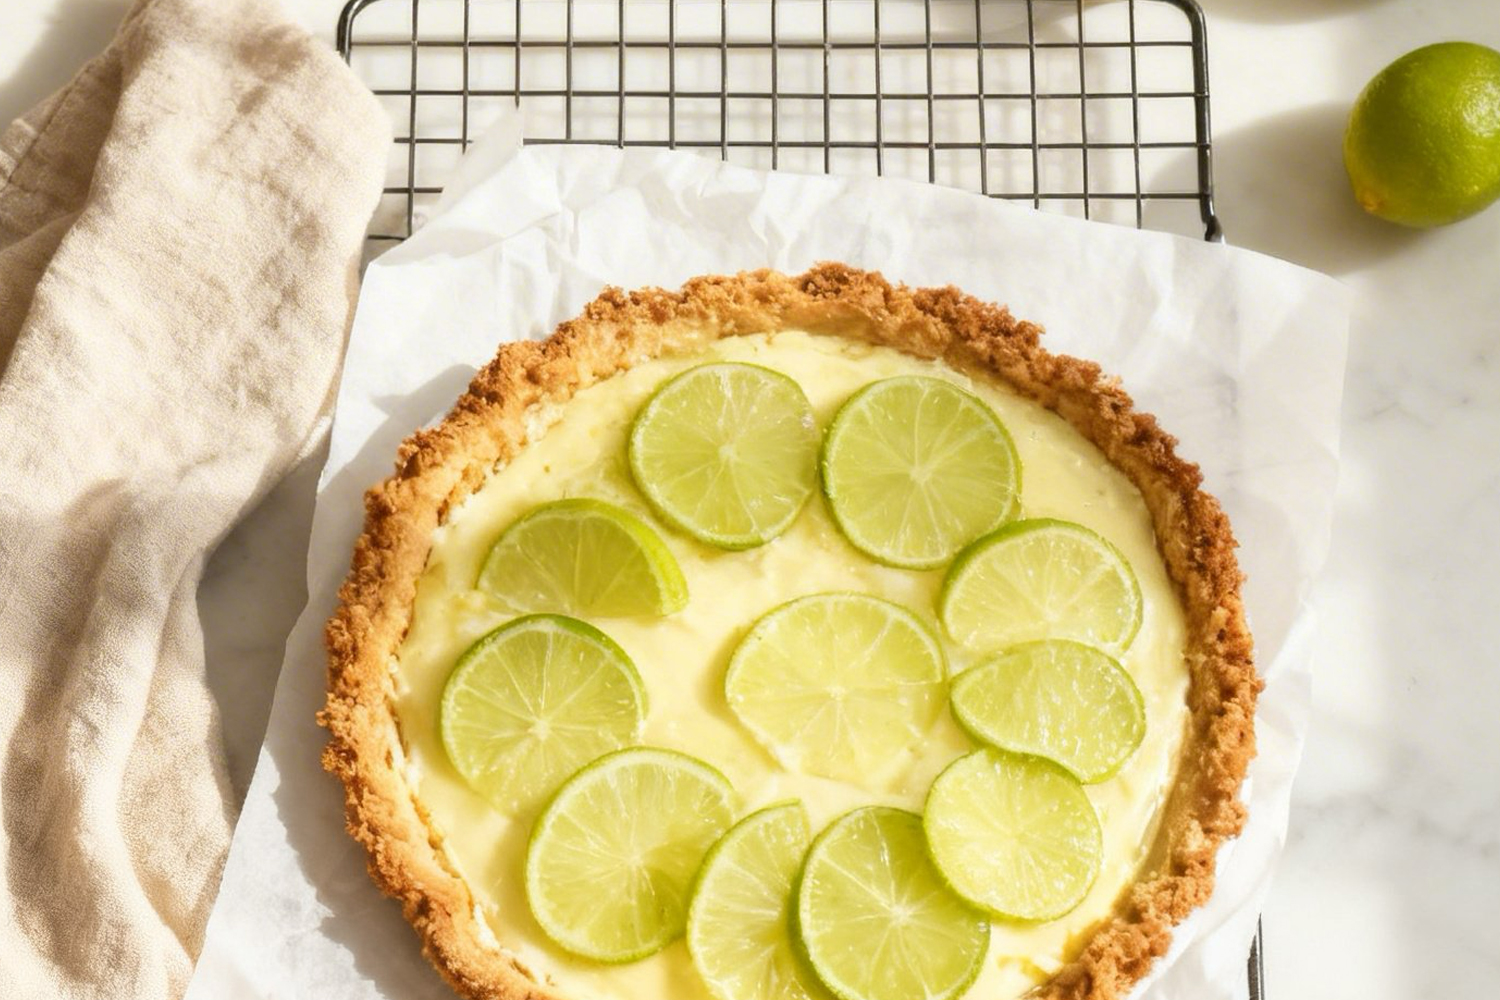
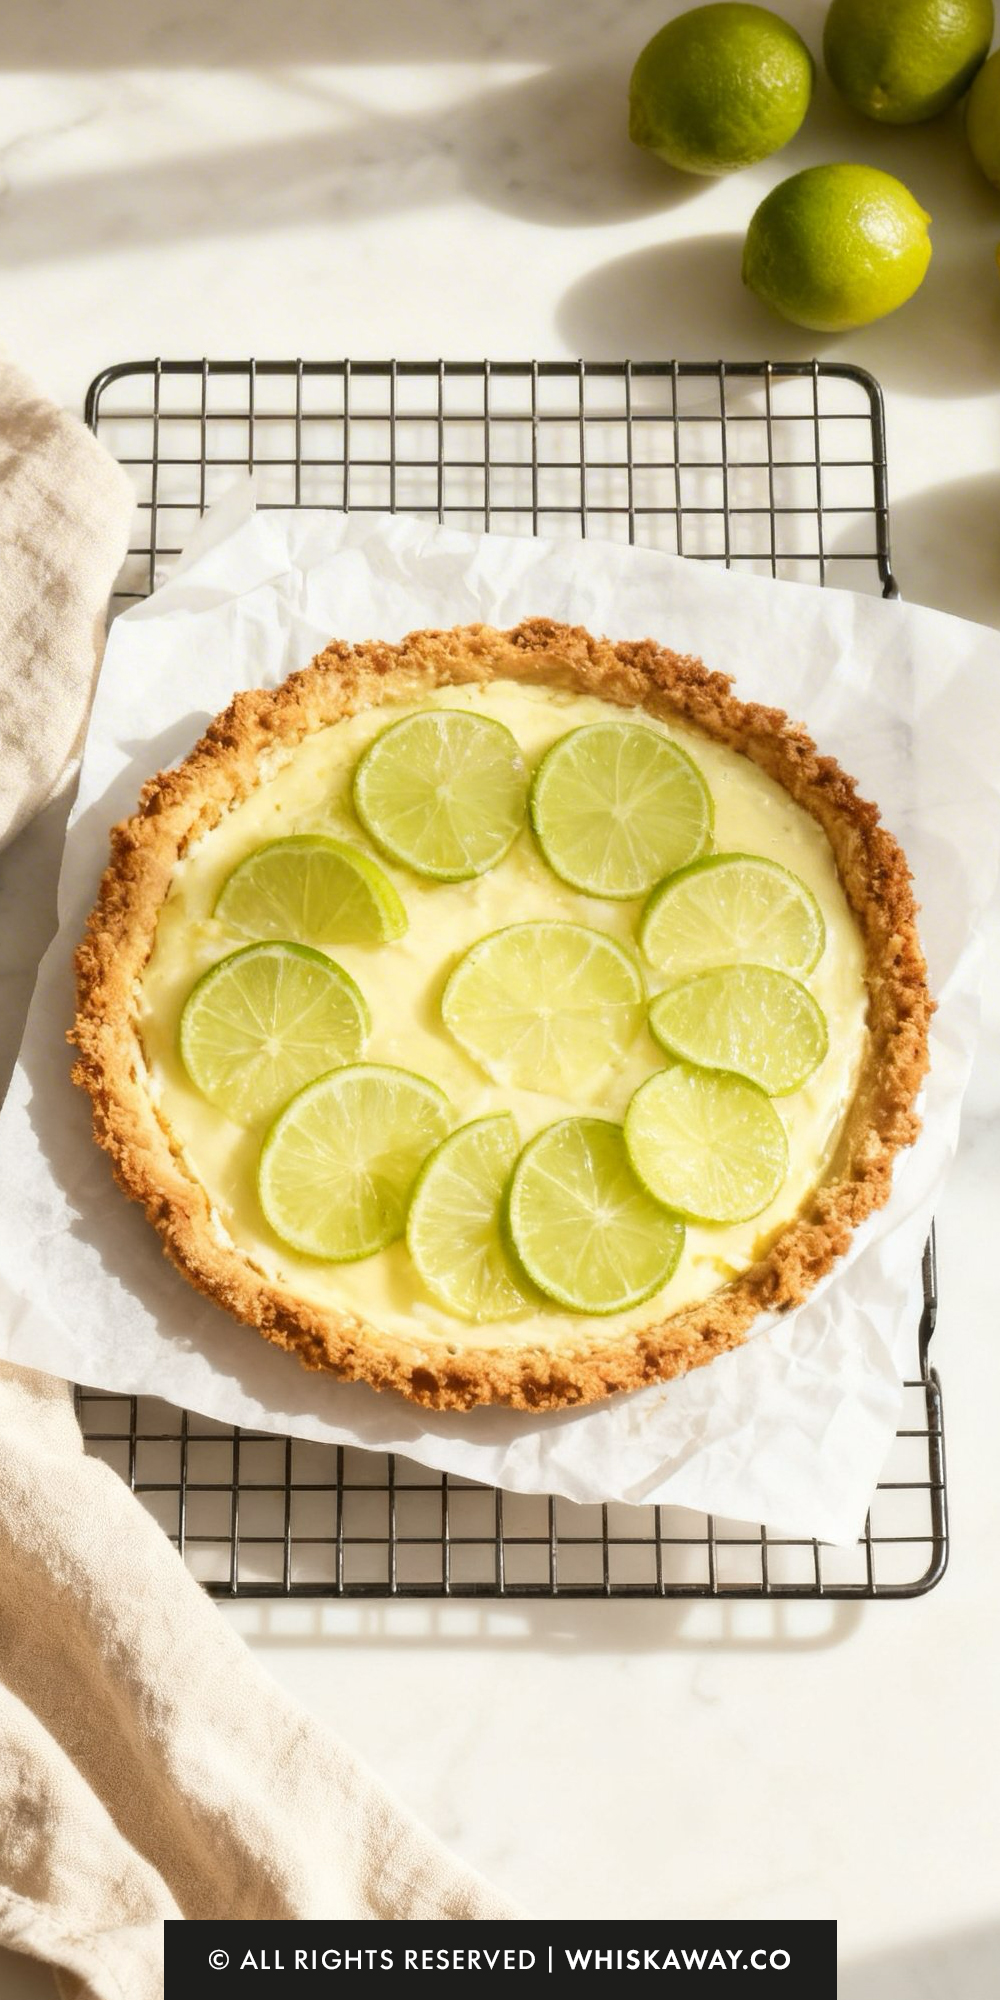
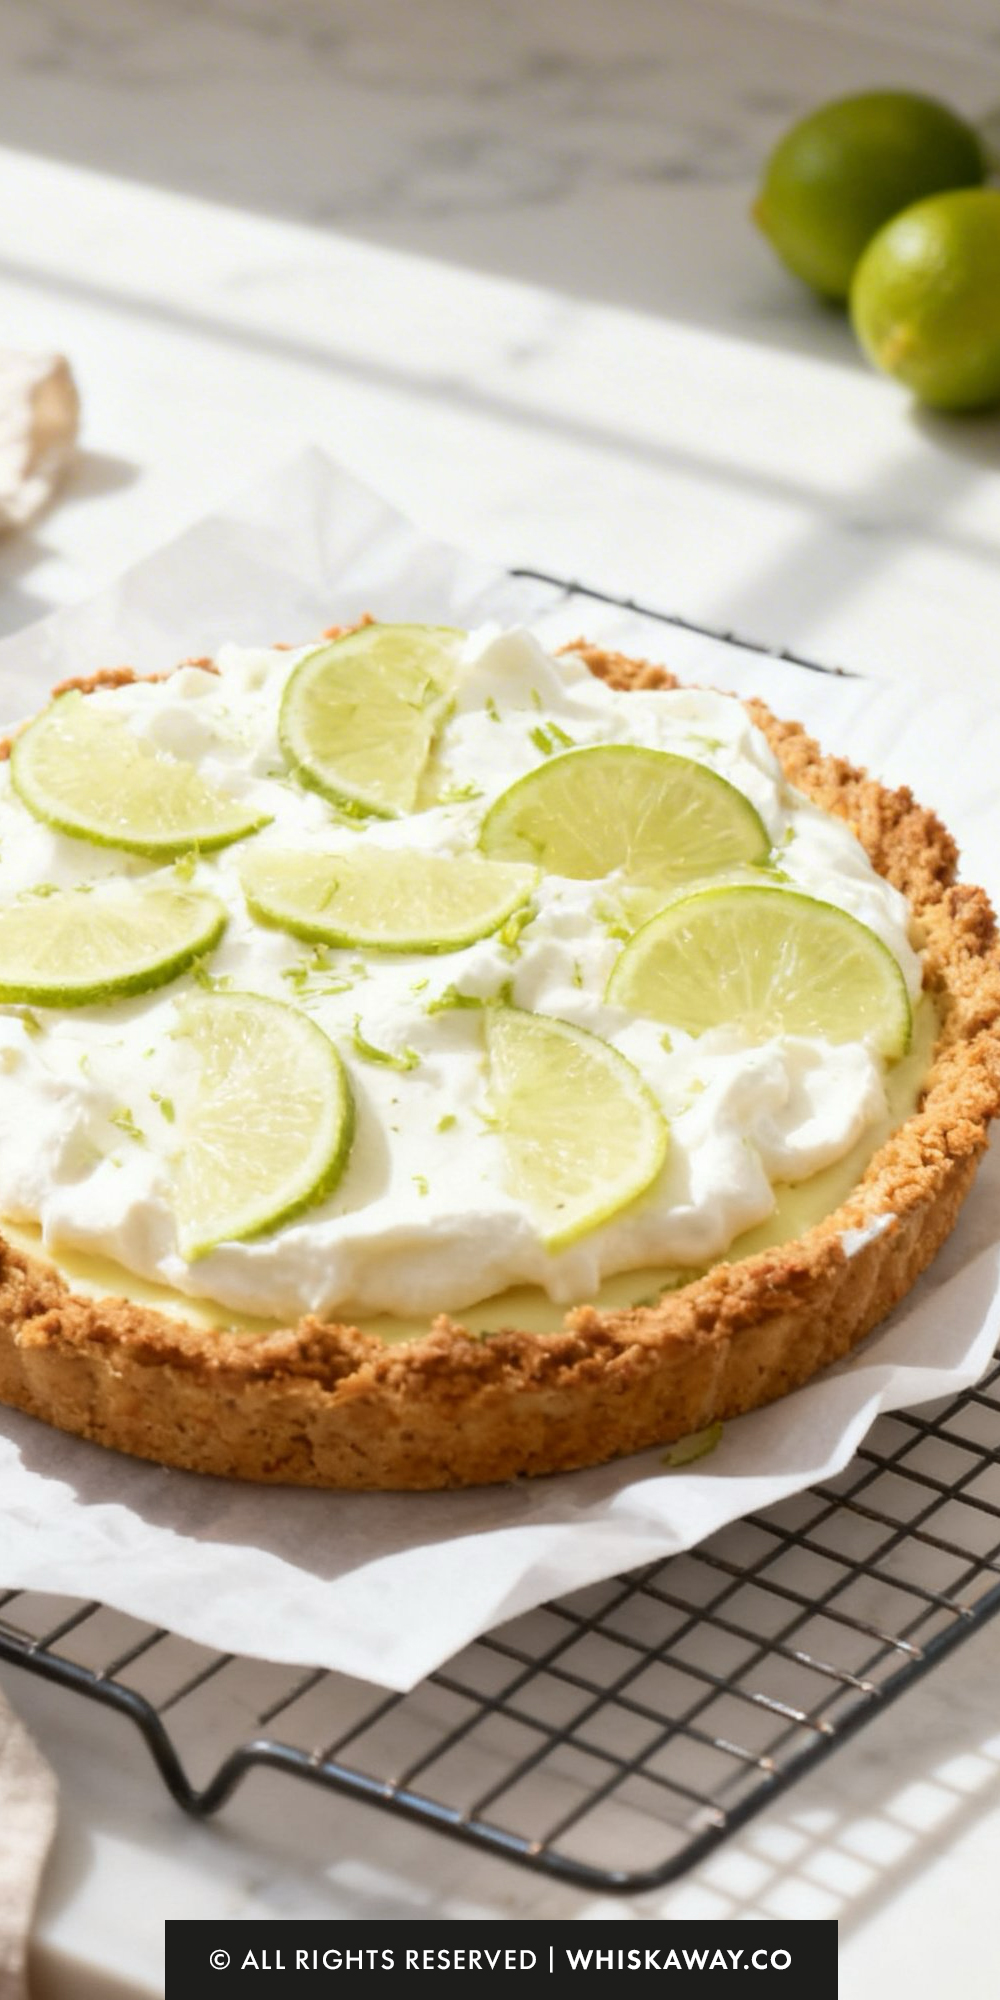
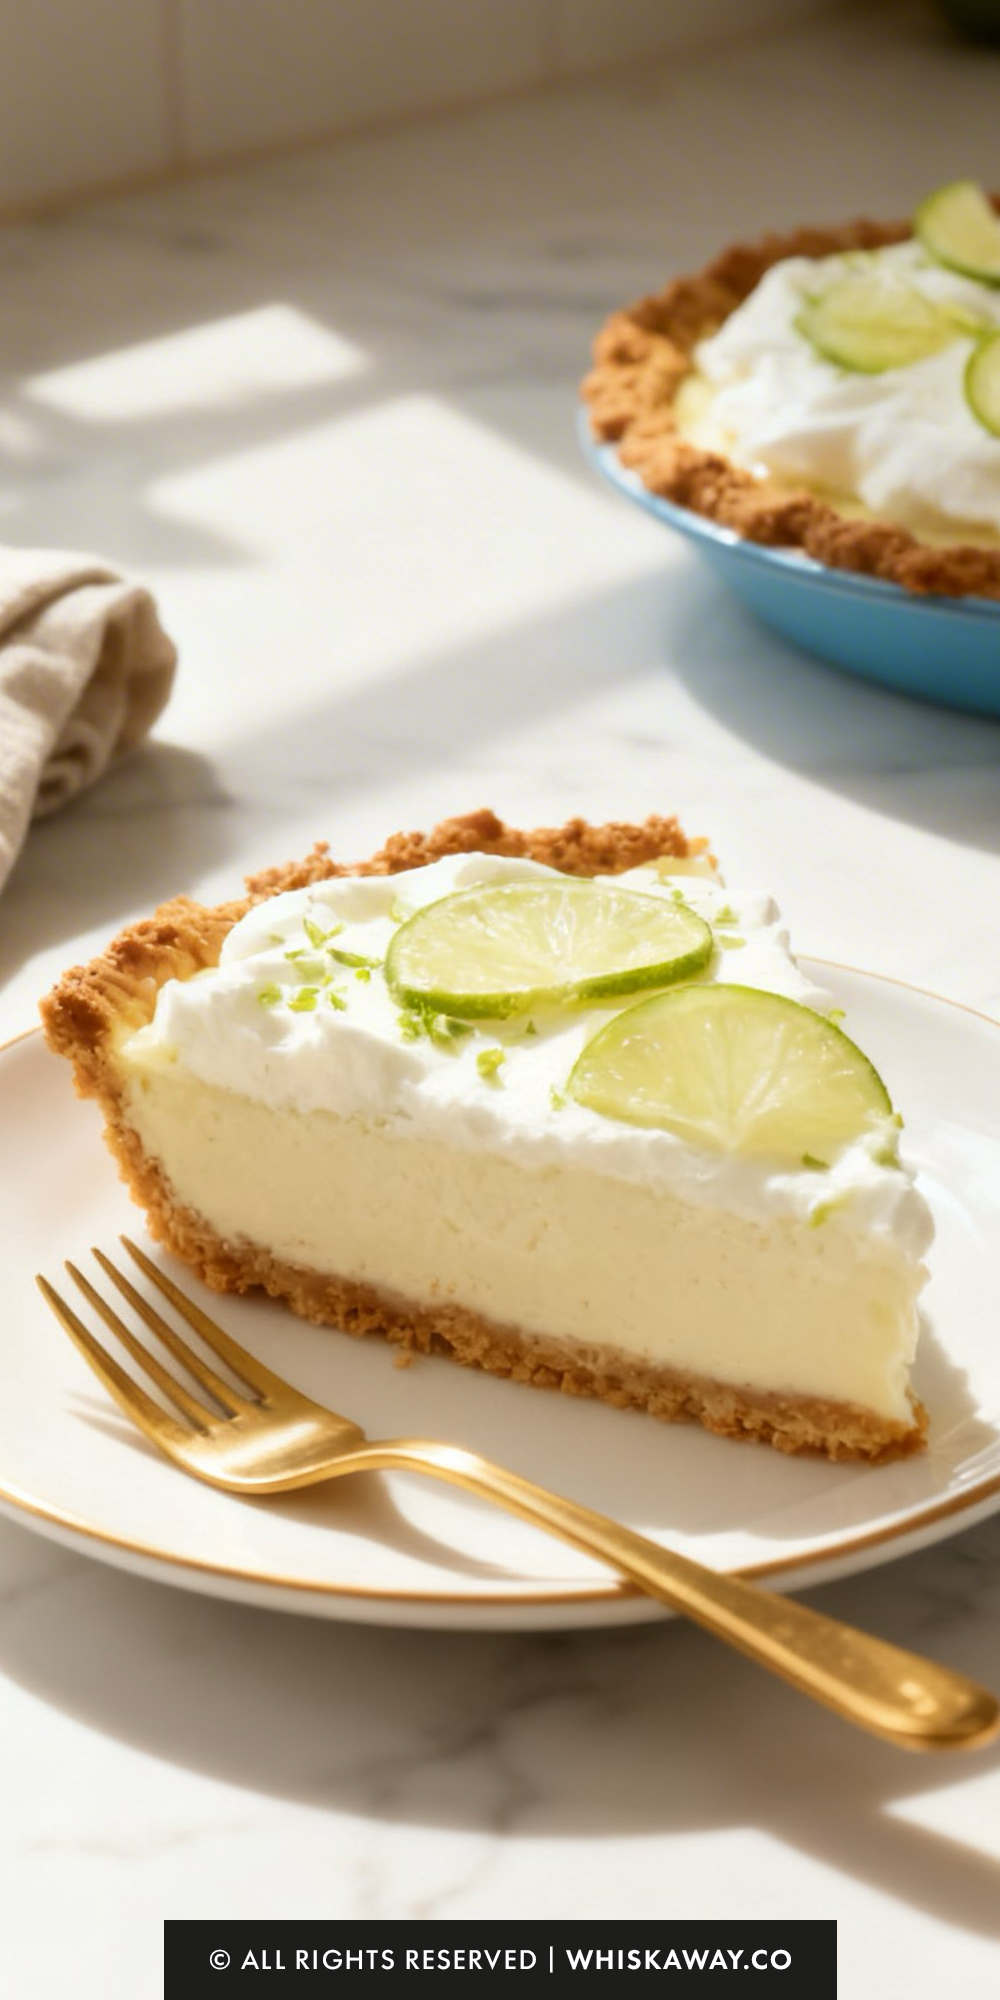
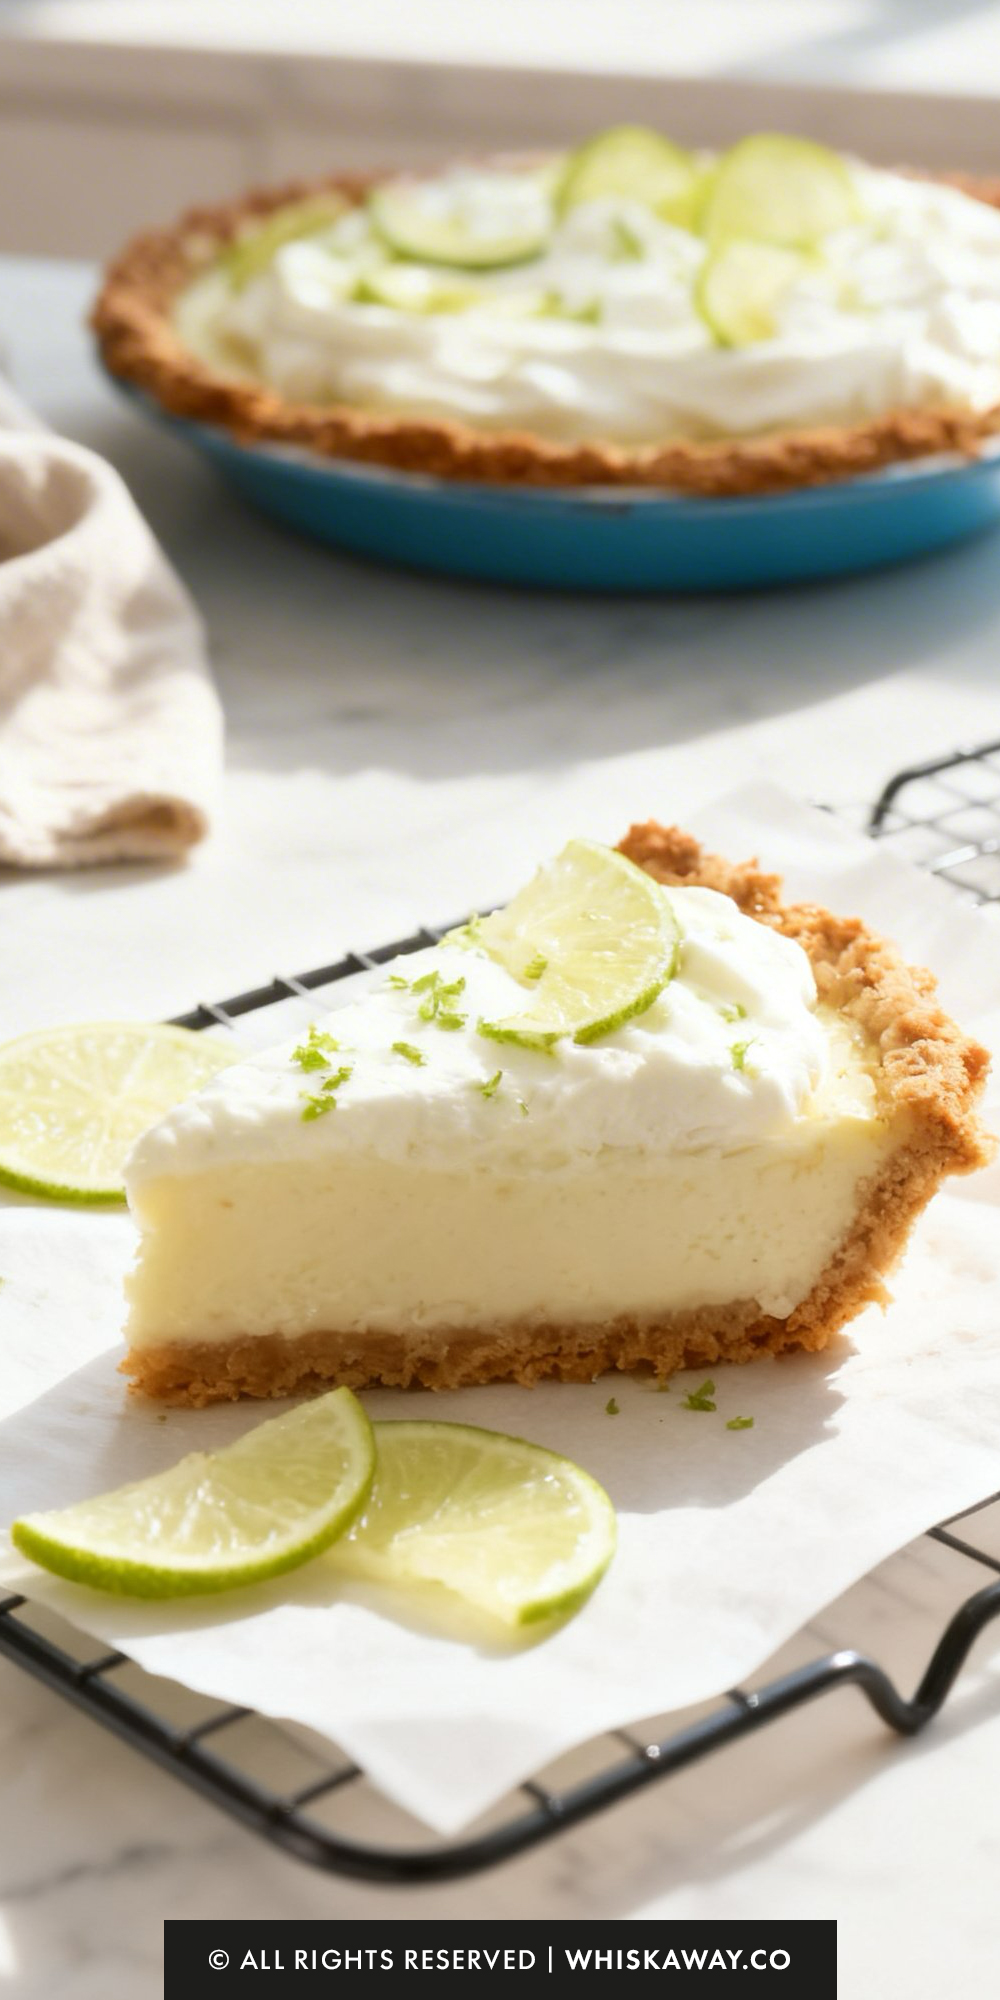
Looking for a dessert that’s bright, tangy, and refreshingly sweet? My key lime pie delivers a zesty citrus punch in a creamy, silky filling nestled in a crisp crust.
Every bite is a balance of tart and sweet, making it feel light yet indulgent.
Baking a key-lime pie at home is surprisingly easy, and the result is a dessert that looks elegant and tastes extraordinary.
Garnish with whipped cream or lime zest for an extra pop of flavor and color. Perfect for summer gatherings, casual dinners, or anytime you crave something fresh and flavorful.
Why You’ll Love This Recipe
This pie works because of its condensed milk chemistry: acid thickens the dairy without requiring complicated custard techniques.
What Makes Them Special
- Lime juice naturally thickens sweetened condensed milk
- Tart citrus cuts through the creamy base
- Graham crust adds crunch and subtle caramel notes
- Sets firmly when chilled
- Refreshing finish that isn’t overly sweet
Save This Pin for Later to Your Pinterest Board
🔥 If you enjoy tangy, refreshing desserts with creamy texture, these are perfect follow-ups:
How to Get Your Key Lime Pie Just Right
A perfect key lime pie is a delicate balance of intense citrus tang and velvety sweetness.
While the recipe is straightforward, these professional nuances will help you achieve that signature “bakery-style” finish.
1. The “Wobble” is Your Friend
The most common mistake is over-baking the filling, which can cause it to crack or become rubbery.
When you pull the pie out at 15 minutes, the edges should be slightly set, but the center should still have a noticeable jiggle (like firm gelatin).
The Greek yogurt and lime juice react with the sweetened condensed milk to thicken the pie even after it leaves the oven. This “carry-over” setting ensures a silky, melt-in-your-mouth texture.
2. Zest Before You Juice
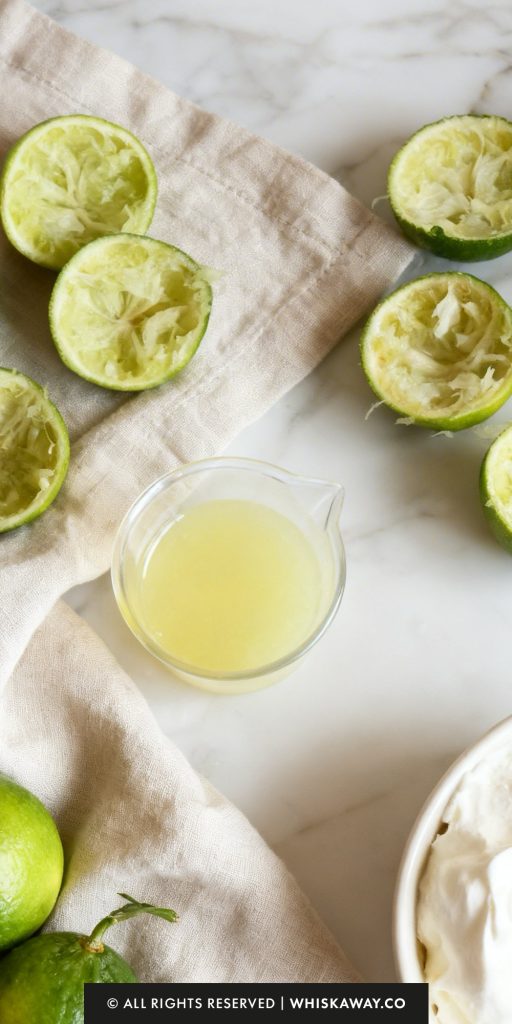
Always grate the lime zest before you cut and juice the limes. It is nearly impossible to zest a squeezed, limp lime half.
Rub the lime zest into the Greek yogurt or sugar before mixing it into the liquid. This releases the essential oils and ensures the lime flavor is infused throughout the entire custard, not just sitting on top.
3. The Crust “Anchor”
If your crust crumbles when you slice the pie, it wasn’t packed tightly enough.
Use the flat bottom of a heavy glass to really compress the crumbs into the “elbow” of the pie pan (where the bottom meets the sides).
Always press the crumbs up the sides of the pan first, then do the bottom. This prevents the corners from becoming too thick and ensures the sides don’t collapse during the pre-bake.
4. Temperature Control
Cold Cream: For the topping, ensure your heavy cream and your mixing bowl are ice-cold.
Cold cream holds air bubbles much better, resulting in a stable whipped cream that won’t “weep” or deflate once it’s on the pie.
The Full Chill: Never rush the 3-hour refrigeration period. Key Lime Pie is a cold-set dessert; cutting into it early will result in a messy, semi-liquid slice.
5. Common Mistakes to Avoid
Using Bottled Juice: Whenever possible, use fresh lime juice. Bottled juice often has a bitter, metallic aftertaste and lacks the bright, floral notes of fresh citrus.
If you can’t find tiny Key Limes, a mix of regular Persian lime juice and a splash of lemon juice is a better substitute than bottled concentrate.
Over-Mixing the Filling: Whisk the filling until just combined.
If you beat it too vigorously, you’ll incorporate air bubbles that will rise to the surface during baking, leaving your pie with a “pitted” or bubbly appearance.
Skipping the Knife Wipe: Because the filling is sticky and the crust is buttery, a dirty knife will “drag” crumbs through the filling.
Wipe your blade with a warm, damp cloth between every single cut for those perfectly sharp, clean wedges.
Baking Tips for This Recipe
- Use freshly squeezed lime juice for proper thickening; bottled juice can alter the set.
- Whisk filling just until combined as overmixing adds air bubbles.
- Bake only until the center barely jiggles; overbaking causes cracks.
- Chill at least 3 hours for full structure.
- Dip knife in hot water before slicing for clean cuts.
Variation Tips
The hallmark of a great Key Lime Pie is its versatility. Once you have the basic ratio of citrus to condensed milk down, you can experiment with different flavor profiles and dietary needs to make the recipe your own.
1. The Tropical Twist
Lean into the island vibes by incorporating coconut.
- Replace ½ cup of the graham cracker crumbs with finely shredded toasted coconut.
- Use a vegetable peeler to create large coconut curls for a more dramatic garnish.
- Swap the Greek yogurt for coconut-flavored Greek yogurt for a subtle flavor boost.
2. “Spiced” Graham Crust
Add warmth to contrast the sharp citrus.
- Mix ½ teaspoon of ground ginger or a pinch of cardamom into the graham cracker crumbs.
- Replace the graham crackers entirely with Biscoff (speculoos) cookie crumbs or gingersnaps for a deeper, caramelized flavor that pairs beautifully with lime.
3. Margarita-Inspired Pie
For an adult version of this classic dessert:
- Stir 1 tablespoon of high-quality tequila and a teaspoon of orange liqueur (like Cointreau) into the filling before baking.
- Sprinkle a very light dusting of flaky sea salt over the whipped cream just before serving.
4. Frozen Key Lime “Slab”
Perfect for hot summer days when you want a firmer texture.
- Instead of a pie pan, press the crust into a square 8×8-inch pan.
- After chilling, move the pie to the freezer for 2 hours. Slice into small squares while frozen to create refreshing, tangy lime bars.
5. Dietary Adaptations
Gluten-Free:
Simply substitute the graham crackers with certified gluten-free graham crumbs. Since the filling is naturally gluten-free, this is the only change needed.
Lighter Version:
Use 0% or low-fat Greek yogurt and low-fat sweetened condensed milk. The pie will be slightly less creamy and a bit more “icy” in texture, but it will still be bright and flavorful.
6. Egg-Free (Standard):
This specific recipe is already naturally egg-free, as the yogurt and lime juice act as the thickening agents.
This makes it a great choice for those with egg allergies!
How to Properly Store Your Key Lime Pie
Because Key Lime Pie is a chilled, dairy-based dessert, its longevity depends on keeping the filling stable and the whipped cream from deflating. Properly stored, it can be a fantastic “make-ahead” treat for a busy week.
1. Refrigeration (The Best Method)
Duration: 3 to 4 days.
Once the pie has cooled completely and set, cover it loosely with plastic wrap or aluminum foil.
To prevent the plastic wrap from sticking to your beautiful whipped cream peaks, insert a few toothpicks around the edge of the pie to act as “tent poles” for the covering.
Serving Note: Always serve this pie straight from the fridge. It is meant to be eaten cold; as it warms up, the filling loses its firm, velvety structure.
2. Freezing for Long-Term Storage
Key Lime Pie freezes remarkably well due to its high fat and sugar content, which prevents large ice crystals from forming.
Duration: Up to 1 month.
It is best to freeze the pie before adding the whipped cream topping. Wrap the set pie in a double layer of plastic wrap and a final layer of heavy-duty aluminum foil to prevent freezer burn.
Move the pie from the freezer to the refrigerator 4 to 6 hours before serving. Once thawed, add your fresh whipped cream and lime garnishes.
You can also freeze individual slices. Many people actually prefer eating key lime pie slightly frozen. It takes on a texture similar to a premium citrus ice cream.
3. Storage Mistakes to Avoid
The Room Temperature Risk: Never leave this pie out for more than 2 hours.
Because of the condensed milk and Greek yogurt, it is highly perishable and will soften significantly if left in a warm kitchen.
Condensation Trap: Avoid covering the pie while it is still warm from the oven.
If you seal it too early, steam will collect on the lid and drip onto the crust, making it soggy and unappealing.
Fruit “Weeping”: If you garnish with lime slices, they will eventually release juices into the whipped cream (a process called “weeping”).
If you aren’t serving the whole pie at once, it’s better to garnish individual slices right before they hit the table.
4. A Note on Reheating
Never reheat a Key Lime Pie! This is a cold-set custard.
Any application of heat after the initial bake will melt the structure and turn your dessert into a liquid.
If the crust feels a bit soft after storage, simply enjoy it as is. The flavor will still be excellent!
FAQs
Can I use regular limes if I can’t find Key Limes?
Yes, you absolutely can. While Key Limes are smaller, more acidic, and more floral, you can achieve a very similar result using standard Persian limes (the ones typically found in grocery stores). If you want to mimic the Key Lime “punch,” use a blend of 2 parts lime juice and 1 part lemon juice. Avoid bottled juice if possible, as it lacks the bright aromatic oils of fresh fruit.
My filling didn’t thicken; it’s still runny. What happened?
The thickening of this pie occurs through a process called “denaturing,” where the acid in the lime juice reacts with the proteins in the milk and yogurt. If your filling is runny, you may not have used enough lime juice, or you might have used a “light” condensed milk which has a different protein structure. Also, ensure you gave it the full 3-hour chill—it needs that cold time to reach its final velvety consistency.
Why did my graham cracker crust fall apart when I sliced it?
A crumbly crust usually means the crumbs weren’t packed tightly enough or there wasn’t enough “glue” (melted butter). When forming the crust, use the bottom of a heavy glass to press the crumbs into the pan until they feel like a solid shell. Additionally, make sure the crust is completely cold before slicing; if the butter is still warm, the structure will be weak.
Is the Greek yogurt necessary, or can I leave it out?
The Greek yogurt is a secret weapon in this recipe. It adds a sophisticated tang that balances the intense sweetness of the condensed milk, and its thickness helps the pie set without needing eggs. If you must substitute it, sour cream is the best alternative. We don’t recommend leaving it out entirely, as the pie will be much sweeter and potentially less stable.
How do I get those perfect, clean slices I see in photos?
The secret is all about the knife and the temperature. The pie must be ice-cold. Use a long, thin, sharp knife. Dip the blade in hot water and wipe it bone-dry before every single cut. This “hot blade” method melts slightly through the fats of the filling and crust, preventing the knife from dragging and creating a jagged edge.
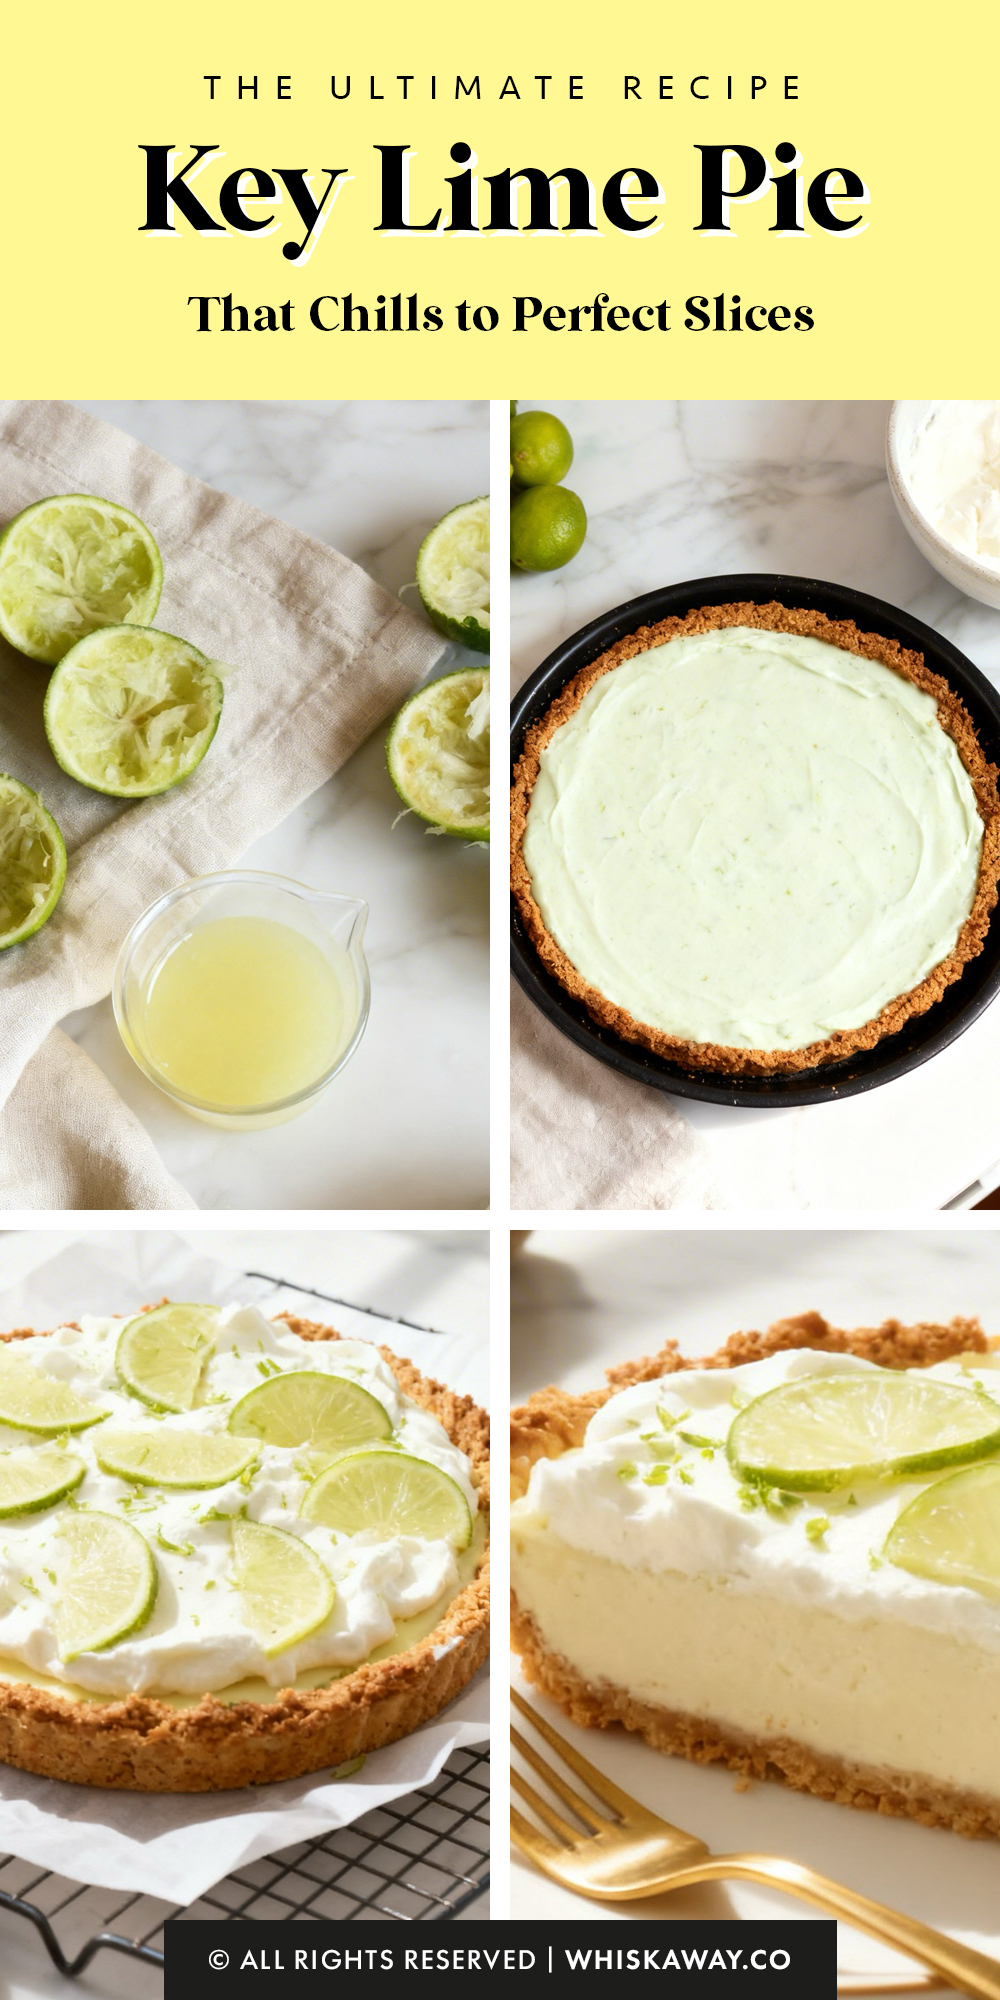
Key Lime Pie
8
Slices20
minutes25
minutes3
hrsThis key lime pie recipe is tangy, creamy, and a refreshing classic dessert.
Ingredients
- For the Crust
1 ½ cups finely crushed graham cracker crumbs (about 12 whole crackers)
4 tablespoons unsalted butter, melted
⅓ cup (packed) light brown sugar
- For the Filling
Two 14-oz cans sweetened condensed milk
1 cup plain Greek yogurt (2% or whole milk)
¾ cup fresh lime juice
1 tablespoon grated lime zest
- For the Topping
1 cup cold heavy cream
8 to 10 thin lime slices
2 tablespoons confectioners' sugar
1 teaspoon grated lime zest
Directions
- Prepare and Bake the Crust
- Begin by preheating your oven to 375°F (190°C). Position your oven rack in the center for even heating.
- In a medium mixing bowl, blend the graham cracker crumbs, brown sugar, and melted butter. Start by mixing with a fork, then use your hands to ensure the butter is fully incorporated and the mixture holds together when squeezed.
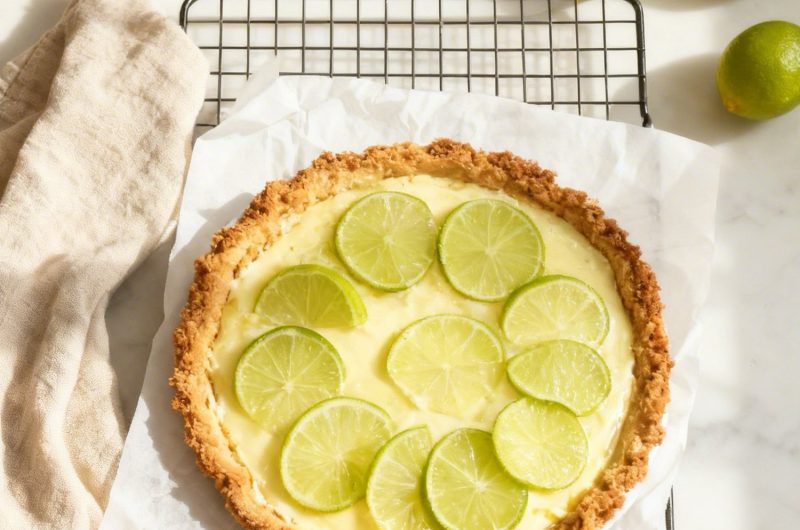
- Transfer the crumbs to a 9-inch pie plate. Using your fingertips or the flat bottom of a measuring cup, press the mixture firmly against the bottom and up the sides. Aim for a consistent thickness of about 1/4 inch. Tip: Focus on the sides first to ensure they don't slump.
- Bake the crust for roughly 10 minutes, just until it takes on a light golden color. Move it to a wire rack to begin cooling.
- Create the Lime Filling
- Lower the oven temperature to 350°F (180°C).
- In a large bowl, combine the sweetened condensed milk, Greek yogurt, lime zest, and lime juice. Whisk until the mixture is uniform and thick.
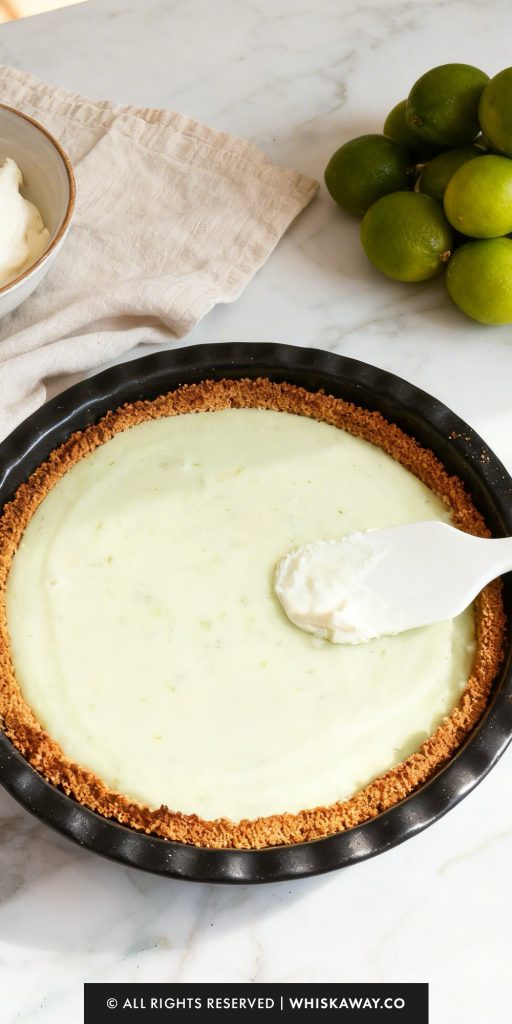
- Pour the lime custard into the pre-baked crust. Return it to the oven for 15 minutes. The pie is done when the edges are stable, but the center still has a slight, gelatinous wobble.
- Allow the pie to rest on the counter for 30 minutes. Once it has reached room temperature, move it to the refrigerator for at least 3 hours to set completely.
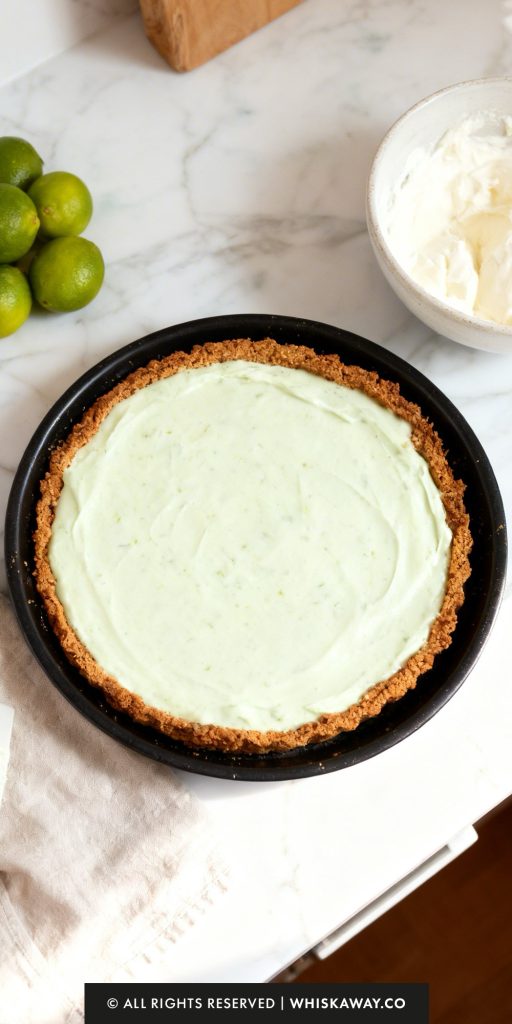
- Using a stand mixer or hand mixer, beat the cold heavy cream until it begins to thicken into soft peaks. Sift in the confectioners’ sugar and continue beating until the peaks are firm enough to hold their shape (medium peaks).
- Spread or pipe the whipped cream over the chilled pie. Finish by sprinkling the extra lime zest and arranging the thin lime slices on top.
- Keep the pie refrigerated until the moment you're ready to eat. For professional-looking wedges, use a sharp knife and wipe the blade clean after every slice.