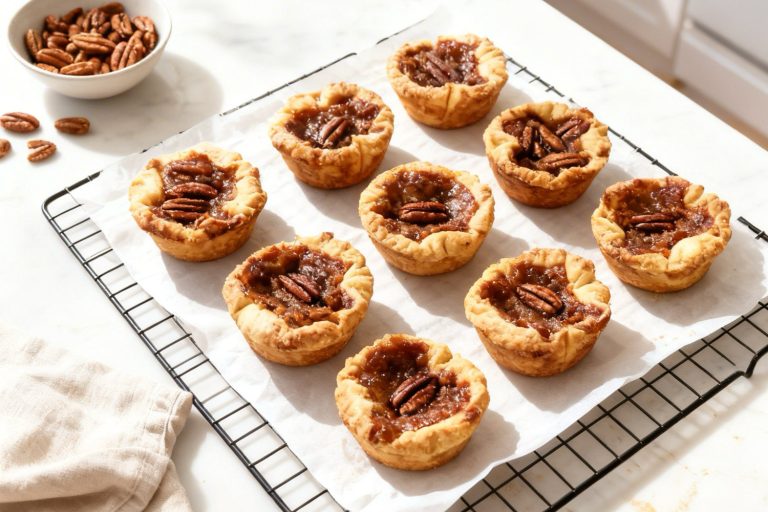
Looking for a portable dessert that’s both charming and delicious? These super cute hand pies are individually sized pastries filled with sweet or savory fillings, perfect for on-the-go snacking or casual gatherings.
I guarantee you baking these hand pies at home is fun and also flexible as you can fill them with fruit, chocolate, or even nut spreads.
They’re a great way to enjoy classic flavors in a playful, handheld format, perfect for sharing or enjoying as a personal treat.
Why You’ll Love This Recipe
Hand pies are practical and portion-controlled while still delivering full pie flavor.
What Makes Them Special
- Individual servings eliminate messy slicing
- Sealed edges prevent filling leakage
- Portable and freezer-friendly
- Crisp pastry-to-filling ratio in every bite
- Great for batch baking
Save This Pin for Later to Your Pinterest Board

🔥 For portable, individual-sized desserts perfect for sharing, try these next:
How to Get Your Hand Pies Just Right
Hand pies are all about the ratio of crust to filling. Because they are held in the hand, the structural integrity of the dough and the thickness of the fruit center are paramount.
Here is how to ensure your portable pies are crisp, golden, and leak-proof.
1. Master the Crust
Roll your dough thinner than you would for a standard pie. Aim for about 1/8-inch.
A thinner crust ensures that the dough bakes through completely and stays crunchy rather than becoming “gummy” or doughy in the center.
If the dough becomes too warm while you are cutting and filling, the butter will melt, and you’ll lose your flaky layers.
If the dough feels soft or sticky, pop it back in the fridge for 10 minutes before continuing.
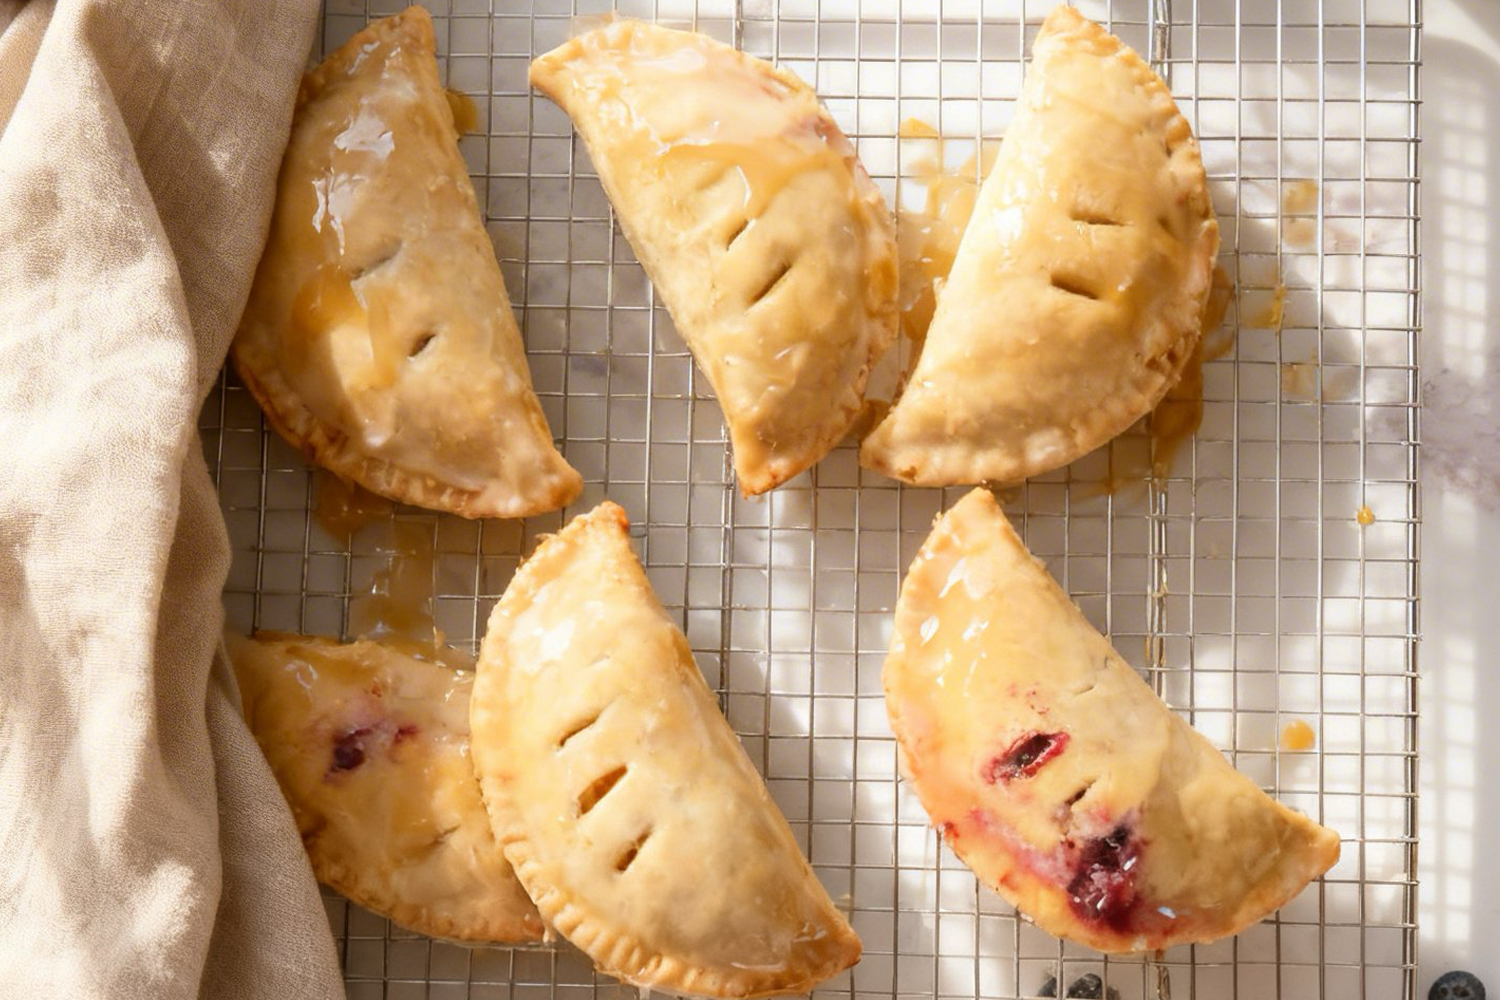
2. The Art of the Seal
The biggest challenge with hand pies is the “blowout”—where the filling leaks out the side in the oven.
It is tempting to pack in the fruit, but 3 tablespoons is the absolute limit for a 6-inch pie. Any more, and the steam will force the edges open.
Use the egg wash as a “glue” on the inside edge, fold, and then use the tines of a fork to crimp the edges firmly.
For extra security, you can even fold the crimped edge over itself once more and crimp again.
Always poke at least two or three small holes or slits on the top. This allows steam to escape so the pressure doesn’t build up inside and burst the seams.
3. Texture & Flavor Tricks
Never put warm filling on raw dough. It will melt the butter in the crust instantly, resulting in a soggy bottom and a messy assembly.
The filling should be room temperature or colder.
Chilling the assembled pies for 20 minutes before they hit the oven is a professional secret. This “shocks” the cold butter when it hits the 400°F heat, creating maximum lift and flakiness.
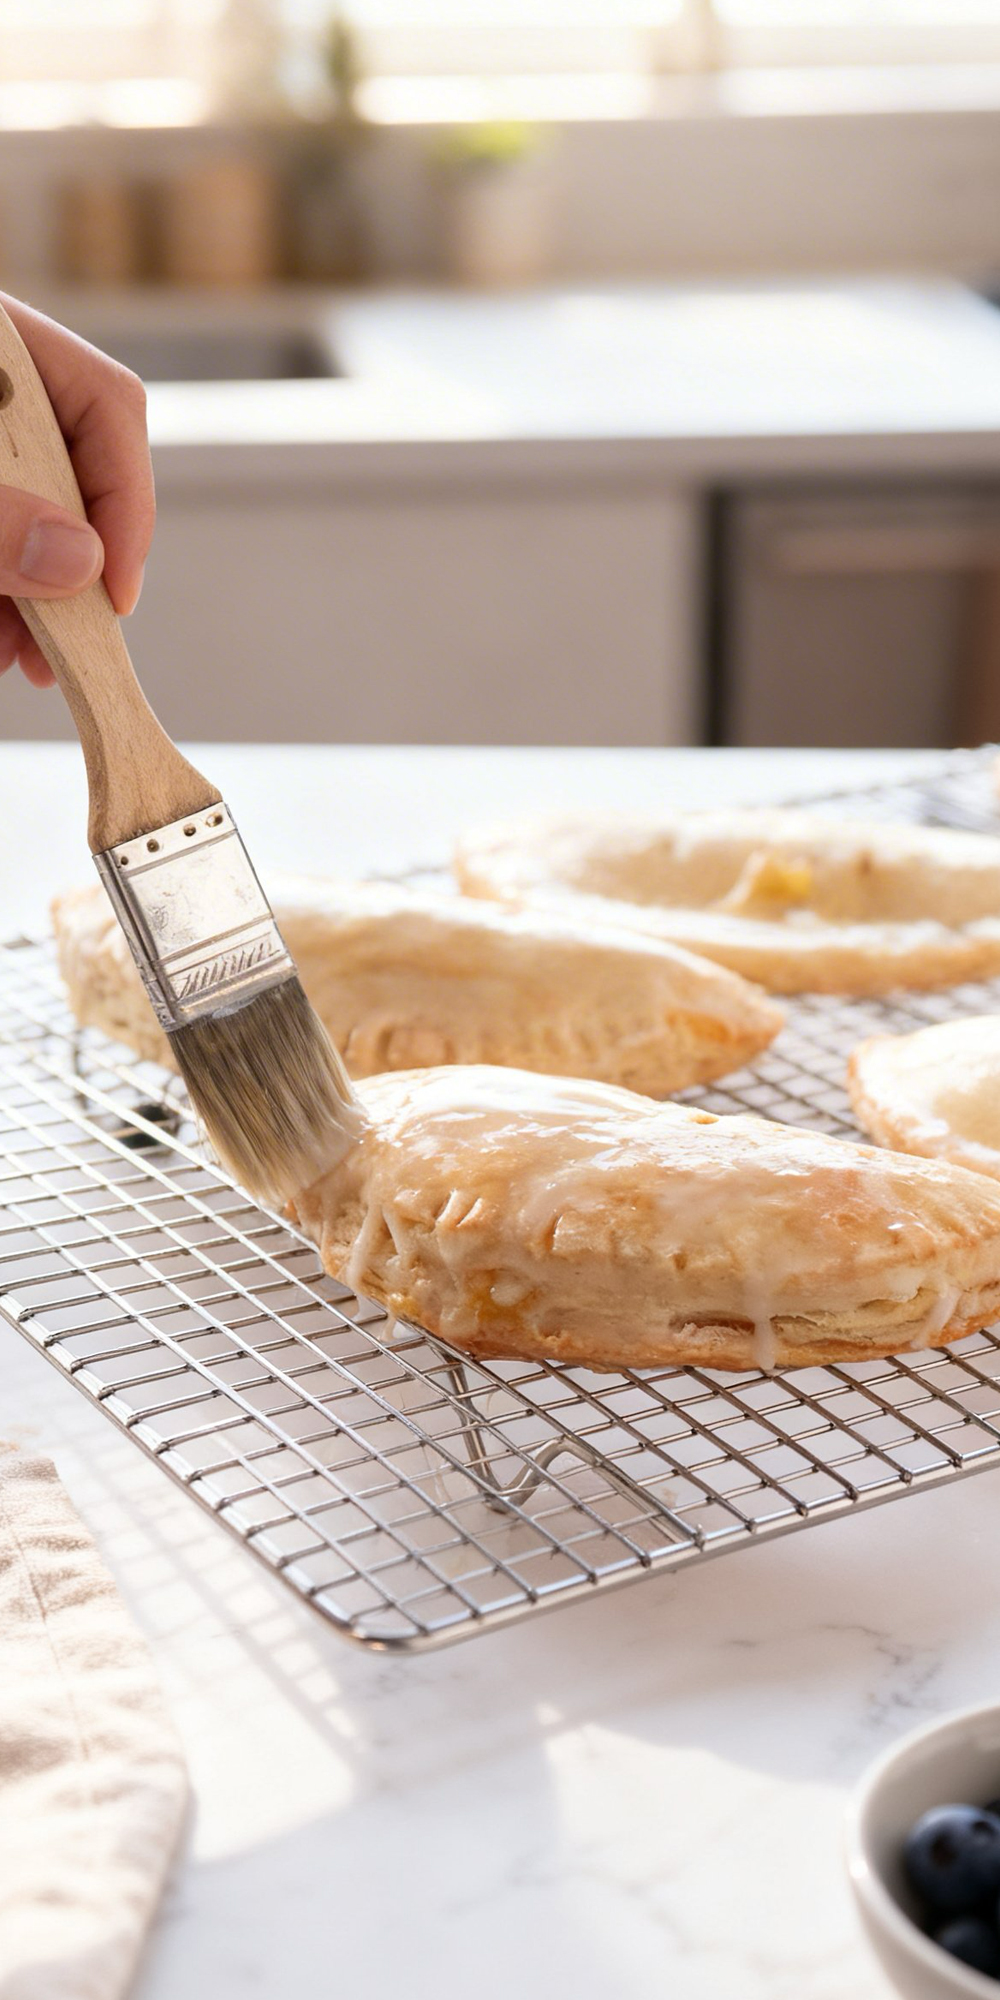
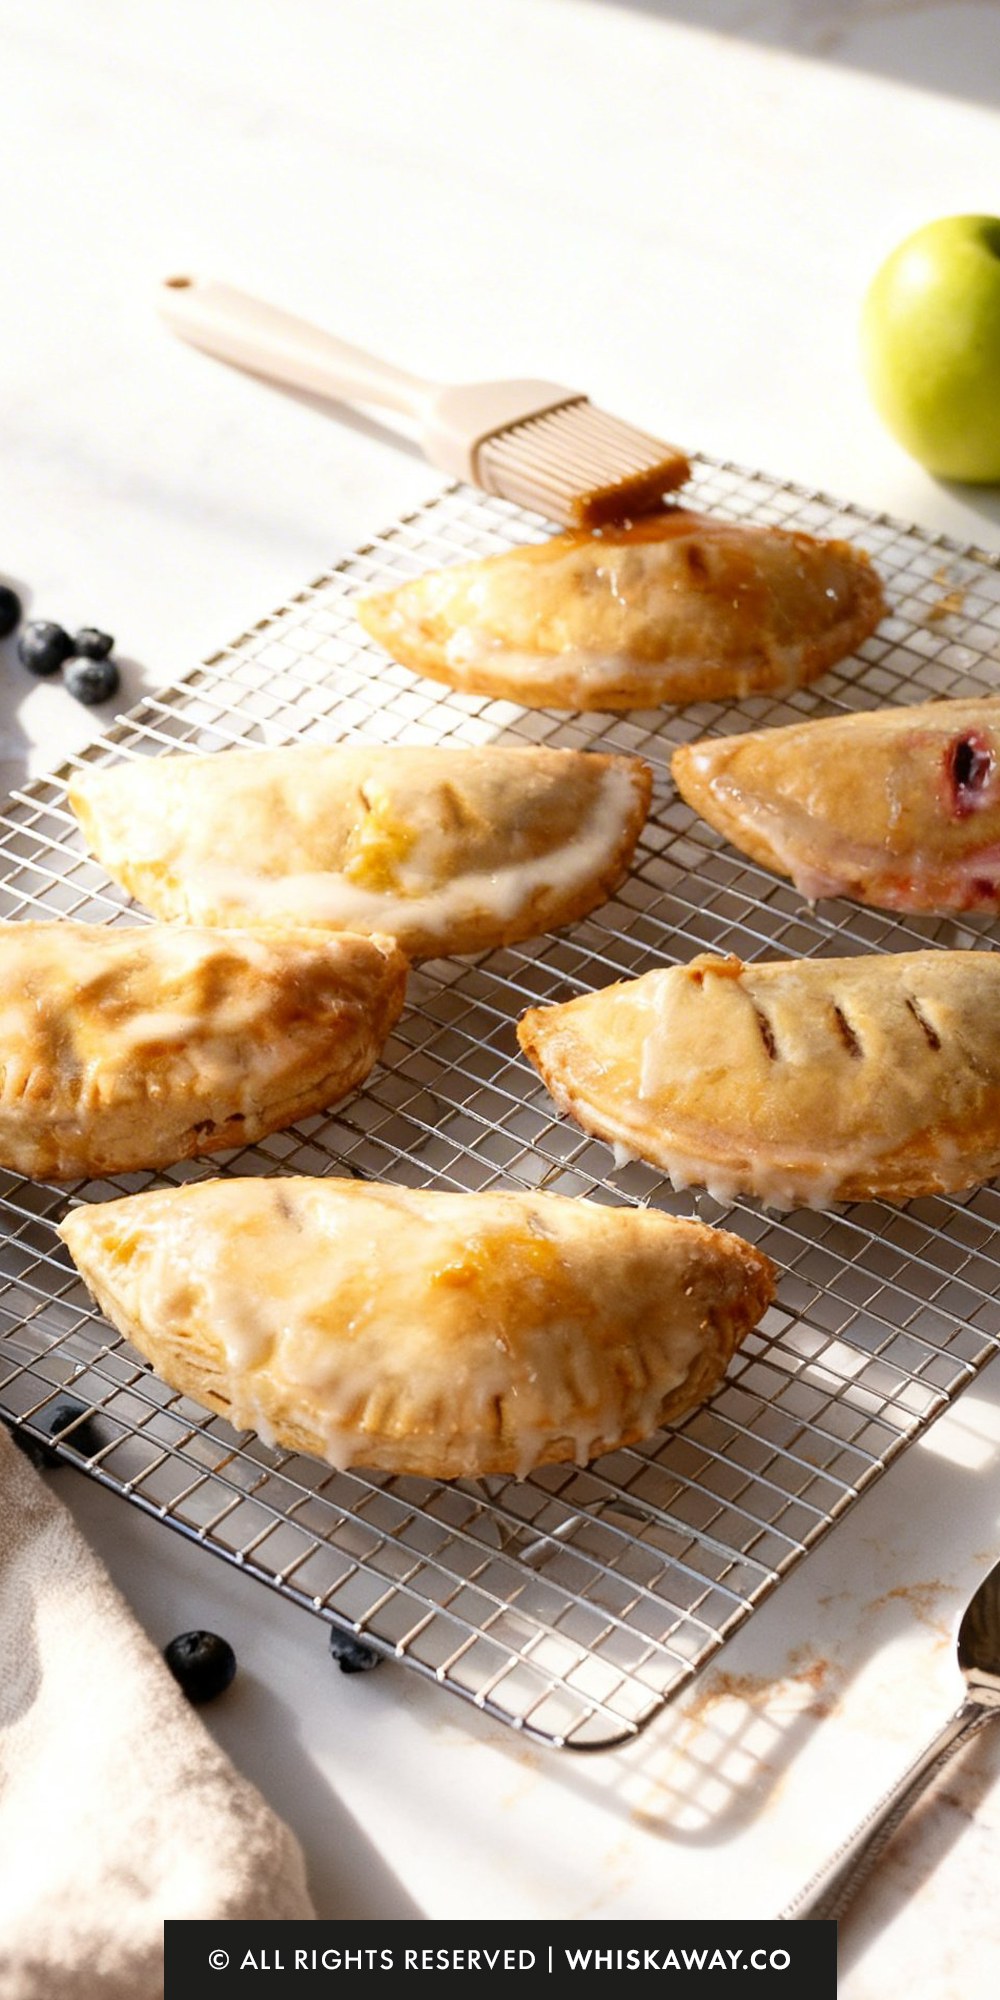
Apply the glaze while the pies are still slightly warm, but not hot. This allows the glaze to seep slightly into the crust and set into a thin, crackly shell rather than just sliding off.
4. Common Mistakes to Avoid
Skipping the Egg Wash: The egg wash is what gives you that “bakery-style” mahogany glow. Without it, the pies will look pale and floury even when they are fully cooked.
Under-Cooking: Don’t be afraid of a deep golden brown. If the pies look “blonde,” the bottom crust likely isn’t crisp enough to support the fruit.
Measuring Flour by Volume: If you have a scale, use the 12-ounce measurement for the flour. Volume measurements (cups) can vary wildly, and too much flour will make your hand pies dry and tough.
Baking Tips for This Recipe
- Roll dough evenly so one side isn’t thicker than the other.
- Seal edges with a fork and chill 15 minutes before baking to prevent leaks.
- Cut small slits on top to allow steam to escape.
- Avoid overfilling. 1–2 tablespoons is usually enough.

Variation Tips
The beauty of a hand pie is its “blank canvas” nature. Since the dough is a classic pastry and the filling is a cooked fruit compote, you can easily shift the flavor profile to match the season or your own pantry.
1. The “Stone Fruit & Herb” Fusion
Instead of a standard berry filling, try a more sophisticated, aromatic pairing:
- Use diced peaches or nectarines and stir in 1 teaspoon of finely chopped fresh thyme or rosemary after the filling has thickened.
- Swap the lemon juice in the glaze for honey and a splash of milk to complement the herbs.
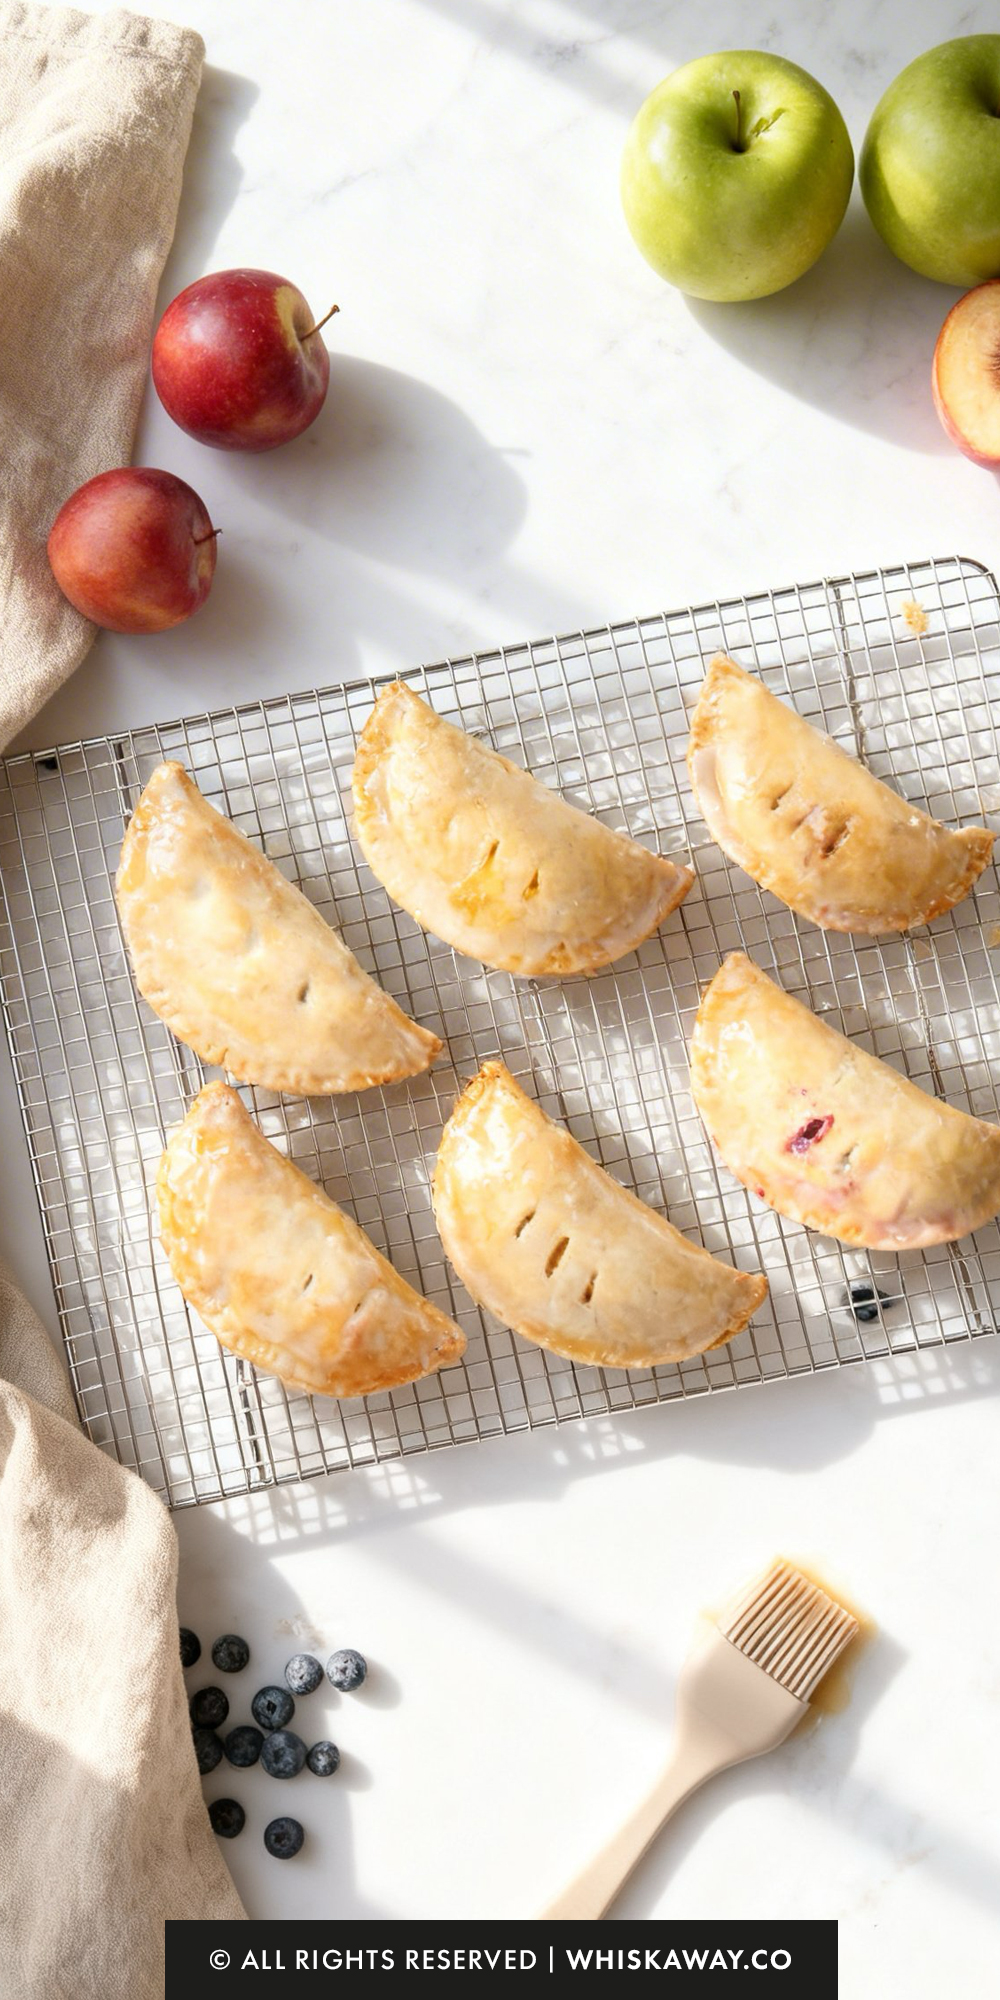
2. “Apple Pie” Hand Pies
For a portable version of the American classic:
- Use tart Granny Smith apples diced very small. Increase the sugar to 3 ounces and add 1 tablespoon of ground cinnamon and a pinch of nutmeg.
Toss a handful of toasted pecans into the cooled filling before assembling for an added crunch.
3. Savory-Sweet Breakfast Pies
Hand pies don’t always have to be dessert!
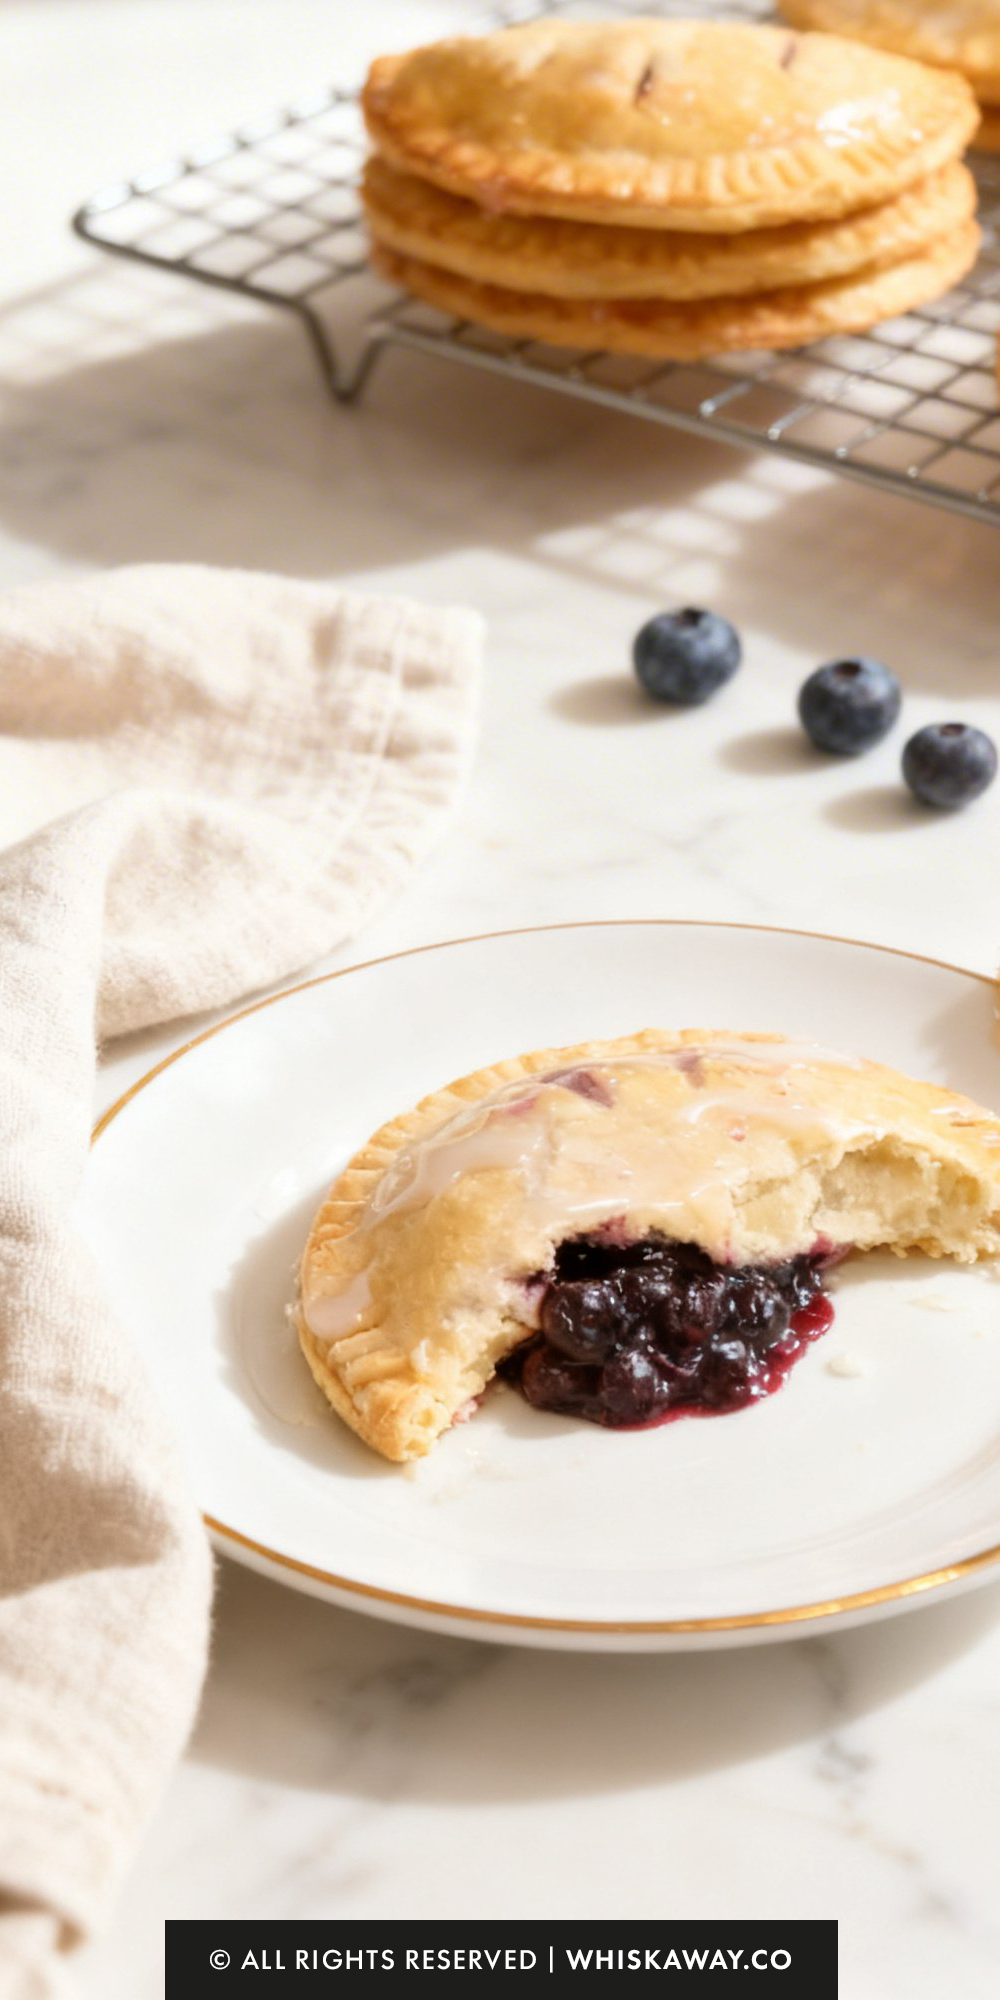
Omit the glaze. In the filling, use blueberries and a tablespoon of balsamic vinegar.
Place a small dollop of goat cheese or a slice of brie on the dough before adding the fruit filling. The tang of the cheese cuts through the sweet fruit perfectly.
4. Chocolate-Drizzled Fruit Pies
If you want to lean into a more decadent dessert:
- Use strawberries or raspberries.
- Instead of the lemon glaze, melt 2 ounces of dark chocolate and drizzle it over the cooled pies. Sprinkle with a few grains of flaky sea salt for a gourmet finish.
5. Dietary Adaptations
Gluten-Free:
- Use a high-quality 1:1 Gluten-Free Flour blend in the dough.
- Gluten-free dough can be more fragile when folding. Use the parchment paper to help “lift” the dough over the filling to prevent it from snapping.
Vegan / Dairy-Free:
- Substitute the butter in both the dough and the filling with vegan butter sticks (ensure they are very cold for the dough).
- Replace the egg wash with a mixture of almond milk and a teaspoon of agave nectar to achieve a similar golden-brown shine.
Lower Sugar:
- Sweeten the fruit filling with maple syrup instead of granulated sugar. Because maple syrup is a liquid, you may need to simmer the filling for an extra 2 minutes to reach the desired thickness.
6. Shaping Variations
The “Pop-Tart” Shape: Instead of 6-inch circles, cut the dough into 3×4-inch rectangles. Place the filling on one rectangle, top with another, and crimp all four sides.
Heart or Star Pies: Use large cookie cutters to create fun shapes for holidays. Just ensure you have enough surface area for at least a tablespoon of filling!
How to Properly Store Your Hand Pies
Hand pies are prized for their portability and crisp texture, but because they are fully enclosed, moisture from the fruit can eventually soften the crust.
Proper storage ensures they stay crunchy rather than becoming soggy.
1. Room Temperature (Best for Freshness)
Duration: Up to 24 hours.
Once the glaze has fully set and the pies are completely cool, store them in a single layer in an airtight container or under a glass cloche.
If you live in a humid environment, keep the lid slightly cracked to allow for airflow, which helps maintain the crust’s snap.
2. Refrigeration (For Longer Life)
Duration: Up to 3 days.
Place the pies in an airtight container. If you need to stack them, place a sheet of parchment paper between the layers to prevent the glaze from sticking.
Refrigeration will soften the pastry. To bring back the original texture, we highly recommend reheating them before serving.
3. Freezing (The Ultimate Convenience)
Duration: Up to 2 months.
- Baked: Wrap individual, fully cooled pies in plastic wrap and place them in a heavy-duty freezer bag.
- Unbaked (Recommended): You can freeze the assembled, unbaked pies! Flash-freeze them on a baking sheet for 1 hour, then bag them. Bake straight from frozen at 400°F, adding about 5–8 minutes to the total bake time.
4. How to Reheat for the Best Crunch
To avoid a “gummy” crust, stay away from the microwave. The goal is to re-melt the butter in the layers to crisp them back up.
Oven or Toaster Oven: This is the best method. Preheat to 350°F (175°C) and heat the pies for 5–10 minutes. This restores the crunch of the pastry and warms the fruit center perfectly.
The Air Fryer: For a single pie, 3 minutes at 180°C will make it taste like it just came out of the oven for the first time.
5. Storage Mistakes to Avoid
The Sweat Trap: Never bag or box your hand pies while they are even slightly warm.
The residual steam will get trapped inside the container, turning your beautifully crisp crust into a mushy mess within minutes.
Early Glazing: If you plan on freezing baked pies, it is often better to freeze them without the glaze.
Add the fresh glaze after you have reheated them for the best flavor and appearance.
Ignoring the Vent: If you didn’t poke holes in the top before baking, steam will be trapped inside the pocket.
This moisture will migrate into the crust during storage, making it soggy much faster.
FAQs
What is ClearGel, and can I just use flour instead?
ClearGel is a modified cornstarch often used by professional bakers because it stays clear and doesn’t “weep” liquid when cooled or frozen. If you don’t have it, cornstarch is the best substitute. We don’t recommend using flour as a thickener for hand pies; it can make the fruit filling look cloudy and taste slightly pasty.
Why did my hand pies burst open in the oven?
This is usually caused by one of two things: overfilling or lack of airflow. If there is too much fruit, the steam pressure will force the crimped edges apart. Similarly, if you forgot to poke vent holes in the top, the steam has nowhere to go but out the sides. Aim for 3 tablespoons of filling and always give them a quick “prick” with a fork before baking.
Can I use store-bought pie dough for this recipe?
You can, but store-bought dough is often thinner and less sturdy than this specific hand pie pastry. If you use it, be extra careful not to overfill the pies and consider skipping the 15-minute “softening” step on the counter, as commercial dough tends to become very sticky very quickly.
My dough is shrinking back when I try to roll it out. What should I do?
This is a sign that the gluten has been overworked. If the dough is fighting you, stop rolling, cover it with a towel, and let it rest for 10 minutes at room temperature. This allows the protein strands to relax, making it much easier to roll into those thin, 6-inch circles.
Can I bake these in an Air Fryer instead of an oven?
Yes! Hand pies are excellent in the air fryer. Cook them at 375°F (190°C) for about 10–12 minutes. Because air fryers circulate heat so efficiently, the crust will be incredibly crispy. Just be sure not to crowd the basket; you’ll likely need to cook them in batches of two or three.

Hand Pies
8
servings5
minutes20
minutes1
hrThese hand pies are flaky, sweet, and perfect for on-the-go indulgence.
Ingredients
- For the Hand Pie Dough
12 ounces all-purpose flour
6 ounces cold unsalted butter (cut into cubes or grated)
1 ounce ice cold water
1 large egg
¼ teaspoon salt
- Fruit Filling
16 ounces fresh or frozen fruit (apples, peaches, blueberries, strawberries, etc.)
6 ounces water or juice that complements the flavor of the fruit
2 ounces sugar (white or brown)
1 ounce unsalted butter
1 ounce ClearGel (or ½ ounce cornstarch)
1 ounce water
2 Tablespoons lemon juice (to taste)
¼ teaspoon salt
- Glaze
4 ounces powdered sugar
1 Tablespoon lemon juice
Directions
- Prep the Pastry
- In your stand mixer bowl, combine the flour, salt, and chilled butter cubes. Mix on a low setting until the texture is gritty, like coarse sand.
- Incorporate the egg and a splash of ice water, adding just enough liquid until the dough begins to clump together.
- Gather the dough, press it into a flat disk, and wrap it in plastic. Let it chill in the refrigerator for at least one hour.
- Fruit Filling
- Prepare your fruit by dicing it into small bits (if using frozen, no need to thaw). In a large saucepan over medium-high heat, cook the fruit and butter together until the butter is melted and foamy.
- Stir in the juice (or water), sugar, lemon juice, and salt. Bring the mixture to a gentle simmer.
- Whisk the ClearGel (or cornstarch) with the extra water to create a smooth slurry. Pour this into the bubbling fruit and stir for 1–2 minutes until the mixture is thick and clear. Remove from heat and let it cool completely before using.
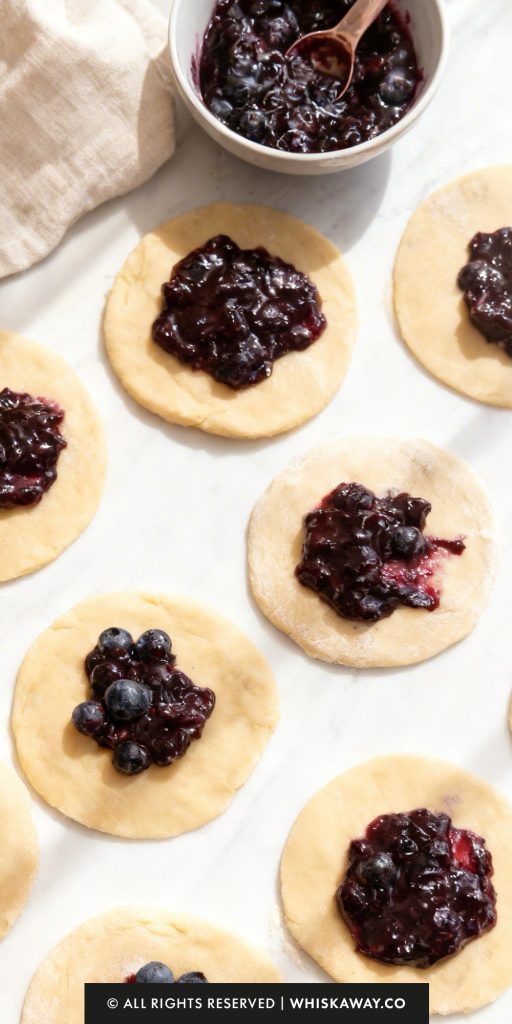
- Roll, Fill, and Seal
- Preheat your oven to 400°F and line a baking sheet with parchment paper.
- Let the chilled dough sit on the counter for 15 minutes to soften slightly. On a floured surface, roll it out until it is roughly 1/8-inch thick. Keeping it thin is the key to a crunchy, professional-style crust.
- Cut the dough into 6-inch rounds (or 5-inch for smaller pies). Place 3 tablespoons of filling in the center of the larger rounds (or 1 heaping tablespoon for the smaller ones). Avoid overfilling, as this causes leaks!
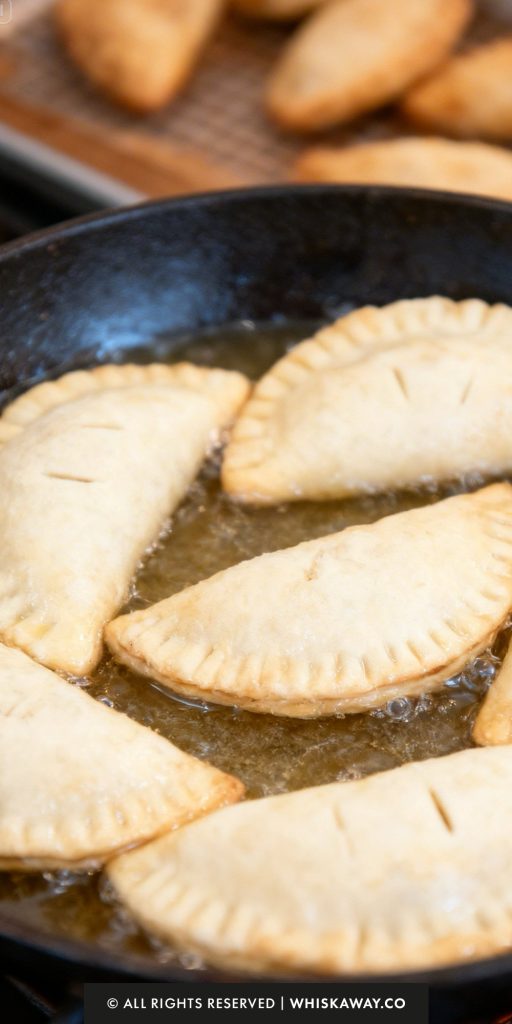
- Brush the perimeter with a simple egg wash (one egg beaten with a tablespoon of water). Fold the dough over the fruit and press the edges firmly with a fork to crimp them shut.
- Bake and Glaze
- Poke a few small holes or slits in the top of each pie to allow steam to escape. Brush the tops with more egg wash. For the best rise, chill the assembled pies on the tray for 20 minutes before baking.
- Slide them into the oven for 20–25 minutes until they are a deep golden brown and you see the filling just starting to bubble.
- While the pies cool for 10 minutes, whisk together the powdered sugar and lemon juice. Brush this thin glaze over the warm pies and let them set before serving.