
Could breakfast be this buttery and tender? These classic English plain scones are delightfully fluffy with a slightly crisp exterior, perfect for slathering with jam or cream.
Every bite is soft, comforting, and utterly satisfying, making them ideal for brunch or a relaxed weekend morning.
Baking classic English plain scones at home is quick and easy, so even beginners can enjoy fresh, homemade scones.
Pair with tea or coffee for a classic treat that never fails!
Why You’ll Love This Recipe
These classic plain scones are beloved because they deliver the ideal balance of a tender interior and lightly golden exterior without being overly sweet, making them endlessly versatile.
They’re a foundational bake that can be enjoyed simply or elevated with whatever toppings you love.
What Makes Them Special
- Light, fluffy texture that pulls apart easily, not dense or dry.
- Neutral base lets clotted cream, jam, honey or curd shine without competing flavors.
- Quick to make with minimal pantry ingredients, so you can bake on a whim.
- Pairs beautifully with tea, brunch spreads, or simply coffee and butter.
- Freezer-friendly and easy to reheat later, perfect for baking ahead.
Save This Pin for Later to Your Pinterest Board

🔥 These classic English plain scones are light, tender, and perfect with jam and cream. If you want a fruity twist, blueberry scones and cranberry orange scones are great next recipes to try. For a savory alternative, herb-cheese scones work beautifully.
How to Get Your Classic English Plain Scones Just Right
The perfect English scone should be tall, light, and boast a distinct natural break around its middle, allowing it to be pulled apart easily by hand.
Achieving this iconic vertical rise requires a gentle touch and a few specific techniques that separate a bakery-style scone from a dense biscuit.

1. The Secret to the Vertical Rise
(a) Firstly, you don’t wanna twist the cutter. This is the most common mistake in scone-making.
When you press the cutter into the dough, go straight down and straight up.
If you twist the cutter, you cauterize the edges of the dough, sealing the layers together and preventing the scone from rising upward.
(b) When brushing the tops with egg wash, be precise.
If the egg wash drips down the sides of the scone, it can act like glue, pinning the layers together and hindering that signature pop in the oven.
(c) Also, you want the butter to remain in solid, cold fragments within the dough.
When these cold bits hit the 425°F heat, they create steam, which creates air pockets.
If the butter melts while you’re handling the dough, your scones will be heavy and flat.
2. Master the Texture
(a) Avoid the Rolling Pin! Rolling pins are too heavy-handed for scones; they compress the air you’ve worked so hard to keep. Always pat the dough out with your palms.
(b) Stop mixing the moment the dough holds together. It should look a bit rough and shaggy.
If the dough is perfectly smooth and elastic like bread dough, you’ve over-mixed it, and the resulting scone will be tough.
(c) Many people pat the dough too thin. Start with a thickness of at least ¾-inch (2 cm). If you start thin, you’ll end up with a cookie; if you start thick, you’ll end up with a tower.

3. Common Mistakes to Avoid
Old Baking Powder: Scones rely almost entirely on baking powder for their lift.
If yours has been sitting in the pantry for over six months, test it in a splash of hot water.
If it doesn’t fizz aggressively, your scones won’t either.
Over-kneading: You only need to fold the dough 2 or 3 times to get a smooth-ish top.
Every fold beyond that develops gluten, which turns flaky and tender into chewy and bread-like.
Over-crowding the Tray: Scones need airflow to rise and brown. Space them at least 2 inches apart on the baking sheet so the heat can circulate around the sides.
Pro-Tip for Freshness
As soon as the scones leave the oven, cover them with a clean, dry kitchen towel while they cool on the wire rack.
This traps a small amount of residual steam, ensuring the crust stays soft and tender rather than becoming hard or crusty.
Baking Tips for This Recipe
Keep ingredients cold: Cold butter and cold liquid slow fat melting, so bits of butter turn to steam in the oven and create tall, flaky layers rather than flat and dense ones.
Rub butter into flour until it looks like coarse crumbs: Small butter pieces distributed evenly help pockets of steam form as the scones bake, boosting rise and tenderness.
Don’t brush egg wash down the sides: Only brushing the top helps the Maillard reaction to brown while avoiding a sealed edge that inhibits upward lift.
Cut straight down with your cutter: Twisting seals edges and compresses layers, which reduces rise.
Bake at a high temperature (around 425–430°F / 220°C): The initial blast of heat helps the leavening activate and the butter to steam before melting completely, giving height and flakiness.

Variation Tips
The beauty of a classic English scone is its neutrality as it is designed to be a vessel for other flavors.
While the plain version is the traditional choice for a formal tea, these simple adjustments can transform the recipe for any occasion.
1. The Fruit Scone Classic
For a sweeter, more textured bite that is popular in British tea shops:
Gently fold ½ cup of sultanas, dried currants, or chopped dried cranberries into the flour mixture before adding the liquid.
The dried fruit plumps up slightly in the oven, providing bursts of sweetness throughout the airy crumb.
2. The Savory Cheese & Chive Twist
If you prefer a scone that pairs well with butter, soups, or sharp chutneys:
- Remove the sugar from the recipe.
- Fold in ¾ cup of sharp grated cheddar and 2 tablespoons of fresh snipped chives.
- Sprinkle a little extra cheese or a pinch of cayenne pepper over the egg wash before baking.
3. The Lemon & Poppy Seed Brightener
A refreshing, fragrant variation that feels very “garden party”:
- Whisk the zest of one large lemon and 1 tablespoon of poppy seeds into the dry ingredients.
- After baking and cooling, drizzle with a simple icing made of powdered sugar and a splash of lemon juice.
4. Texture & Technique Alternatives
The Buttermilk Swap: For an even more tender, tangy crumb, replace the regular milk with buttermilk. Because buttermilk is acidic, it reacts beautifully with the baking powder to create an even loftier rise.
The Cream Scone: For a richer, “melting” texture, replace both the milk and the eggs with 1 cup of heavy whipping cream. This creates a very luxurious, soft scone that is common in the American style.
Miniature Tea Scones: Use a smaller 1 ½ inch (4 cm) cutter to create bite-sized treats. Reduce the baking time to about 10–12 minutes. These are perfect for large gatherings or platters.
5. Dietary Adaptations
Gluten-Free:
Use a high-quality 1:1 gluten-free flour blend. Add ½ teaspoon of xanthan gum if your blend doesn’t already include it to help with the structure.
Handle the dough as little as possible to prevent it from becoming crumbly.
Vegan:
Use chilled vegan butter (sticks work best) and replace the milk with unsweetened soy or oat milk.
For the egg in the dough, use a “flax egg” or 3 tablespoons of aquafaba (chickpea liquid).
The Wash: Brush the tops with plain plant milk or melted vegan butter instead of an egg wash.
Sugar-Free:
Simply omit the granulated sugar. The scone will be purely savory-neutral, which is actually how many traditionalists prefer them when serving with very sweet jams.
6. Creative Serving Idea
For a sophisticated twist, skip the butter and serve your warm scones with honey-infused mascarpone and a side of fresh figs.
The creamy, tangy mascarpone is a wonderful alternative to traditional clotted cream.

How to Properly Store Your English Plain Scones
Classic English Scones are at their peak the moment they have cooled slightly, but since they are made with a high proportion of flour and leavening, they can dry out quickly.
Proper storage is the key to maintaining that tender, buttery crumb.
1. Room Temperature (Best for Immediate Use)
Duration: Up to 2 days.
Store your cooled scones in an airtight container. Keeping them at room temperature prevents the starch from recrystallizing too quickly, which is what makes bread feel stale.
2. Refrigeration (For Mid-Term Storage)
Duration: Up to 5 days.
If you aren’t going to finish them within 48 hours, move them to the fridge in a sealed container.
Note: Scones will naturally firm up in the cold. To bring back their soft texture, always warm them in the oven or toaster before serving.
3. Freezing (The Best Way to Preserve Freshness)
Duration: Up to 3 months.
Scones freeze exceptionally well. Wrap them individually in plastic wrap and then place them in a freezer-safe bag.
To Thaw: Let them sit on the counter until they reach room temperature, then refresh them in a warm oven for a few minutes to restore the crust.
4. How to Reheat for “Day-One” Quality
A cold scone can feel heavy, but heat reactivates the fats and makes the interior light again.
The Toasted Scone: This is a fan-favorite method. Simply cut the scones in half and lightly toast them.
The heat crisps the interior edges while warming the center, they are absolutely delicious this way, especially with a melting pat of butter.
The Oven Method: To warm whole scones, place them on a baking sheet at 300°F (150°C) for 5–10 minutes.
This mimics the original bake and keeps the outside tender.
The Microwave: Only use this for a quick 10–15 second “blast” if you are eating them immediately.
Any longer and the scone will become tough and rubbery once it starts to cool.
5. Storage Mistakes to Avoid
Packaging While Warm: If you put a warm scone in a container, the trapped steam will make the exterior sticky and the interior gummy.
They must be stone-cold before you seal them up.
Leaving the Container Ajar: Scones are like sponges for air; if the container isn’t truly airtight, they will turn into bricks within a few hours.
Re-Freezing: Avoid thawing and then re-freezing scones, as this destroys the delicate cell structure of the crumb and makes them crumbly.
FAQs
Why didn’t my scones rise very high?
There are usually three culprits: old baking powder, overworking the dough, or twisting the cutter. Ensure your baking powder is fresh, handle the dough as little as possible to keep the gluten relaxed, and always press the cutter straight down without rotating it. Twisting seals the edges, which prevents the layers from expanding upward.
Can I use self-rising flour instead of all-purpose?
Yes, you can. If you use self-rising flour, omit the baking powder and the salt from the recipe, as these are already included in the flour blend. However, for the most consistent and highest “pop” in the oven, many bakers prefer the control of adding fresh baking powder to all-purpose flour.
Why is the texture of my scones tough or bread-like?
This is a sign of over-mixing. Scone dough should be handled with “light” hands. If you knead it like bread, you develop too much gluten. The dough should just barely come together and still look a bit shaggy before you pat it out. Also, make sure your butter is ice-cold; if it melts into the flour before baking, the result will be heavy rather than flaky.
Can I make the dough in advance?
While scones are best when baked immediately, you can “rub in” the butter and flour and keep that dry mixture in the fridge for up to 24 hours. However, do not add the liquid until you are ready to bake. Once the milk and baking powder meet, the chemical reaction starts, and the “lifting power” begins to fade.
What is the traditional way to serve an English scone?
In England, the debate is famous: Jam first or Cream first?
The Devon Way: Spread clotted cream first, then top with a dollop of strawberry jam.
The Cornish Way: Spread the jam first, then top with a generous spoonful of clotted cream. Regardless of your preference, always split the scone by hand (not a knife) to enjoy the fluffy interior texture.

Classic English Plain Scones
6
servings15
minutes20
minutesThese classic english plain scones are tender, buttery, and easy to make.
Ingredients
2 cups (260 grams) all-purpose flour
¾ cup (180 ml) plus 1 teaspoon milk, room temperature
5 tablespoons (2 ½ ounces/70 grams) unsalted butter, cold, cut into small pieces
2 tablespoons granulated sugar
2 large eggs, room temperature
2 teaspoons baking powder
½ teaspoon salt
Directions
- Preheat your oven to 425°F (220°C) and prepare a baking tray by lining it with parchment paper.
- In a large bowl, sift together the flour, baking powder, and salt.
- Toss the cold butter pieces into the dry ingredients. Use your fingertips to rub the butter into the flour until the mixture resembles large, shaggy crumbles.
- Give the bowl a quick shake; any large, un-rubbed chunks of butter will float to the surface, allowing you to break them down easily.
- In a separate small bowl, whisk one of the eggs into about half of the milk.
- Create a well in the center of your flour mixture and pour in the egg-milk blend and the sugar. Use a fork to gently toss the ingredients together.
- Gradually add the remaining milk a little at a time as you stir. Stop once the dough just clings together; it should be moist to the touch but not wet or sticky. You may have a little milk left over.
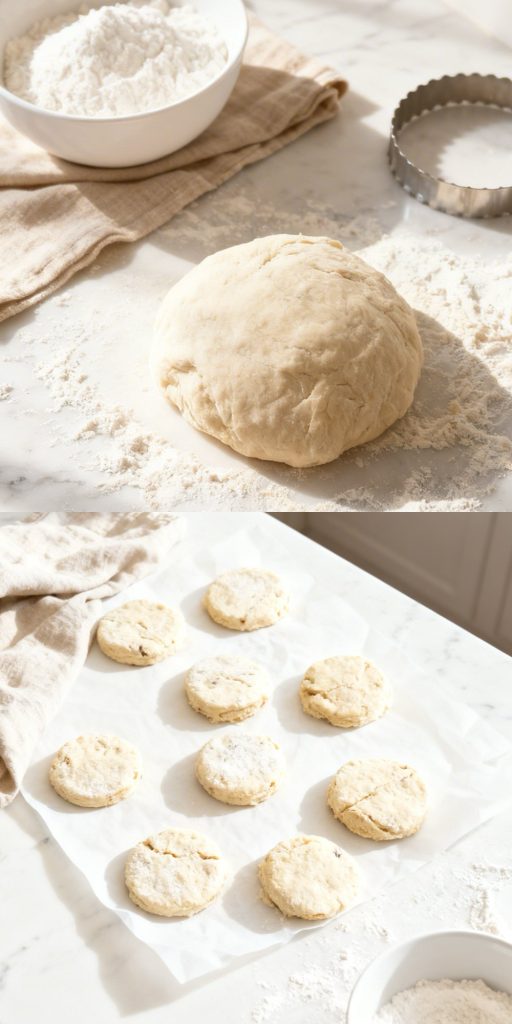
- Move the dough onto a lightly floured surface. Instead of using a rolling pin, use your hands to gently pat it down and fold it over itself until the top is smooth and free of cracks.
- Pat the dough into a steady round that is ¾-inch (2 cm) thick. Be careful not to overwork the dough, as warmth from your hands will melt the butter.
- Take a plain 2 ½ inch (5 cm) circular cutter and dip it in flour. Press it straight down into the dough and lift it directly back up. Crucial: Do not twist the cutter, as twisting seals the edges and prevents the scone from rising tall.
- Whisk the second egg with the teaspoon of milk. Lightly brush only the tops of the scones with this mixture, being careful not to let it drip down the sides (which can act like glue and stop the rise).
- Slide the tray into the oven for 15–20 minutes. They are done when they have doubled in height and the tops are a beautiful light golden brown.
- Move the scones to a wire rack. While they are cooling, drape a clean kitchen towel over them; this traps a bit of steam and ensures the crust stays tender rather than becoming hard.