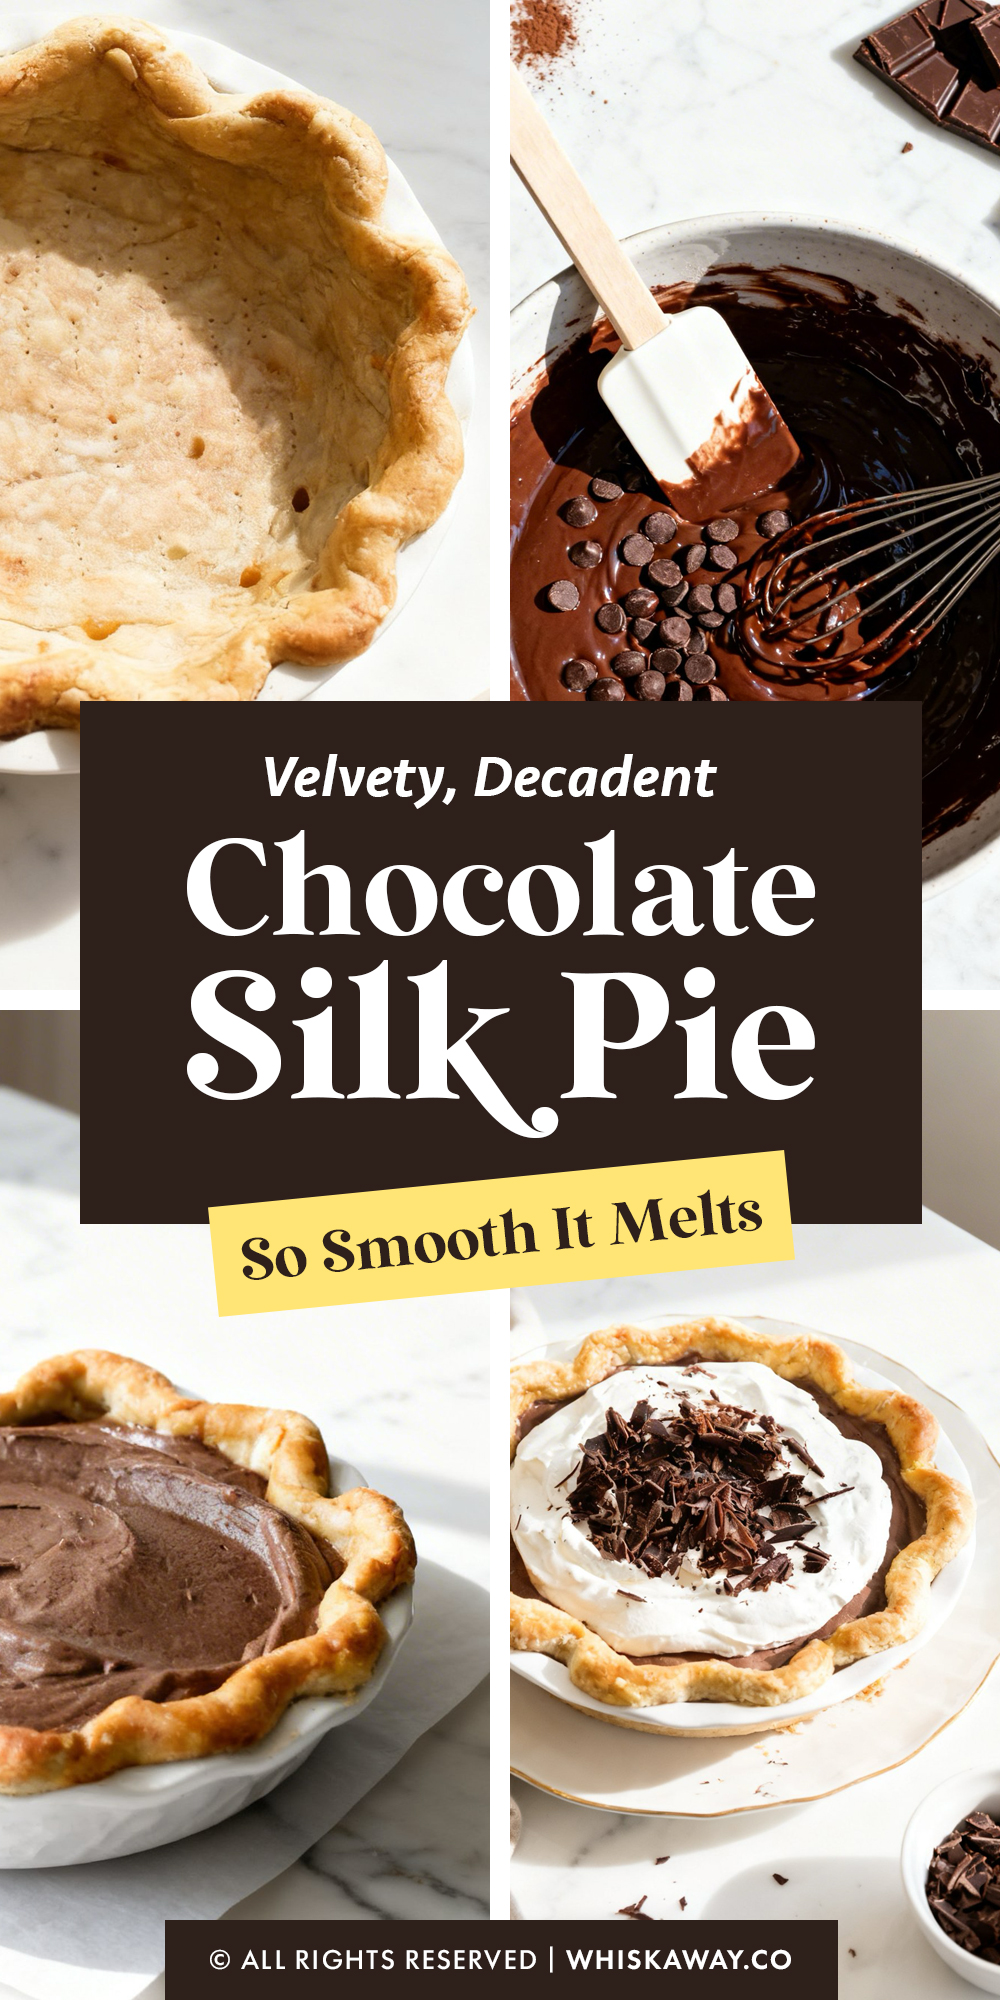
Who can resist a pie that’s smooth, chocolatey, and utterly decadent?
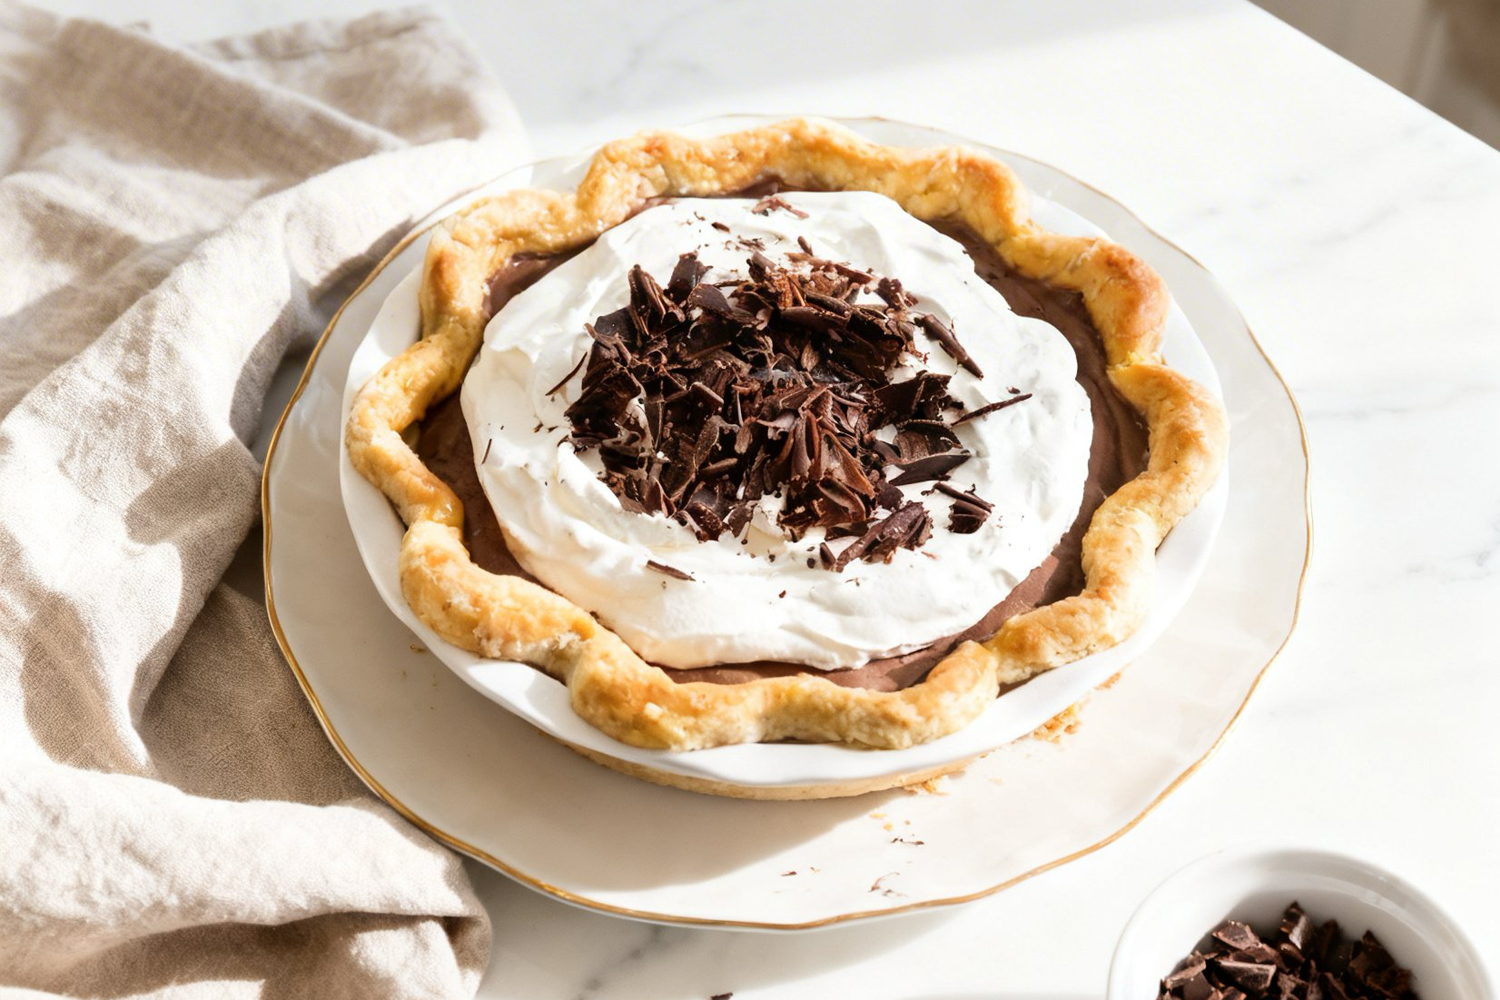
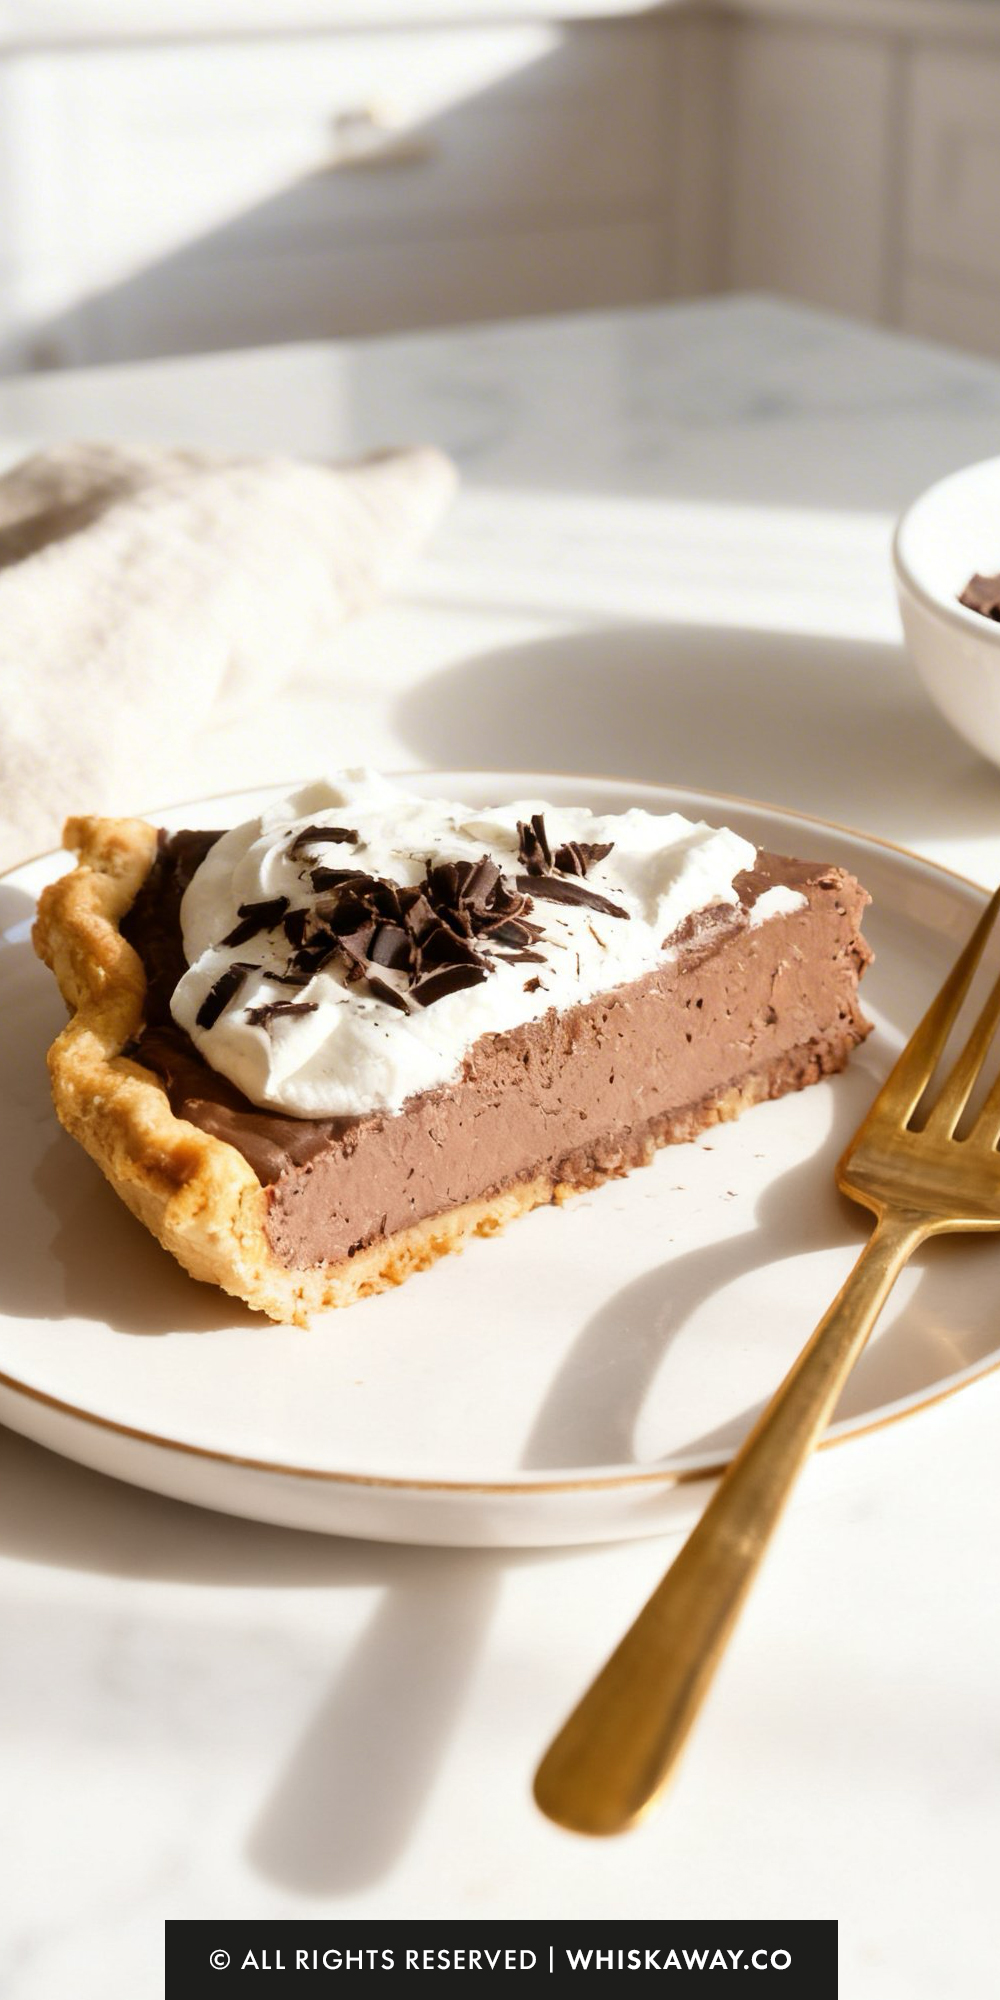
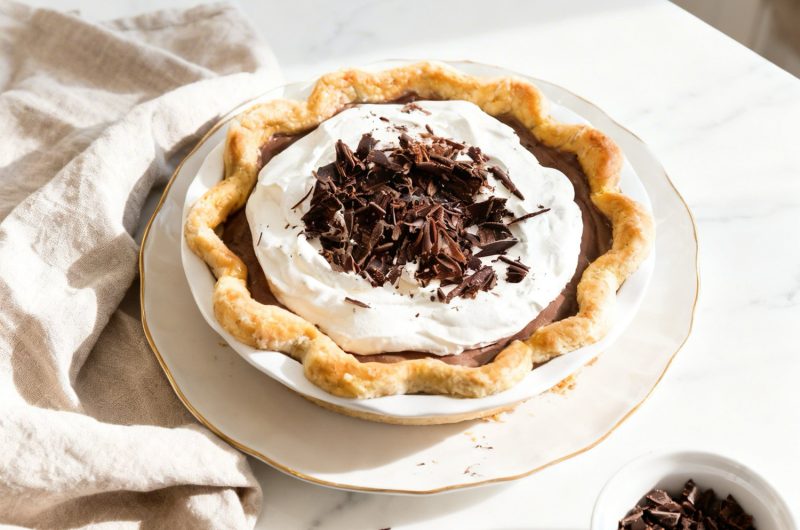
This chocolate silk pie features silky chocolate filling nestled in a crisp crust, topped with a cloud of whipped cream.
Each bite is luxuriously rich yet soft, making it a dessert for chocolate lovers of all ages.
Baking a chocolate silk pie at home is straightforward, and the result feels indulgent and professional without the fuss.
Perfect for birthdays, dinner parties, or a personal treat, it’s a slice of chocolate heaven you’ll want to enjoy again and again.
Why You’ll Love This Recipe
A chocolate silk pie is prized for its ultra-smooth, whipped chocolate filling.
What Makes Them Special
- Melted chocolate folded into butter for silk texture
Lightened structure prevents density
Rich flavor without being fudgy
No-bake filling simplifies prep
Luxuriously smooth mouthfeel
Save This Pin for Later to Your Pinterest Board
🔥 For ultra-smooth, decadent chocolate desserts, try these next:
How to Get Your Chocolate Silk Pie Just Right
Achieving that signature silk texture requires a delicate balance of temperature and aeration.
Because this recipe relies on an emulsion of cooked eggs, melted chocolate, and creamed butter, the details of the process are what separate a dense pudding from a world-class silk filling.

1. Master the Chocolate-Egg Emulsion
The “No-Grit” Check: When cooking the eggs and sugar, your thermometer is your best friend.
If you don’t have one, the finger test is mandatory. If you feel even a single grain of sugar, the filling will be grainy.
Keep whisking over the heat until it is perfectly smooth.
The 10-Minute Resting Rule: Timing is everything in Step 3. If you add the chocolate to the eggs while they are too hot, the chocolate can seize.
Conversely, if the chocolate-egg mixture is too hot when added to the butter, it will melt the butter into a greasy liquid rather than a fluffy cream.
Wait those 10 minutes at each stage; it’s the secret to the pie’s stability.
The 3-Minute Beat: When you combine the butter and the chocolate-egg base, do not cut the mixing time short.
That 3-minute window is where the silk is made as it incorporates tiny air bubbles and ensures the fat is perfectly suspended, creating a mousse-like mouthfeel.
2. Perfecting the Crust & Texture
Weight the Sides: When blind-baking, don’t just put weights in the bottom; push them up against the walls of the crust.
This acts as a physical barrier that prevents the sides from “slumping” down the pan as the butter melts.
Room Temperature Butter: Your butter must be soft enough that a finger leaves an indentation easily, but it shouldn’t be oily or melting.
If the butter is too cold, it will leave tiny yellow lumps in your dark chocolate filling.
3. Common Mistakes to Avoid
Over-Whipping the Folding Cream: In Step 2, whip the cream to stiff peaks, but be careful not to turn it into butter.
If it’s over-whipped, it will be difficult to fold into the chocolate base and may result in a broken or grainy-looking filling.
Using Low-Quality Chocolate: Since chocolate is the primary flavor profile, avoid baking chips, which contain stabilizers that prevent them from melting smoothly.
Use high-quality bars (like Ghirardelli or Guittard) for the best melt and flavor depth.
Rushing the Final Set: A 4-hour chill is the bare minimum.
If you cut the pie too early, the butter and chocolate won’t have fully solidified, and the slice will collapse on the plate.
Overnight is always the superior choice.
4. Timing & Technique Advice
The Knife Trick: For those sharp, professional-looking slices, use a hot, dry knife.
Run your knife under hot water, wipe it completely dry, and make your cut.
Clean and reheat the knife between every single slice to prevent the sticky chocolate from dragging.
The Vanilla Timing: Add your vanilla extract specifically to the butter.
ince vanilla is alcohol-based, the fats in the butter help trap the aroma, ensuring the flavor doesn’t dissipate when mixed with the other ingredients.
Baking Tips for This Recipe
- Use high-quality chocolate — flavor is central.
- Beat butter and sugar thoroughly for smooth texture.
- Chill at least 4 hours before serving.

Variation Tips
The Chocolate Silk Pie is a luxurious masterpiece on its own, but its velvety base is incredibly accommodating to new flavors and textures.
Whether you want to add a salty crunch or a fruity brightness, these variations allow you to customize the experience.
1. The Mocha Silk Upgrade
For coffee lovers, adding an espresso kick deepens the richness of the bittersweet chocolate.
Dissolve 2 teaspoons of espresso powder into the egg and sugar mixture while it cooks over the double boiler.
Dust the whipped cream topping with a light coating of cocoa powder mixed with a pinch of finely ground coffee.
2. The Salted Peanut Butter Swirl
Chocolate and peanut butter are a classic duo. This adds a savory element to the airy filling.
Before folding in the whipped cream, gently marble 1/3 cup of slightly warmed, creamy peanut butter into the chocolate base.
Use a Pretzel Crust (crushed pretzels, butter, and a bit of sugar) instead of a traditional pastry shell for a salty, crunchy contrast.
3. The Midnight Orange Twist
The combination of dark chocolate and citrus provides a bright, sophisticated finish.
Stir 1 tablespoon of fresh orange zest and 1 teaspoon of orange extract into the chocolate-egg mixture after it has cooled.
Decorate the whipped cream with candied orange peels or fresh zest.
4. Crust & Texture Alternatives
The Oreo / Chocolate Cookie Crust: For a double chocolate experience, swap the pastry for a crust made of crushed chocolate sandwich cookies and melted butter.
This provides a dense, crunchy counterpoint to the silky filling.
The Mint Chocolate Refresh: Add 1/2 teaspoon of peppermint extract to the filling and garnish the top with crushed Andes mints or peppermint bark.
5. Dietary Adaptations
Gluten-Free:
The chocolate silk filling is naturally gluten-free! Simply use a gluten-free pastry crust or a crust made from gluten-free chocolate cookies.
Reduced Sugar:
Use extra-dark bittersweet chocolate (70% cocoa or higher) and reduce the granulated sugar in the filling to 3/4 cup.
The richness of the butter and heavy cream will ensure it still feels like a decadent treat.
Dairy-Free (Alternative):
The Substitution: Use a high-quality vegan butter and full-fat coconut cream (chilled and whipped) in place of the dairy cream.
Ensure your chocolate bars are dairy-free/vegan-certified.
6. Creative Garnish Ideas
Toasted Hazelnuts: Sprinkle crushed, toasted hazelnuts over the whipped cream for a Nutella-inspired flavor profile.
Raspberry Coulis: Serve each slice with a drizzle of fresh raspberry sauce. The tartness of the berries cuts through the heavy fat of the silk filling perfectly.
How to Properly Store Your Chocolate Silk Pie
Because Chocolate Silk Pie is an emulsion of butter, chocolate, and eggs, it is highly sensitive to temperature.
Maintaining the silk texture depends entirely on keeping the fats stable and prevented from melting or absorbing refrigerator odors.
1. Refrigeration (The Essential Method)
Duration: 4 to 5 days.
This pie must be kept cold to maintain its structural integrity.
Use a deep pie carrier or an airtight container that won’t touch the whipped cream topping.
If you don’t have one, you can tent aluminum foil over the top (using toothpicks as poles to keep the foil off the cream). Chocolate is a fat, and fats absorb smells.
So, keep it away from strong-scented foods like onions or leftovers.
2. Freezing (For an “Ice Cream Cake” Experience)
Duration: Up to 2 months.
The Technique: You can freeze the pie either with or without the whipped cream topping.
To Freeze: Wrap the entire pie (or individual slices) tightly in plastic wrap, followed by a layer of heavy-duty foil.
To Serve: Thaw in the refrigerator for 4–6 hours before eating. Alternatively, you can eat it partially frozen for a texture that mimics a dense chocolate gelato.
3. Room Temperature (Avoid)
Do not leave this pie out for more than 1 hour.
Because the filling is aerated with whipped cream and stabilized by butter, it will begin to slump and lose its mousse-like texture if it gets too warm.
4. Protecting the Silk Texture
Only take the pie out of the fridge when you are ready to serve. Cut the slices you need and immediately return the rest of the pie to the refrigerator.
This prevents the filling from softening and then re-hardening, which can sometimes affect the mouthfeel.
If you see tiny beads of moisture on the chocolate, it usually means the pie was wrapped while the crust or filling was still slightly warm.
Always ensure the pie is completely cold before sealing it for storage.
5. Storage Mistakes to Avoid
Never Microwave: It may seem tempting to soften a slice, but even 5 seconds in the microwave will melt the butter and collapse the air bubbles, turning your silk pie into a puddle of chocolate soup.
Open-Air Storage: Leaving the pie uncovered in the fridge will cause the whipped cream to dry out and form a skin, and the chocolate filling may begin to lose its glossy sheen.
Freezing the Raw Dough Only? If you are short on time, you can freeze the unbaked crust for 3 months or the blind-baked crust for 2 months.
However, the silk filling itself should be made fresh or frozen only after it is fully set.
FAQs
Is it safe to eat the eggs in this filling since they aren’t baked?
Yes, absolutely. This recipe uses a tempering method where the eggs and sugar are cooked over a double boiler until they reach 160°F (71°C). This temperature is the food safety standard for killing bacteria like Salmonella while maintaining the eggs’ ability to create a smooth, velvety custard.
Can I use chocolate chips instead of chopped chocolate bars?
While you can, it is not recommended for the best “silk” results. Chocolate chips contain stabilizers designed to help them hold their shape under heat, which can result in a grainier or waxier texture when melted into a pie filling. For a truly professional, melt-in-your-mouth feel, use high-quality baking bars (60% cacao or higher).
Why did my filling turn out grainy or lumpy?
Graininess usually happens if the sugar didn’t fully dissolve during the egg-cooking stage or if the butter was too cold when added to the chocolate-egg mixture. If the butter is cold, it won’t emulsify; instead, it will stay in tiny solid chunks throughout the dark chocolate. Ensure your butter is a true room temperature (soft but not melting).
My filling is too soft and won’t hold its shape. What went wrong?
This is typically caused by one of two things: either the egg mixture wasn’t cooked long enough to thicken, or the whipped cream was folded in while the chocolate was still too warm. If the chocolate is warm, it melts the air bubbles in the whipped cream, turning your mousse into a liquid. Always follow the 10-minute cooling rests strictly.
How far in advance can I make this pie?
This is an ideal make-ahead dessert. You can prepare the filling and let it set in the crust for up to 48 hours before serving. However, for the best presentation, wait to add the whipped cream topping and chocolate curls until the day you plan to serve it, as whipped cream can begin to weep or lose its fluffiness after 24 hours.
Chocolate Silk Pie
8
Slices4
hours40
minutes4
hoursThis chocolate silk pie is silky, rich, and melt-in-your-mouth delicious.
Ingredients
- For the Crust
1 unbaked Flaky Pie Crust or All Butter Pie Crust
1 large egg (for egg wash)
1 tablespoon milk or heavy cream (for egg wash)
- For the Filling
two 4-ounce (226g total) quality bittersweet or semi-sweet chocolate bars, finely chopped
1 cup (240ml) heavy cream or heavy whipping cream
1 cup (200g) granulated sugar
3/4 cup (170g) unsalted butter, softened
4 large eggs
1 and 1/2 teaspoons pure vanilla extract
- For the Topping
1 cup (240ml) heavy cream or heavy whipping cream
2 tablespoons confectioners’ sugar or granulated sugar
1/2 teaspoon pure vanilla extract
Optional: chocolate curls for garnish
Directions
- Craft and Blind-Bake the Shell
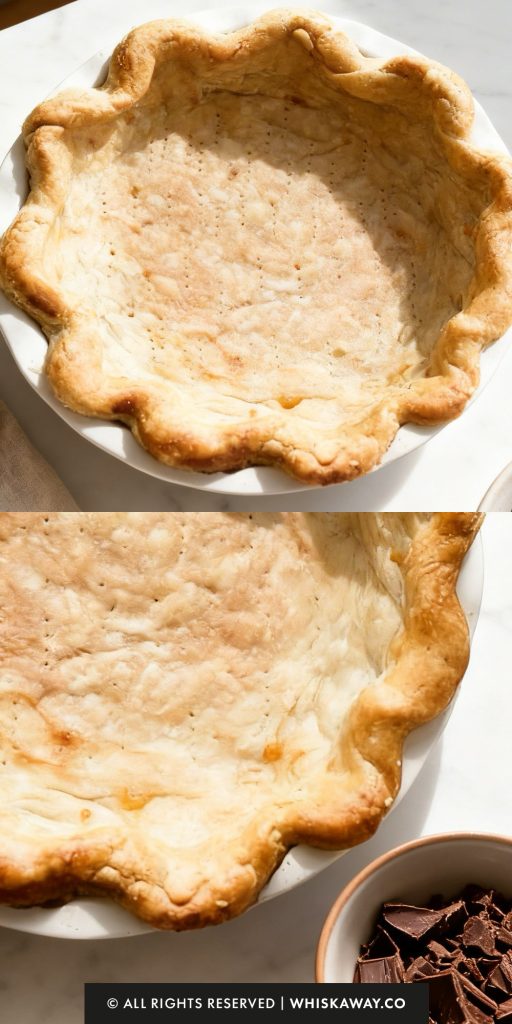
- Start with your chilled pie dough (it’s best if it rested overnight). On a floured surface, roll it out into a 12-inch circle.
- Transfer the dough to your 9-inch pie plate. Instead of trimming the excess, fold it back under itself to create a sturdy, thick rim. Flute the edges with your fingers and chill in the freezer for 30 minutes to prevent the sides from sliding down.
- Preheat your oven to 375°F (191°C). Line the crust with crumpled parchment paper and fill it to the brim with pie weights or dry beans. Bake for 15–16 minutes.
- Remove the weights and parchment. Prick the bottom of the crust with a fork (and brush the edges with egg wash for a golden glow). Bake for another 14–15 minutes until the bottom is a deep golden brown. Let it cool entirely on a wire rack.
- Prep the Foundation
- Using a stand mixer with the whisk attachment, beat 1 cup of heavy cream until it reaches stiff peaks. Place this in the fridge for later.
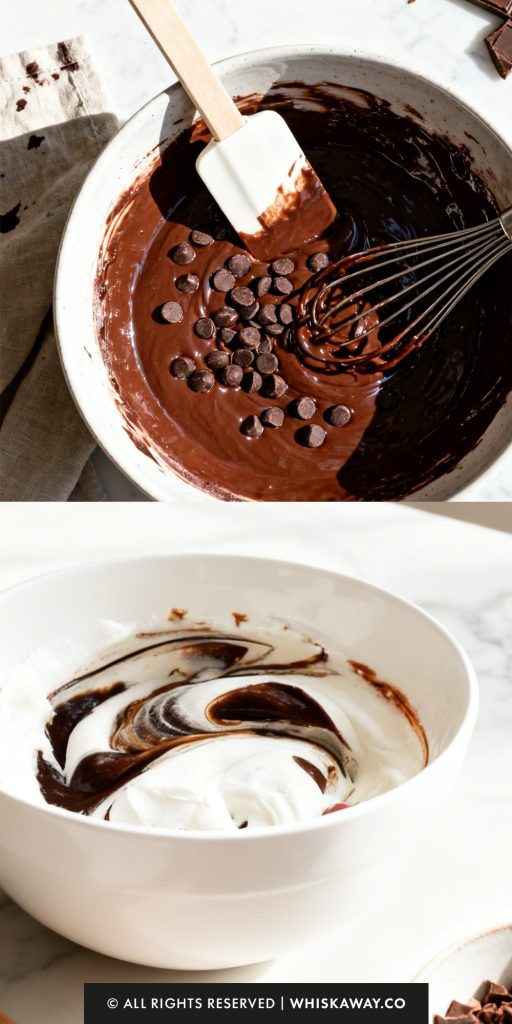
- Finely chop your chocolate bars and melt them either in a double boiler or the microwave in 20-second bursts. Stir until glossy and set aside.
- Cook the Egg Base
- In a heatproof bowl set over a pot of simmering water (ensure the water doesn't touch the bowl), whisk the eggs and sugar constantly.
- Cook for about 10–11 minutes until the mixture hits 160°F (71°C) or until you can no longer feel sugar grains when rubbing the liquid between your fingers.
- Remove from heat and let it rest for 10 minutes. Slowly stir in the melted chocolate and let it cool for another 10 minutes (this prevents the butter in the next step from melting).
- Beat the softened butter for 2 minutes until creamy, then add the vanilla.
- With the mixer on low, pour in the chocolate-egg mixture. Increase the speed to medium-high and beat for 3 full minutes to aerate the filling.
- Gently fold in your chilled whipped cream with a spatula until no white streaks remain.
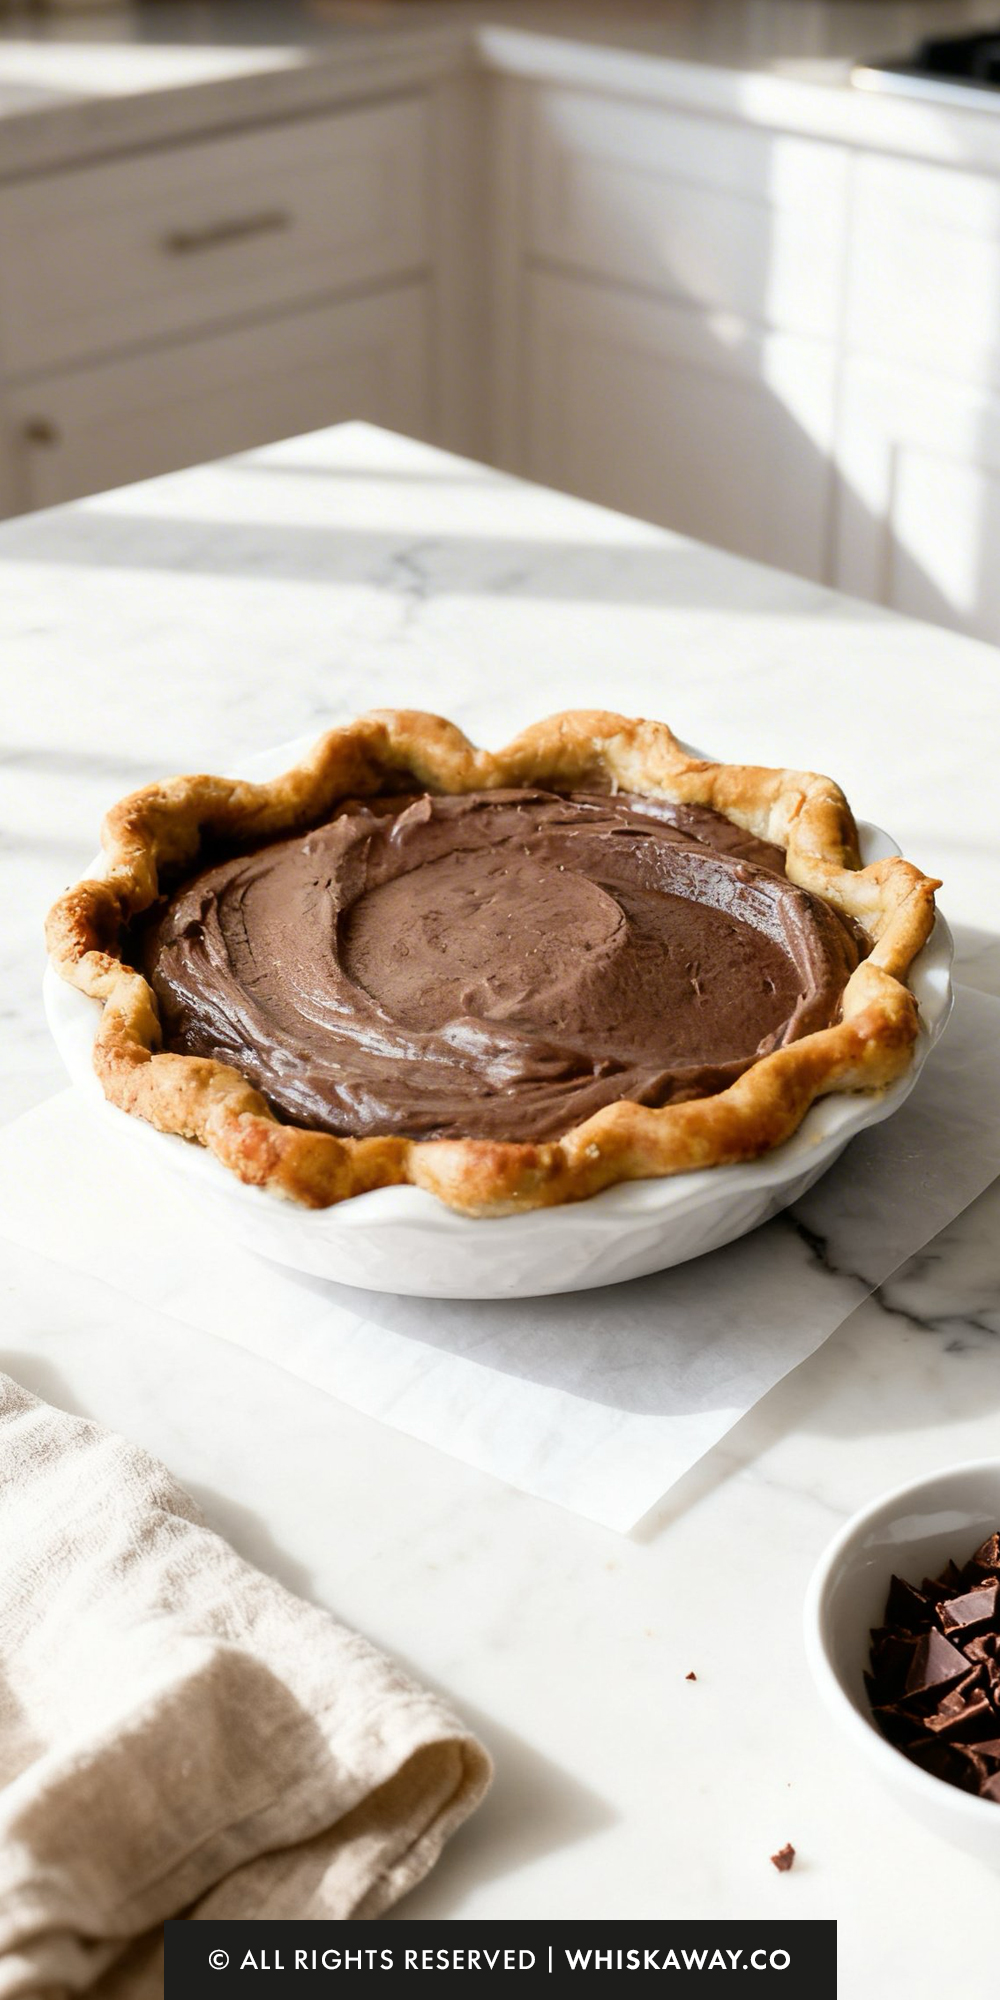
- Pour the filling into your cooled crust and smooth the top. Cover tightly and refrigerate for at least 4–6 hours, though overnight is best for the cleanest slices.
- Whip the remaining cup of heavy cream with the sugar and vanilla until you reach medium peaks.
- Spread or pipe the cream over the pie. For a professional look, add a few dark chocolate curls on top. Keep refrigerated until you're ready to serve.