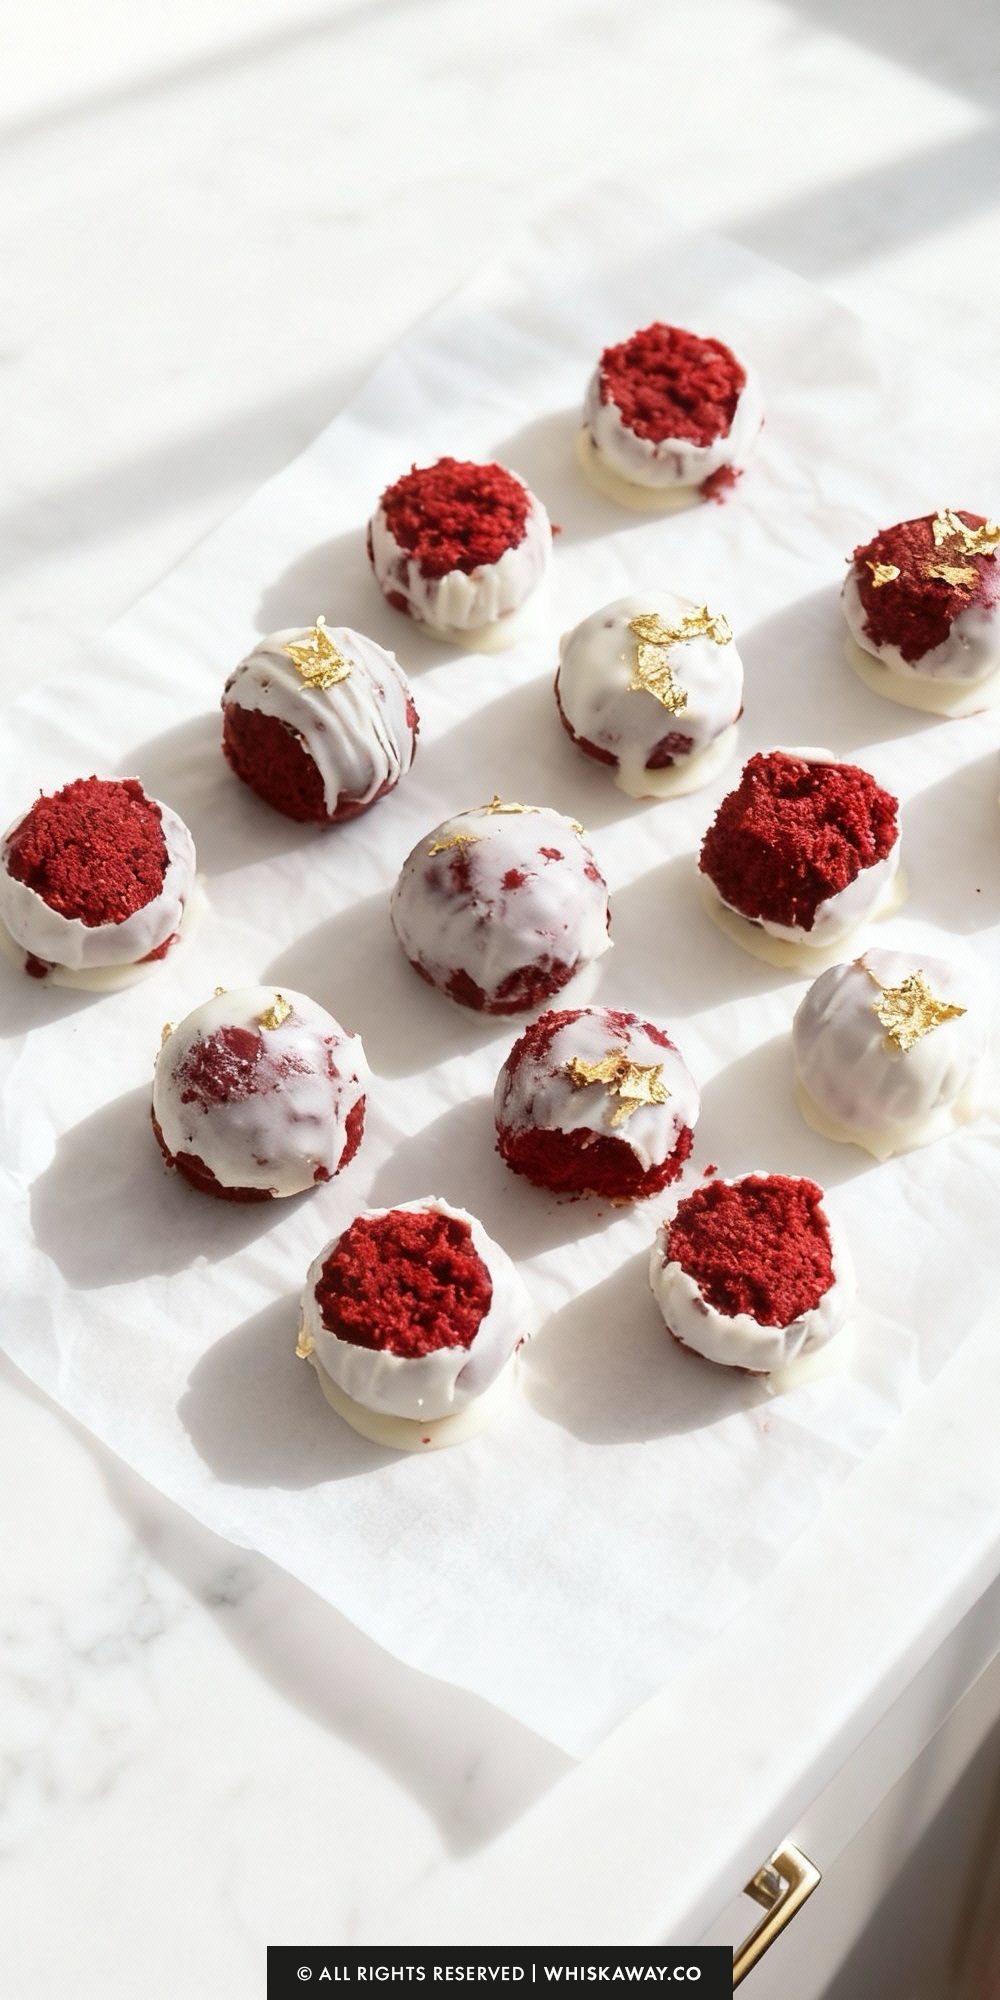
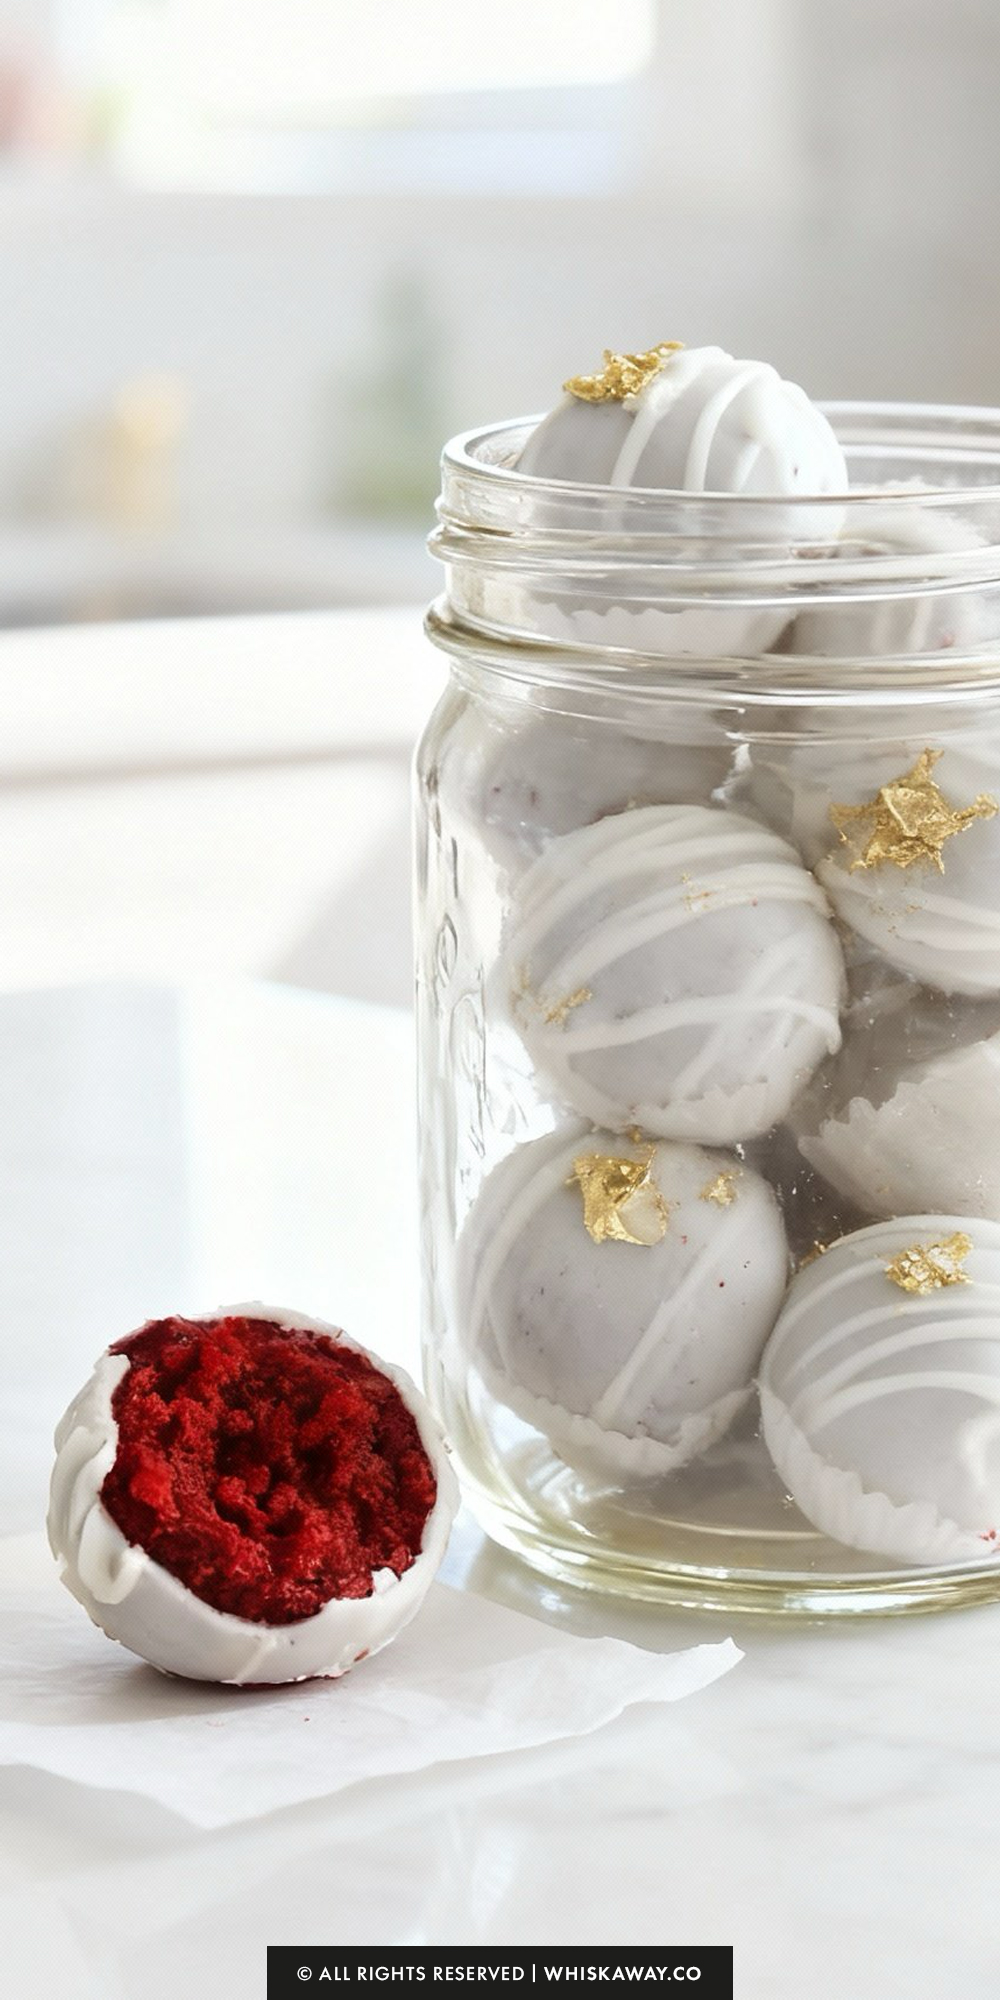
If you’re looking for a dessert that looks like it belongs in a fancy boutique window but is actually low-key easy to whip up, these easy red velvet truffles are about to become your new obsession.
Seriously, these little bites are the ultimate glow-up for a standard red velvet cake.
We’re taking that classic, vibrant sponge, crumbling it into oblivion, and mixing it with tangy cream cheese to create a center that is basically pure decadence.
Give them a try and let me know how many you “sampled” before they even made it to the serving plate!
Happy Baking!
Why You’ll Love This Recipe
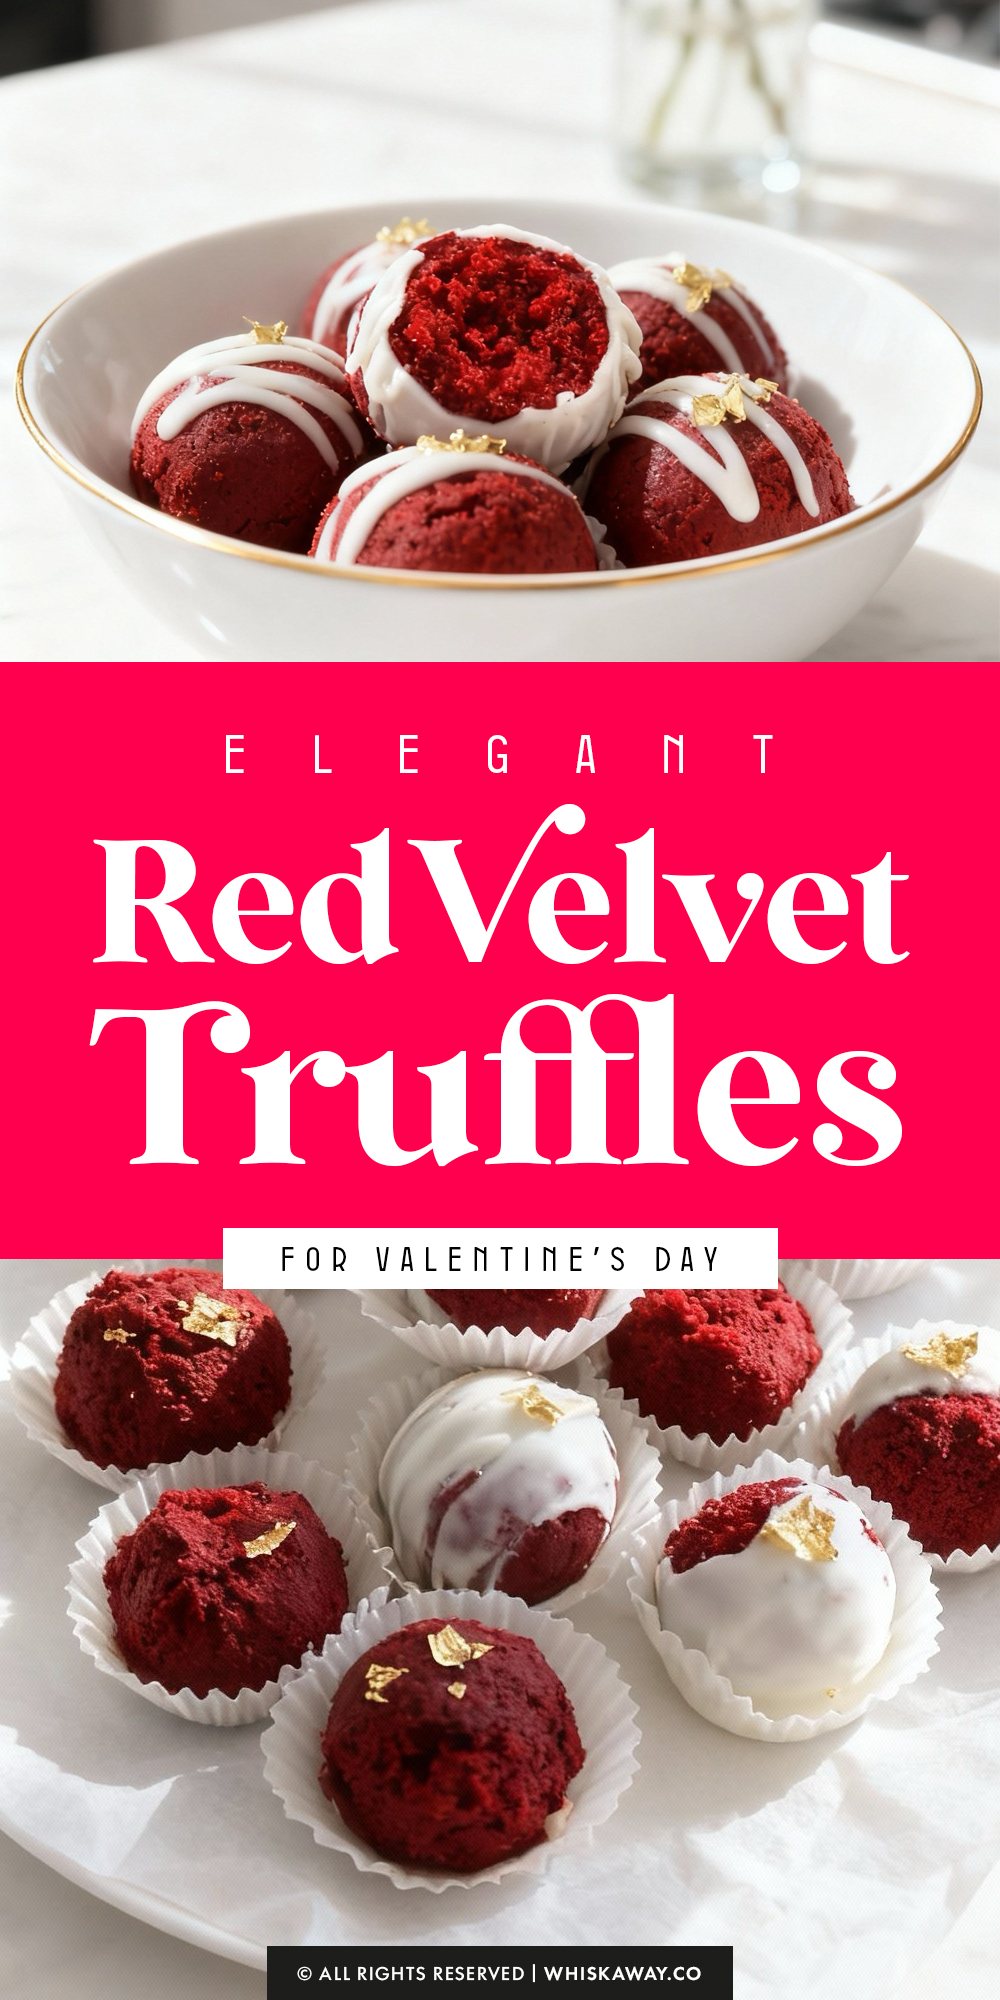
Red velvet truffles are rich, dense, and coated in chocolate, making them decadent bite-sized treats.
They’re visually impressive, easy to portion, and perfect for gifting or serving at special occasions. Each bite delivers indulgent red velvet flavor with a smooth chocolate finish.
Key Reasons to Love Them:
- Dense, fudgy red velvet center with chocolate coating.
- Bite-sized and convenient for sharing or gifting.
- Visually elegant for special occasions or celebrations.
- Beginner-friendly with simple rolling and coating steps.
- Rich, indulgent flavor that satisfies chocolate lovers.
🔥 These rich red velvet truffles make a perfect Valentine’s treat alongside strawberry cheesecake truffles, indulgent red velvet brownies, or elegant chocolate covered raspberries.
How to Get Your Red Velvet Truffles Just Right
Creating the perfect truffle is all about balancing moisture and temperature. If the dough is too wet, they’ll fall apart; if the chocolate is too hot, they’ll melt.
Here is how to achieve that silky, professional finish every time.
1. The “Crust-Free” Secret
The most common mistake is crumbling the entire cake, edges and all.
Before you start crumbling, take a sharp knife and trim away the browned top and crispy edges of the cake.
Those “crusty” bits don’t absorb the cream cheese evenly and create hard lumps in your truffles.
Using only the soft, interior sponge ensures a melt-in-your-mouth texture that mimics high-end ganache.
2. Watch the Cream Cheese Ratio
Not all cakes have the same moisture level. A box mix might be oilier than a scratch-made cake.
Don’t dump all 8 ounces of cream cheese in at once. Start with about three-quarters of the block. Knead it in, and only add more if the dough won’t hold its shape when rolled.
You want a dough that feels like damp sand or Play-Doh. If it’s too sticky, the truffles will be difficult to dip.
3. The Temperature “Sweet Spot”
Dipping a room-temperature cake ball into warm chocolate is a recipe for disaster (they will literally disintegrate).
Your cake balls must be firmly frozen before dipping. However, if they are too cold (straight out of a deep freeze), the sudden temperature change can cause the white chocolate coating to crack as it expands.
Take only 4 or 5 cake balls out of the freezer at a time. This keeps the rest frozen while you work, ensuring the chocolate sets quickly and smoothly.
4. Mastering the White Chocolate Dip
White almond bark and candy melts can be “thick,” leading to a clumpy coating.
If your melted coating feels too heavy, stir in one teaspoon of vegetable shortening or coconut oil. This thins the chocolate, giving you that thin, snappy shell.
The Drip: When you lift the truffle out of the chocolate, gently tap your wrist (not the toothpick itself) to shake off the excess. This prevents a “foot” of pooled chocolate from forming at the base.
5. Clean Hole Removal
Removing the toothpick can sometimes pull a chunk of chocolate off.
Wait until the coating is 100% set. Instead of pulling straight up, twist the toothpick gently between your thumb and forefinger first.
This breaks the seal cleanly, leaving a tiny hole that is easily covered by your drizzle.

Easy Baking Tips That Have Worked for Me
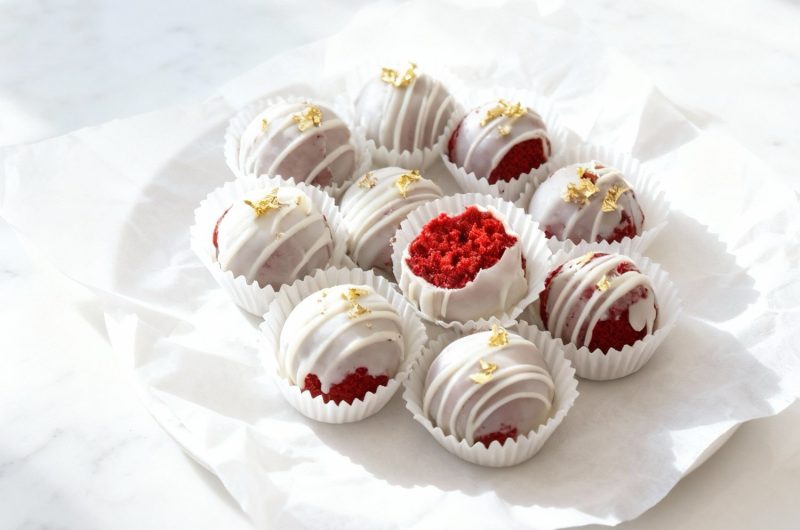
Rolling red velvet cake into small balls and coating them in chocolate creates a hands-on, fun process. The cake is moist and dense, while the chocolate exterior adds a firm, glossy finish.
Decorating the truffles with sprinkles or drizzled chocolate allows for creativity and personalization. Each bite delivers rich, chocolatey cake with a smooth coating, creating an indulgent experience.
Making these truffles is approachable for beginners and results in an elegant, professional-looking treat.
Variation Tips
These Red Velvet Truffles are essentially a blank canvas for your creativity. While the classic red-and-white look is iconic, you can easily tweak the flavors and textures to suit any holiday or craving.
1. The “Peppermint Velvet” (Winter Special)
Add 1/2 teaspoon of peppermint extract to the cake crumbs and cream cheese mixture.
After dipping the truffles in white chocolate, sprinkle them with crushed candy canes instead of gold leaf. The cool mint pairs beautifully with the rich cocoa of the red velvet.
2. Boozy Truffles (For Adults Only)
Replace 1 tablespoon of the cream cheese with 1 tablespoon of Bourbon, Baileys, or Kahlúa.
Be careful not to add too much liquid, or the balls won’t hold their shape. The alcohol adds a sophisticated depth to the sweetness.
3. Dark Chocolate “Tuxedo” Truffles
Instead of white almond bark, use dark chocolate melting wafers (at least 60% cocoa).
The dark shell against the bright red interior is stunning. Drizzle the finished truffles with a tiny bit of white chocolate for a “Tuxedo” effect.
4. The “Crunch” Factor
Fold in 1/4 cup of finely chopped toasted pecans or mini chocolate chips into the cake dough before rolling. This adds a nice textural contrast to the otherwise creamy center.
5. Citrus Twist
Mix in the zest of one orange to the cake crumbs. Red velvet has a subtle chocolate flavor that marries incredibly well with the brightness of orange.
6. Dietary Adaptations
Vegan/Dairy-Free
- The Cake: Use a vegan-certified red velvet box mix or a scratch-made recipe using oil and plant-based milk.
- The Binder: Swap the standard cream cheese for a vegan cream cheese alternative (like Kite Hill or Violife).
- The Coating: Use dairy-free white chocolate or dark chocolate melting wafers.
Gluten-Free
- The Cake: Use a gluten-free red velvet cake mix (like King Arthur). Since the cake is being crumbled anyway, gluten-free versions work perfectly here because you don’t need to worry about the structural integrity of a tall cake slice.
Keto-Friendly
- The Cake: Use a keto red velvet mug cake or a larger almond-flour-based cake.
- The Binder: Use full-fat cream cheese and a keto-approved powdered sweetener.
- The Coating: Use sugar-free white chocolate chips melted with a teaspoon of coconut oil.
Save for Later to Your Pinterest Board
How to Properly Store Your Red Velvet Truffles
Because these Red Velvet Truffles are made with a cream cheese binder, they require a bit more care than a standard cookie.
To keep that “snap” in the white chocolate shell and a moist, fudgy center, follow these guidelines.
1. Refrigeration (The Best Method)
The Duration: Up to 7 days.
Store the truffles in a single layer inside an airtight container. If you must stack them, place a sheet of parchment paper or wax paper between the layers to prevent the coating from sticking or scuffing.
The cream cheese makes these perishable. Keeping them chilled ensures they stay food-safe and maintains the dense, truffle-like texture of the cake center.
2. Freezing (For Long-Term Treats)
The Duration: Up to 3 months.
Place the set truffles on a tray and freeze until solid (about 1 hour). 2. Transfer them to a heavy-duty freezer bag or a vacuum-sealed container.
Thawing: This is the most important part! Move the truffles to the refrigerator the night before you want to serve them.
Do not thaw them on the counter; a sudden jump in temperature causes condensation (beads of water) to form on the chocolate, which can make the shell sticky or cloudy.
3. Room Temperature (Serving Only)
The Limit: No more than 2 hours.
These are best served slightly chilled or at room temperature. If you’re putting them out for a party, keep them in a cool spot away from direct sunlight or heat sources.
After 2 hours, they should be returned to the fridge to keep the dairy fresh.
4. Packaging & Flavor Protection
Chocolate and cream cheese are high in fat, which means they act like sponges for odors. Always use a well-sealed container so your truffles don’t end up tasting like the leftovers in your fridge.
For a professional look and easy handling, place each truffle in a small paper candy liner before storing.
This prevents them from rolling around and bumping into each other.
5. Storage Mistakes to Avoid
Never put warm truffles (if you just drizzled them) into the fridge. Let the coating set completely at room temperature first.
If you seal them while warm, trapped steam will ruin the texture of the shell.
Do not reheat these. Truffles are meant to be a cold or room-temperature confection.
Putting them in the microwave or oven will melt the chocolate shell and cause the cream cheese in the center to separate, leaving you with a greasy mess.
FAQs
Can I use a different type of frosting or binder instead of cream cheese?
Yes! While cream cheese is the classic pairing for red velvet, you can use vanilla or chocolate frosting if you prefer a sweeter, more shelf-stable truffle. Just be sure to add the frosting one tablespoon at a time; you usually need much less frosting than cream cheese to get the dough to hold its shape.
Why are my cake balls falling apart while I’m dipping them?
This is almost always a temperature issue. If the cake balls are too warm, the structural integrity fails the moment they hit the warm candy coating. Ensure they have been in the freezer for at least 20–25 minutes and are firm to the touch. If the dough itself feels too crumbly, you may need to knead in another tablespoon of cream cheese to act as “glue.”
Can I use white chocolate chips instead of almond bark?
You can, but white chocolate chips are formulated to resist melting, which can make them very thick and difficult to work with. If you choose chips, add 1 teaspoon of coconut oil or shortening per cup of chips to help thin the mixture into a smooth, dippable consistency. Almond bark or candy melts are generally easier for beginners because they melt more fluidly.
How do I avoid getting a “puddle” of chocolate at the base of the truffle?
This “foot” is caused by excess chocolate pooling as the truffle sets. To avoid this, after dipping the truffle, hold it over the bowl and gently tap your wrist (not the truffle itself) to shake off the extra coating. You can also gently drag the bottom of the truffle across the rim of the bowl before placing it on the parchment paper.
Do these truffles need to be kept in the fridge?
Yes. Because the binder is cream cheese—a perishable dairy product—these truffles must be stored in the refrigerator. They can stay fresh for up to a week when chilled. If you are serving them at a party, they are fine at room temperature for up to 2 hours, but they should be returned to the fridge after that.
Red Velvet Truffles
3
dozens45
minutes35
minutesIngredients
1 recipe red velvet cake box mix or scratch-made
1 lb. white vanilla almond bark or candy coating such as ghiradelli
8 oz. cream cheese at room temperature
Edible gold leaf optional
Directions
- Prepare your red velvet cake following the directions for a 9x13-inch pan (whether you are using a convenient box mix or a favorite family recipe). Once it’s finished baking, let it sit until it is entirely cool to the touch. This is essential to prevent the cream cheese from melting later.
- Line your baking sheets with parchment paper. In a large mixing bowl, break the cooled cake down into very fine, uniform crumbs. For the best texture, discard any hard or overly browned edges of the cake; you want the crumbs to be soft and consistent to ensure your truffles aren't lumpy.
- Add the room-temperature cream cheese to the bowl. Using your hands (wearing food-safe gloves is a great idea here!), knead the cake and cheese together until a smooth, moldable dough forms. It might feel a bit oily because of the cake's fat content—don't worry, that’s supposed to happen. Scoop out roughly a tablespoon of dough at a time and roll them into even rounds. Arrange the balls on your lined tray and pop them in the freezer for 20–25 minutes until they are firm.
- Melt your white candy coating or almond bark following the instructions on the package. To coat them, stick a toothpick into a chilled cake ball and submerge it in the melted chocolate. Lift it out, let the extra coating drip back into the bowl, and place the truffle back onto the parchment paper.
- When the coating has hardened, carefully twist the toothpicks to remove them. If you have leftover candy coating, re-melt it and drizzle it in a zigzag pattern over the truffles to hide the toothpick holes.
- While the drizzle is still wet, apply a small bit of edible gold leaf to each truffle for an elegant look. Once fully set, place the truffles into paper candy liners.