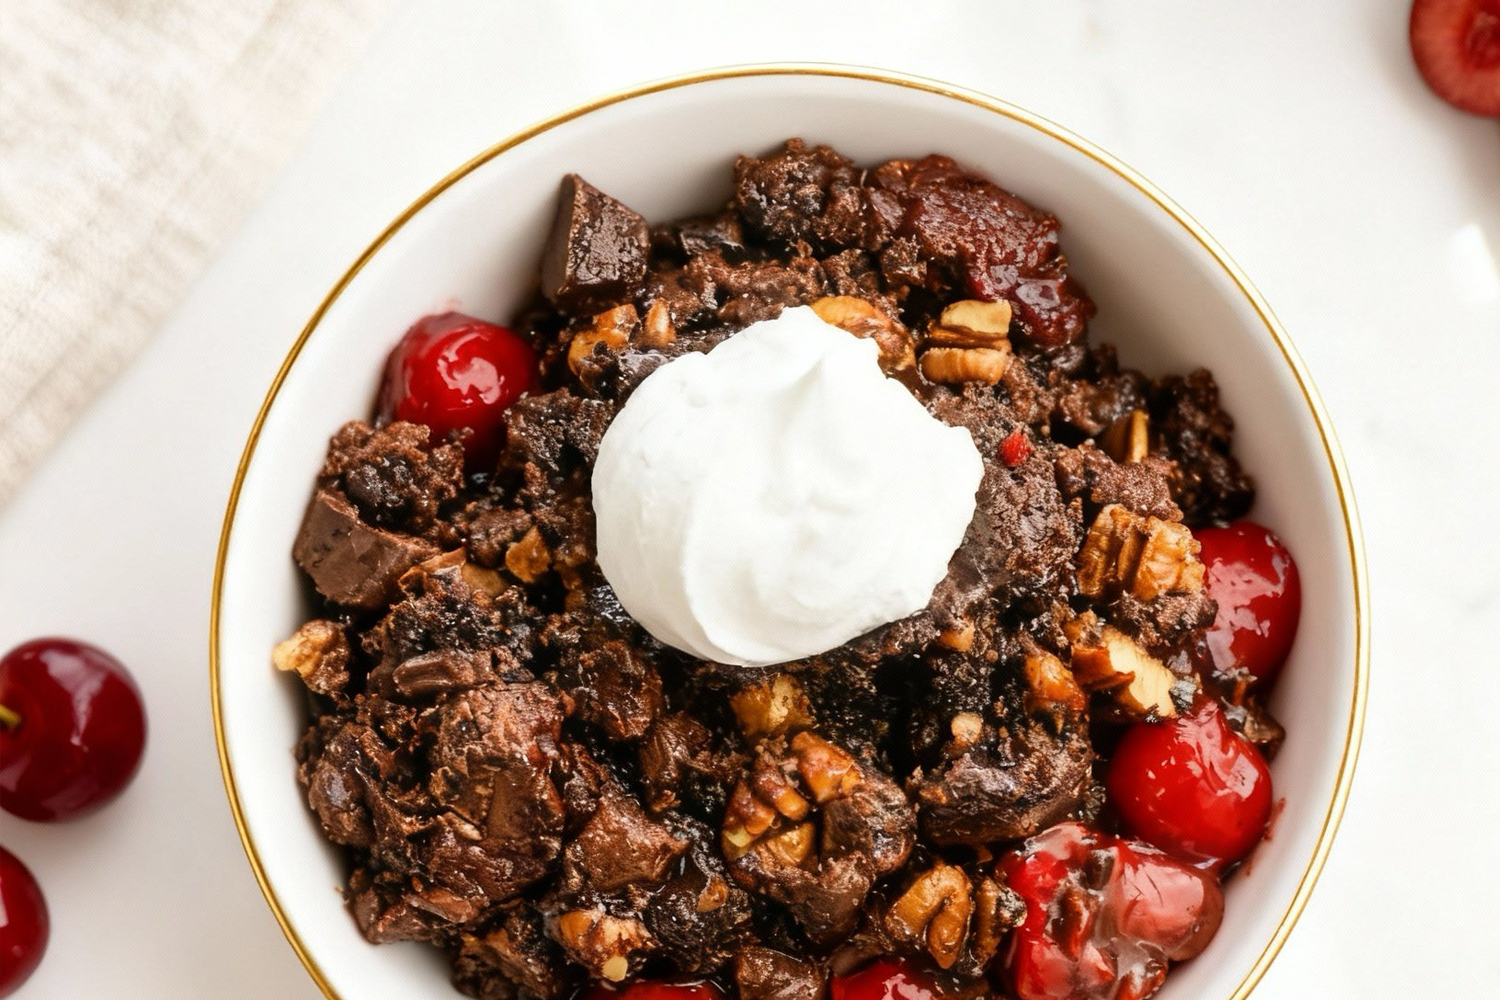
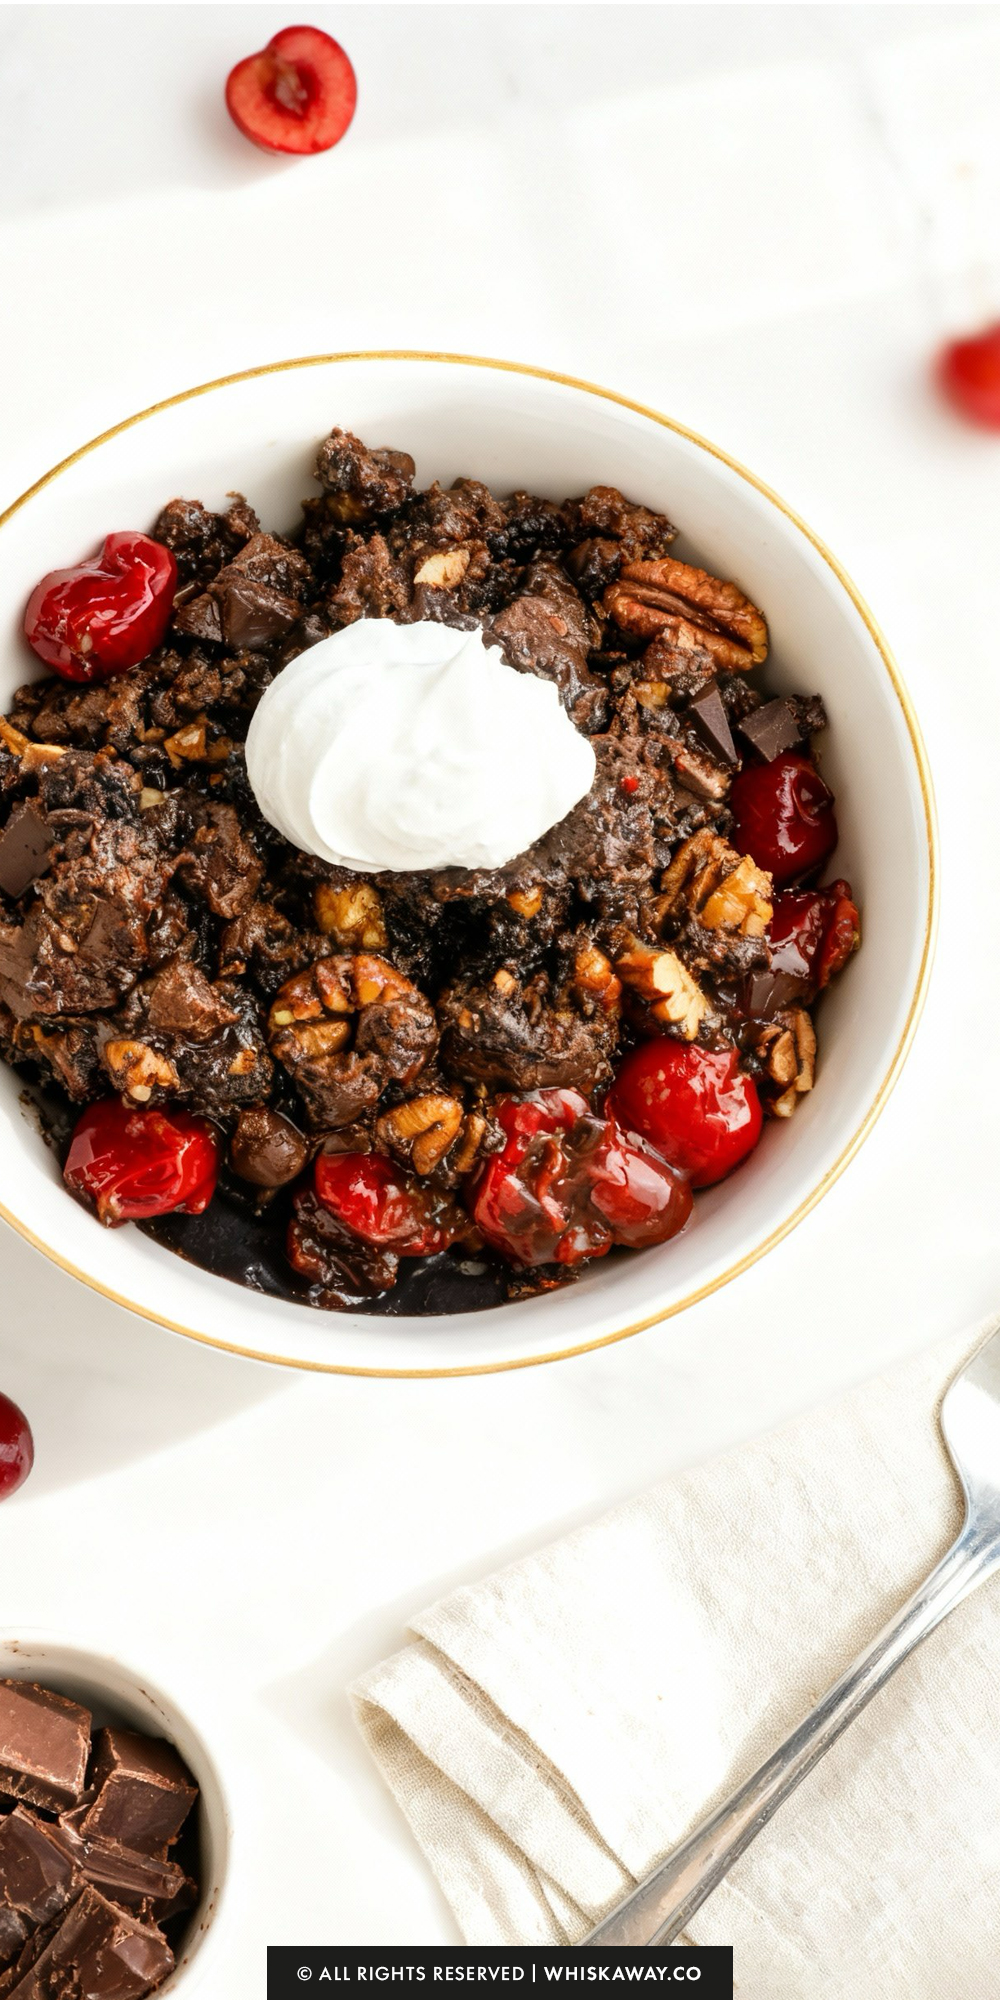
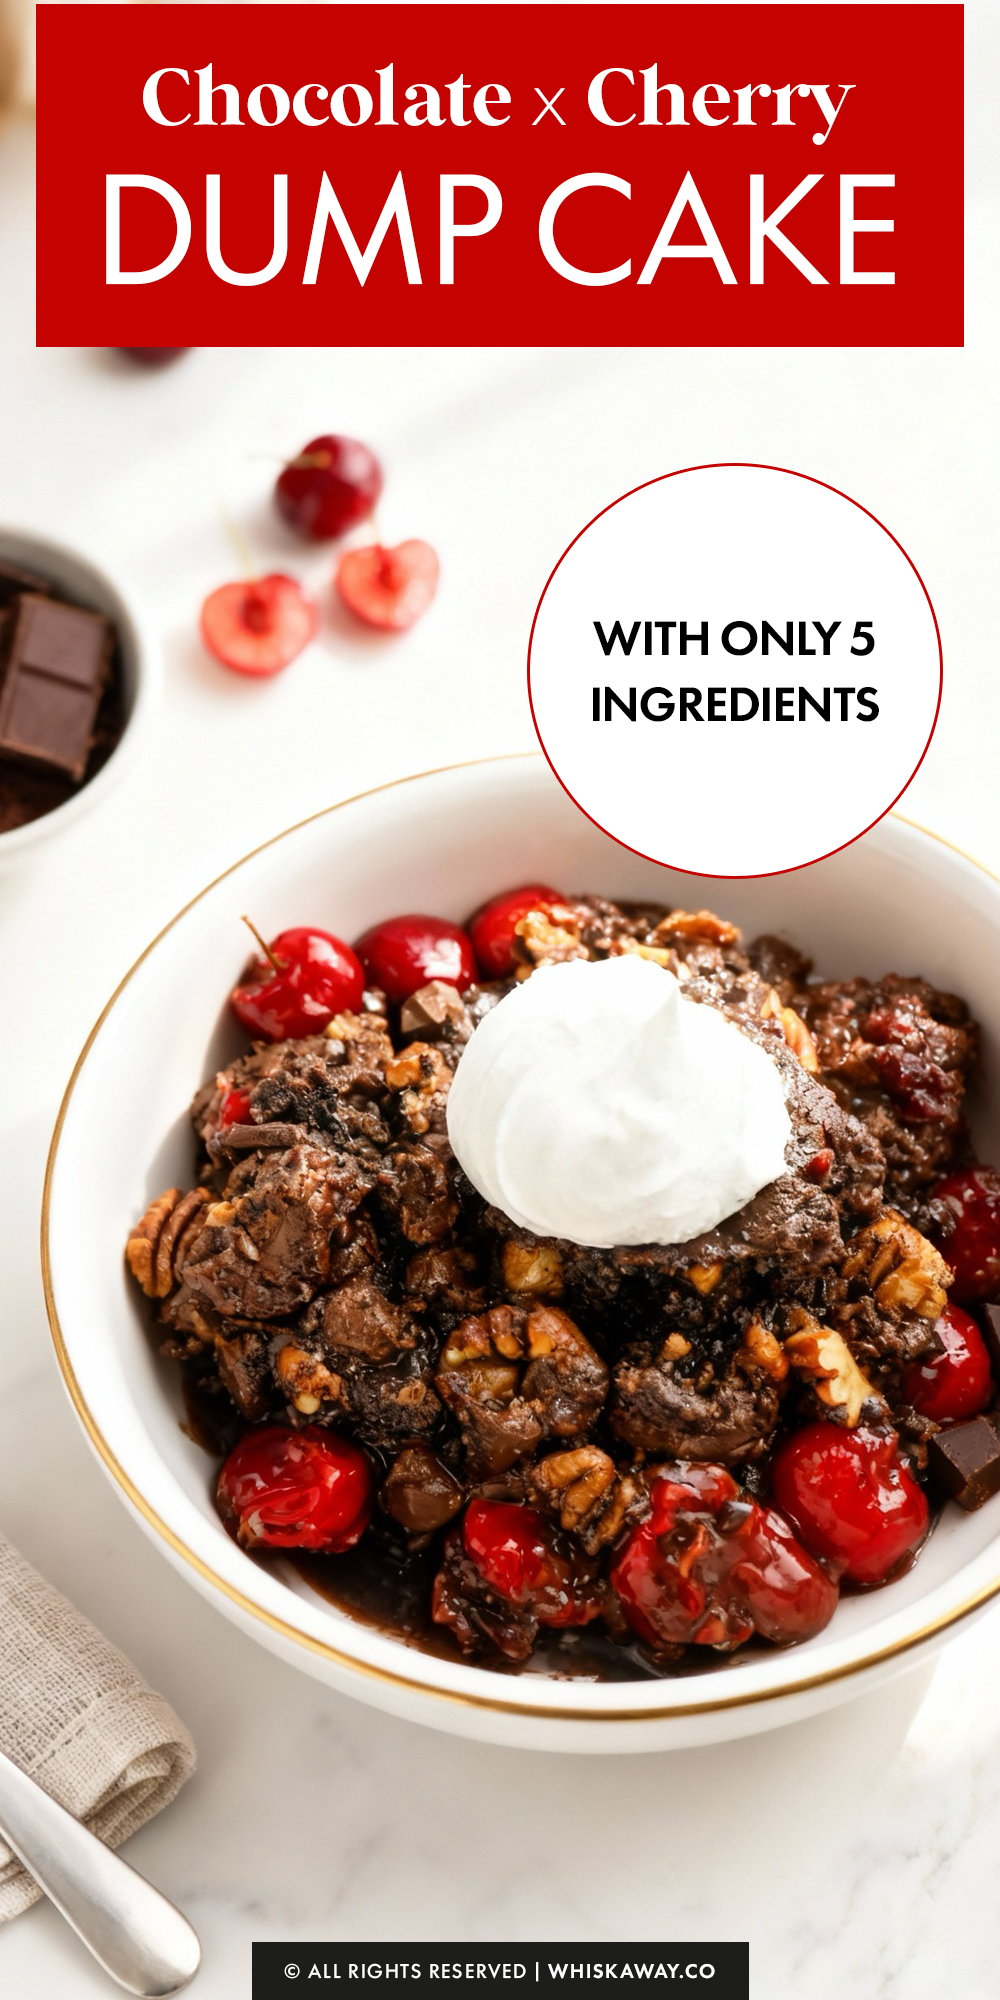
If you are looking for the ultimate lazy dessert that tastes like you spent hours in the kitchen, this Chocolate Cherry Dump Cake is about to become your new obsession.
Seriously, we need to talk about how criminally easy this is.
You know those days when you need an intense chocolate fix immediately but the idea of measuring flour, sifting ingredients, and washing a mountain of sticky mixing bowls makes you want to cry?
This recipe is the answer.
So, grab your can opener and let’s make the easiest, gooiest dessert of your life. Trust me, you’ll want a scoop of ice cream for this one!
Why You’ll Love This Recipe
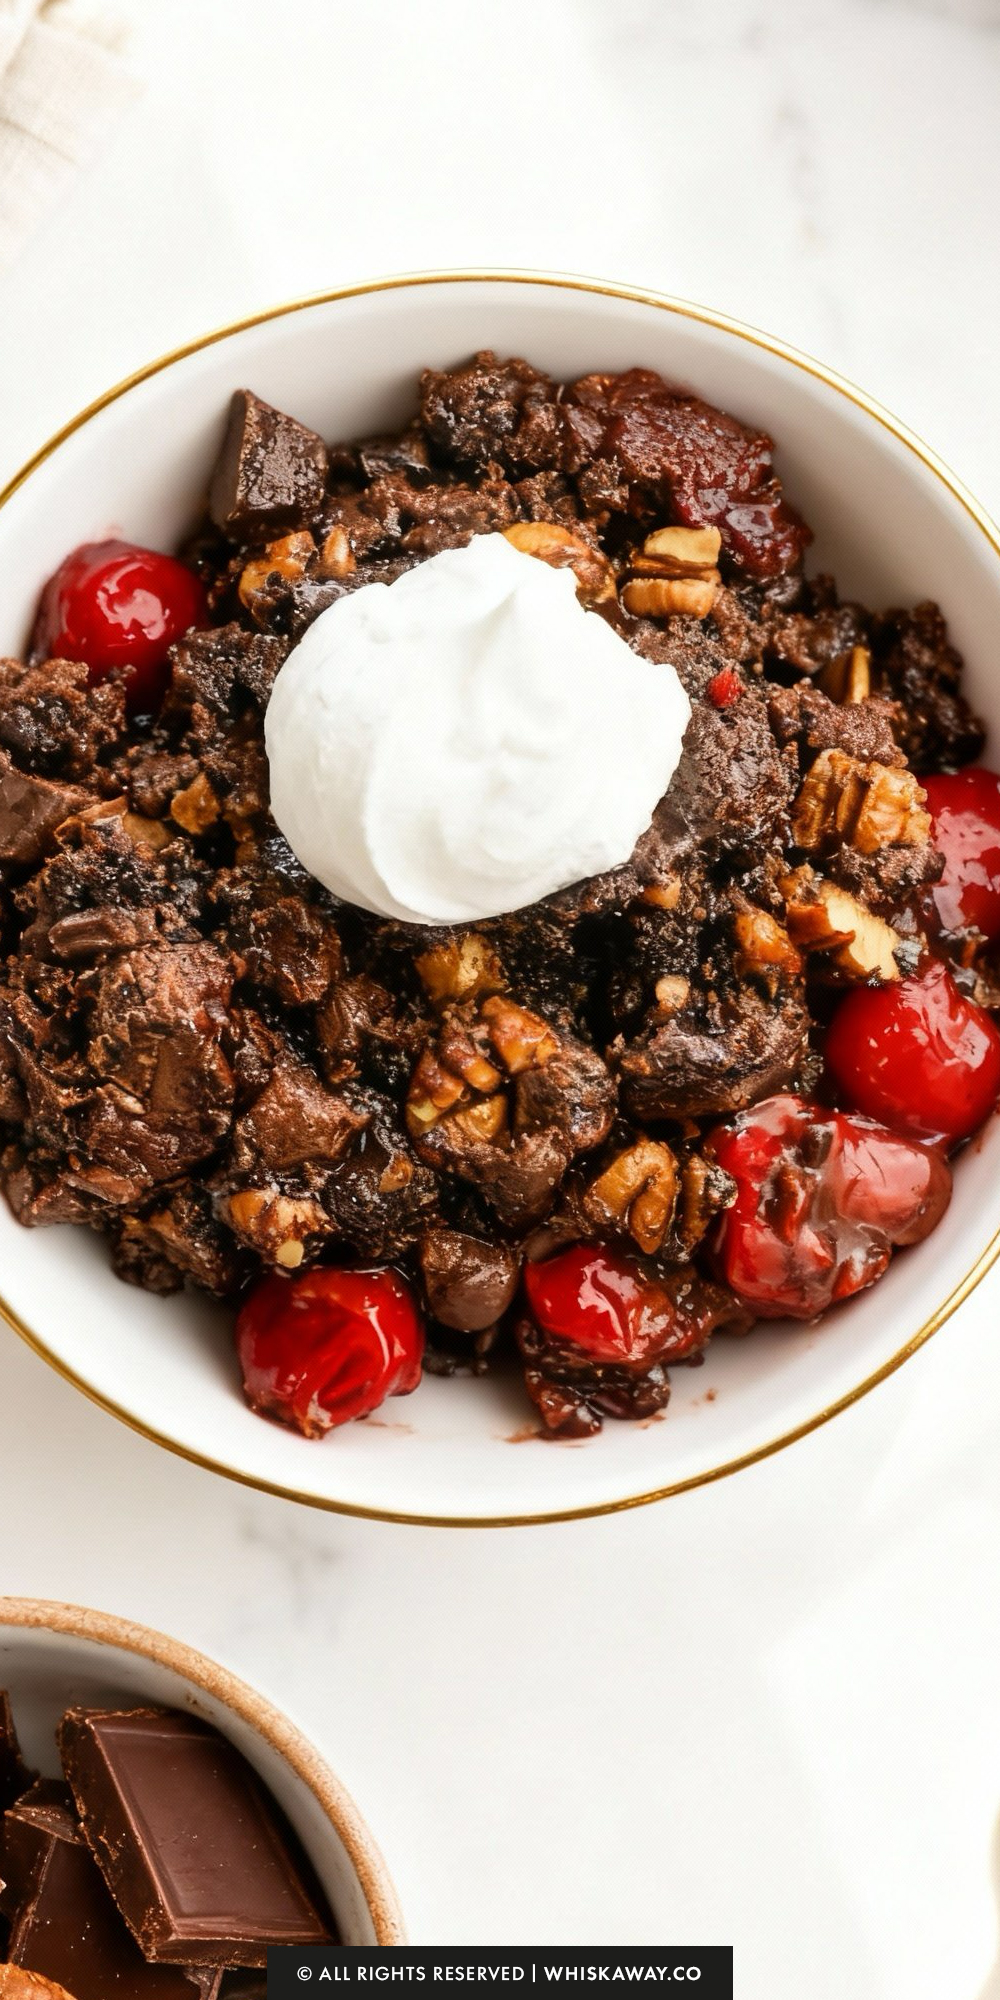
Chocolate cherry dump cake is rustic, comforting, and indulgent, with juicy cherries beneath a sweet, crisp topping. It’s a no-fuss dessert that fills your kitchen with enticing aromas while baking.
The contrast between soft, bubbling fruit and the crunchy cake layer is satisfying and visually appealing, perfect for casual gatherings or family treats.
Key Reasons to Love It:
- Juicy cherry filling with rich chocolate undertones.
- Crisp, golden topping that contrasts the soft fruit layer.
- Easy to prepare for beginners without complicated steps.
- Comforting dessert that fills the kitchen with warmth and aroma.
- Perfect for slicing into portions for sharing or gifting.
🔥 If you love easy chocolate desserts, try cherry cupcakes, indulgent chocolate swiss roll, or rich red velvet brownies for Valentine’s Day.
How to Get Your Chocolate Cherry Dump Cake Just Right
Dump cakes are famous for being “foolproof,” but there is a fine line between a bubbly, cobbler-like dessert and a pan full of dry, powdery cake mix.
Here are the secrets to ensuring your dessert bakes up perfectly every time.
1. The Golden Rule: Do Not Stir
This goes against every baking instinct you have, but you must resist the urge to mix the layers.
This recipe relies on the steam from the cherry filling rising up and the melting butter sinking down to hydrate the cake mix in the middle.
f you stir them together, you will end up with a gummy, uneven texture rather than a fluffy topping with a fruit base.
2. Eliminating Dry Patches
The most common failure with dump cakes is pulling the pan out of the oven and seeing white, powdery spots of raw cake mix on top.
Since this recipe calls for sliced butter, coverage is key. Try to slice the butter as thinly as possible (think cheese slices, not thick chunks) and arrange them like a puzzle over the dry mix.
If you leave large gaps, the cake mix underneath won’t get any fat, and it will remain dry powder.
Vegan Butter Tip: Vegan butter tends to soften faster than dairy butter. Pop your butter sticks in the freezer for 15 minutes before slicing. This makes it much easier to get those paper-thin squares that cover more surface area.
3. Don’t Drain the Fruit
You need every drop of that thick cherry syrup from the cans. That liquid is the primary source of moisture for the cake mix.
Dump the entire contents of the can, i.e, syrup and all, into the pan.
4. Watch the Nuts and Chips
Because this cake bakes for nearly an hour, the toppings are exposed to heat for a long time.
Peek at the oven around the 40-minute mark. If the pecans or chocolate chips look like they are browning too quickly or scorching, loosely tent a piece of aluminum foil over the top of the pan for the final 10 minutes.
5. The Set Time is Crucial
When you take this out of the oven, it will look like molten lava soup. Do not panic! It is not undercooked.
The pectin in the fruit filling and the starches in the cake mix need to cool down to 140°F-ish to thicken back up. If you scoop it immediately, it will be runny.
Give it that full 15 minutes on the counter to firm up into a scoopable consistency.
6. Choosing the Right Pan
A glass or ceramic baking dish (like Pyrex) works best for dump cakes.
It conducts heat more evenly than thin metal pans, preventing the sugary fruit bottom from burning before the top is cooked.
Easy Baking Tips That Have Worked for Me
SampleText
Variation Tips
The beauty of a dump cake is its versatility. While the chocolate-cherry combo is a classic “Black Forest” profile, you can easily remix this recipe to suit different cravings or pantries.
1. German Chocolate Twist
Give this dessert a coconut-pecan upgrade.
Keep the pecans, but add ½ cup of shredded coconut (sweetened or unsweetened) to the topping layer along with the chocolate chips.
The coconut toasts beautifully in the oven, creating a chewy, nutty crust that pairs perfectly with the chocolate cake.
2. The Flavor Booster (Almond Extract)
Cherries and almonds are a match made in heaven.
Before sprinkling on the cake mix, stir 1 teaspoon of almond extract directly into the cherry pie filling in the pan.
This amplifies the cherry flavor and makes the dessert taste less like “canned fruit” and more like a homemade bakery tart.
3. Berry Swap (Chocolate Raspberry)
If you aren’t a fan of cherries, this works with other red fruits.
Swap the cherry pie filling for canned raspberry pie filling or even strawberry pie filling.
Note: Raspberry filling can be slightly tart, so it balances the sweetness of the cake mix and chocolate chips very well.
4. The Mocha Kick
Enhance the chocolate flavor with coffee.
Whisk 1 tablespoon of instant espresso powder into the dry cake mix before sprinkling it over the fruit.
You won’t necessarily taste distinct coffee, but the espresso will make the chocolate taste deeper, richer, and less sugary.
5. Gluten-Free Adaptation
Since the filling is naturally gluten-free (usually cornstarch-based), the only swap needed is the box mix.
Use a 15 oz box of Gluten-Free Chocolate Cake Mix.
Gluten-free mixes sometimes struggle to brown. You might need to increase the butter slightly (add an extra 2 tablespoons) to ensure the flour hydrates fully and doesn’t leave a gritty texture.
6. Salted Caramel Lava
Before adding the dry cake mix, drizzle ½ cup of vegan caramel sauce (or drop in soft caramel candies) over the cherry filling.
When the cake comes out of the oven, sprinkle the top with flaky sea salt. This creates a sweet-and-salty profile that cuts through the richness.
7. The “Double Dutch” Texture
If you prefer a gooey center rather than a crunchy top.
Place half of the chocolate chips under the cake mix (directly on the cherries) and the other half on top. The chips on the bottom will melt into the fruit sauce, creating a fudge-like consistency.
Save for Later to Your Pinterest Board
How to Properly Store Your Chocolate Cherry Dump Cake
Because this cake is essentially a hybrid of a cobbler and a cake, it has a high moisture content from the fruit filling.
This makes it delicious, but it also means it needs to be stored correctly to prevent it from spoiling or becoming soggy.
1. Refrigeration (Recommended)
The Best Method: Because of the wet fruit bottom, the refrigerator is the safest place for this cake. It will stay fresh for 3 to 5 days.
You can leave the cake in the baking dish. Simply cover the top tightly with plastic wrap or aluminum foil. If you have transferred leftovers to a smaller container, ensure the lid is airtight.
The cold will harden the chocolate chips and the vegan butter, making the cake firm. You will definitely want to reheat it before eating.
2. Room Temperature (Short Term Only)
You can leave the cake out on the counter, covered, for up to 24 hours. However, if your kitchen is warm or humid, it is safer to refrigerate it sooner.
After the first day, the moisture in the fruit can create an environment for bacteria, so move any leftovers to the fridge.
3. Freezing (Best for up to 3 Months)
It is best to slice the cake into individual squares before freezing. This way, you can grab a single serving without thawing the whole pan.
Wrap each square tightly in plastic wrap, then place them all in a heavy-duty freezer bag or a sealed container.
Thawing: Move the frozen cake to the refrigerator the night before you want to eat it. Avoid thawing it on the counter, as the temperature change can make the topping mushy.
4. Reheating Tips (Bring Back the Gooeyness)
The Microwave (Quickest): Place a slice on a plate and zap it for 30–45 seconds. This will melt the chocolate chips again and make the fruit sauce bubbly.
The Oven (Best for Texture): If you want to restore the crunch to the topping, reheat the cake in a 350°F (175°C) oven for about 10–15 minutes. This crisps up the nuts and cake mix that may have softened in the fridge.
5. Storage Mistakes to Avoid
Only reheat the portion you plan to eat right then. If you keep warming up and cooling down the entire baking dish, the fruit will turn into mush and the cake will dry out.
If using aluminum foil, try not to let it touch the surface of the cake too much. The sticky fruit and melted chocolate love to glue themselves to foil, and you might peel off all your delicious toppings when you uncover it.
FAQs
Why do I have spots of dry powder on top of my cake?
This happens when the butter doesn’t completely cover the cake mix. If you pull the cake out of the oven and see white, powdery patches, don’t worry! Simply slice a few thin extra pats of butter (or drizzle a tiny bit of melted butter) directly over the dry spots and pop the pan back in the oven for 5–10 minutes. The extra fat will hydrate the mix and bake it into a crust.
Can I melt the butter instead of slicing it?
Yes, you can. While this recipe calls for sliced butter to create distinct, crispy pockets of crust, many people prefer melting the butter and drizzling it over the cake mix to ensure more even coverage. If you choose to melt it, just make sure you drizzle it slowly and evenly so you don’t flood one area and leave another dry.
Can I use regular dairy ingredients for this recipe?
Absolutely. The recipe is written to be vegan-friendly, but if you do not have dietary restrictions, you can use a standard box of chocolate cake mix (which usually contains milk powder) and regular salted or unsalted butter. The measurements and baking time remain exactly the same.
Can I skip the pecans?
Yes, the nuts are completely optional. They add a nice textural contrast to the soft fruit and cake, but if you have a nut allergy or simply don’t like them, you can leave them out. You could substitute them with more chocolate chips, shredded coconut, or just leave the topping as cake mix and butter.
What is the best way to serve this?
This cake is best served warm, right out of the baking dish. Because it is rich and chocolatey, it pairs perfectly with something creamy to cut the sweetness. A scoop of vanilla bean ice cream (dairy or dairy-free) is the classic choice, but a dollop of whipped cream or even a drizzle of cold heavy cream works beautifully too.

Chocolate Cherry Dump Cake
5
minutes10
minutesThis chocolate cherry dump cake is rich, gooey, and effortless. No mixing required for a crowd-pleasing dessert.
Ingredients
30 oz canned cherry pie filling (2 cans)
16.5 oz box chocolate cake mix (dairy-free, egg-free)
1 cup dairy-free chocolate chips
1 cup chopped pecans
½ cup vegan butter, cold and sliced thinly
Directions
- Start by preheating your oven to 350°F (175°C). Grab a standard 9×13-inch baking dish. One of the best parts of this recipe is that you do not need to grease or spray the pan beforehand.
- Open both cans of cherry pie filling and dump them directly into the baking dish. Use a spatula or the back of a spoon to spread the fruit out into an even layer that covers the bottom of the pan.
- Open the box of cake mix and sprinkle the dry powder evenly over the top of the cherries. Do your best to break up any large clumps with your fingers as you sprinkle. Do not stir. The cake mix should sit right on top of the fruit.
- Arrange the cold, thinly sliced vegan butter over the surface of the dry cake mix. Try to place the slices as close together as possible to ensure the flour hydrates properly during baking.
- Note: If you notice significant gaps, you can slice an extra 1/4 cup of butter to fill in the empty spaces.
- Scatter the dairy-free chocolate chips and the chopped pecans over the top of the butter layer. This creates a delicious, crunchy crust.
- Place the dish in the preheated oven and bake for 50 minutes. You are looking for the sides to be bubbly and the butter to be completely melted into the cake mix.
- Remove the cake from the oven. It will be very hot and liquid, so let it rest on a wire rack for 10 to 15 minutes. This resting time allows the sauce to thicken slightly. Serve it while it is still warm.
- If you have leftovers, cover the dish with foil or plastic wrap and store it in the refrigerator. It will stay fresh for 3 to 5 days.