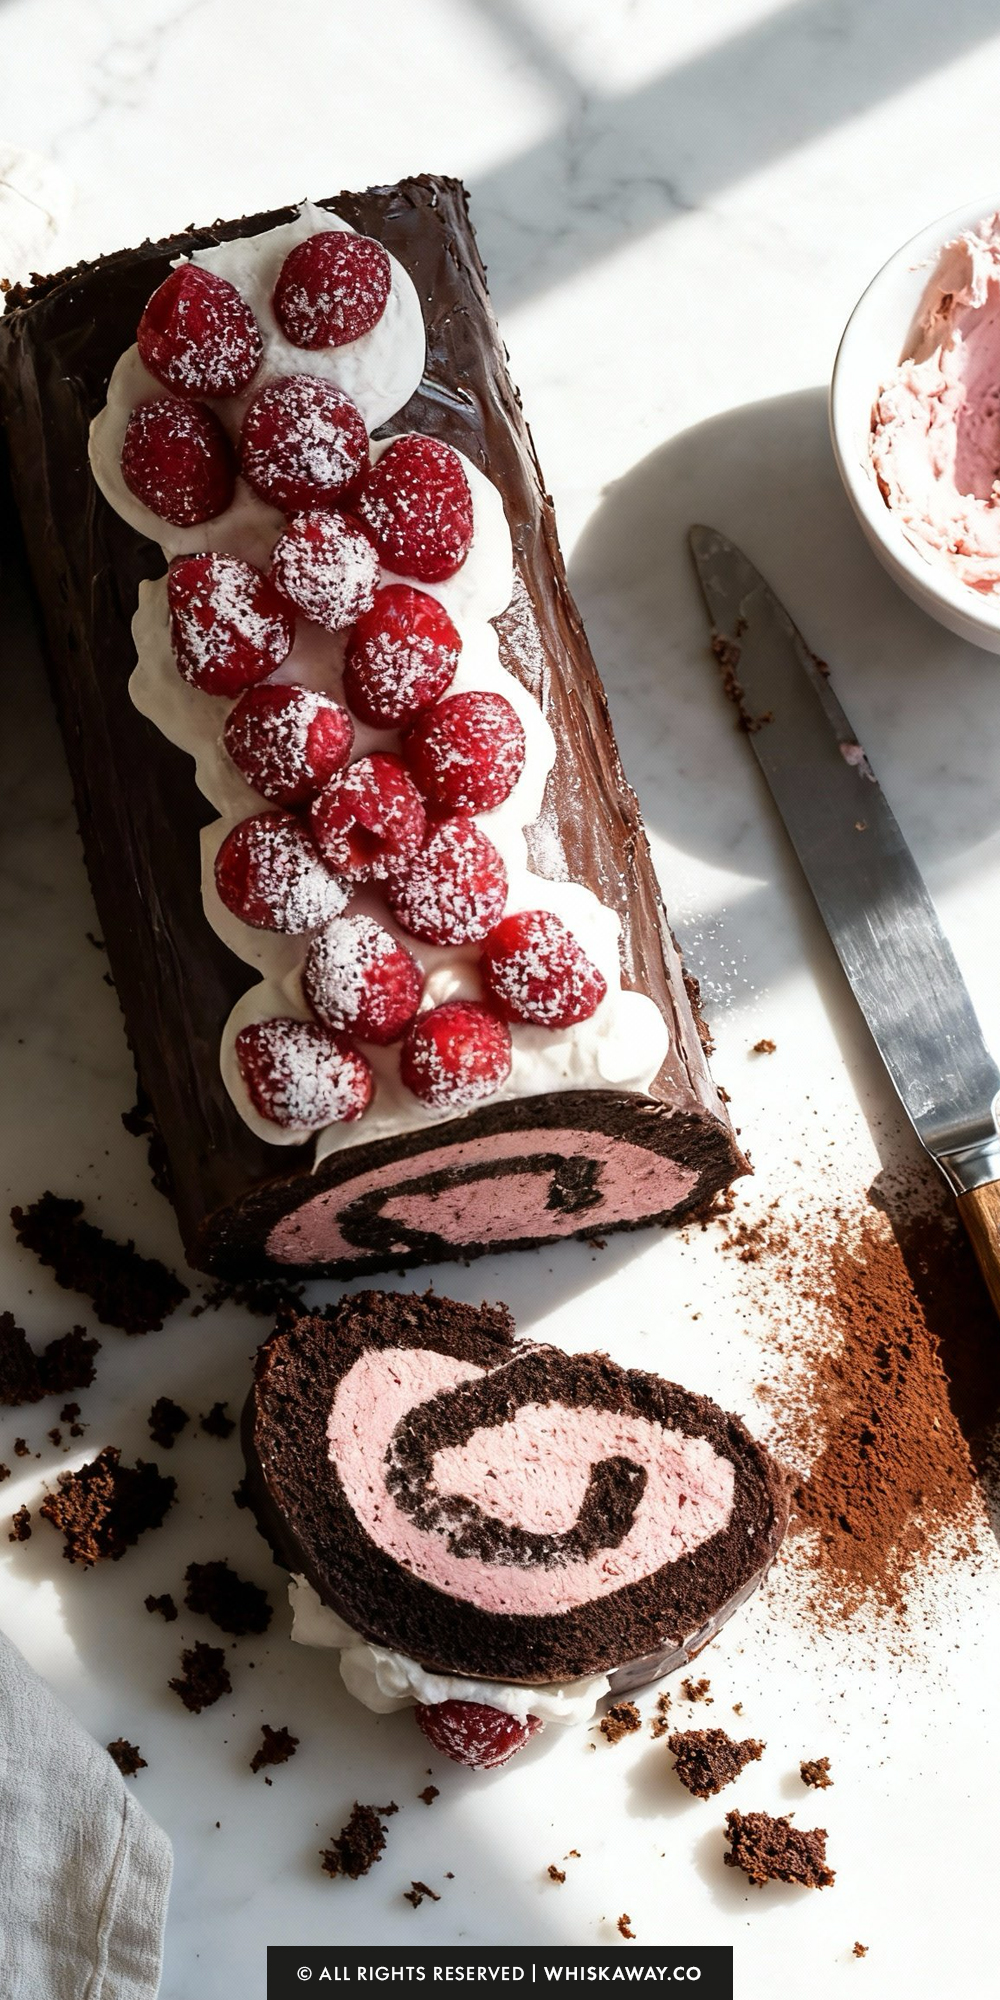
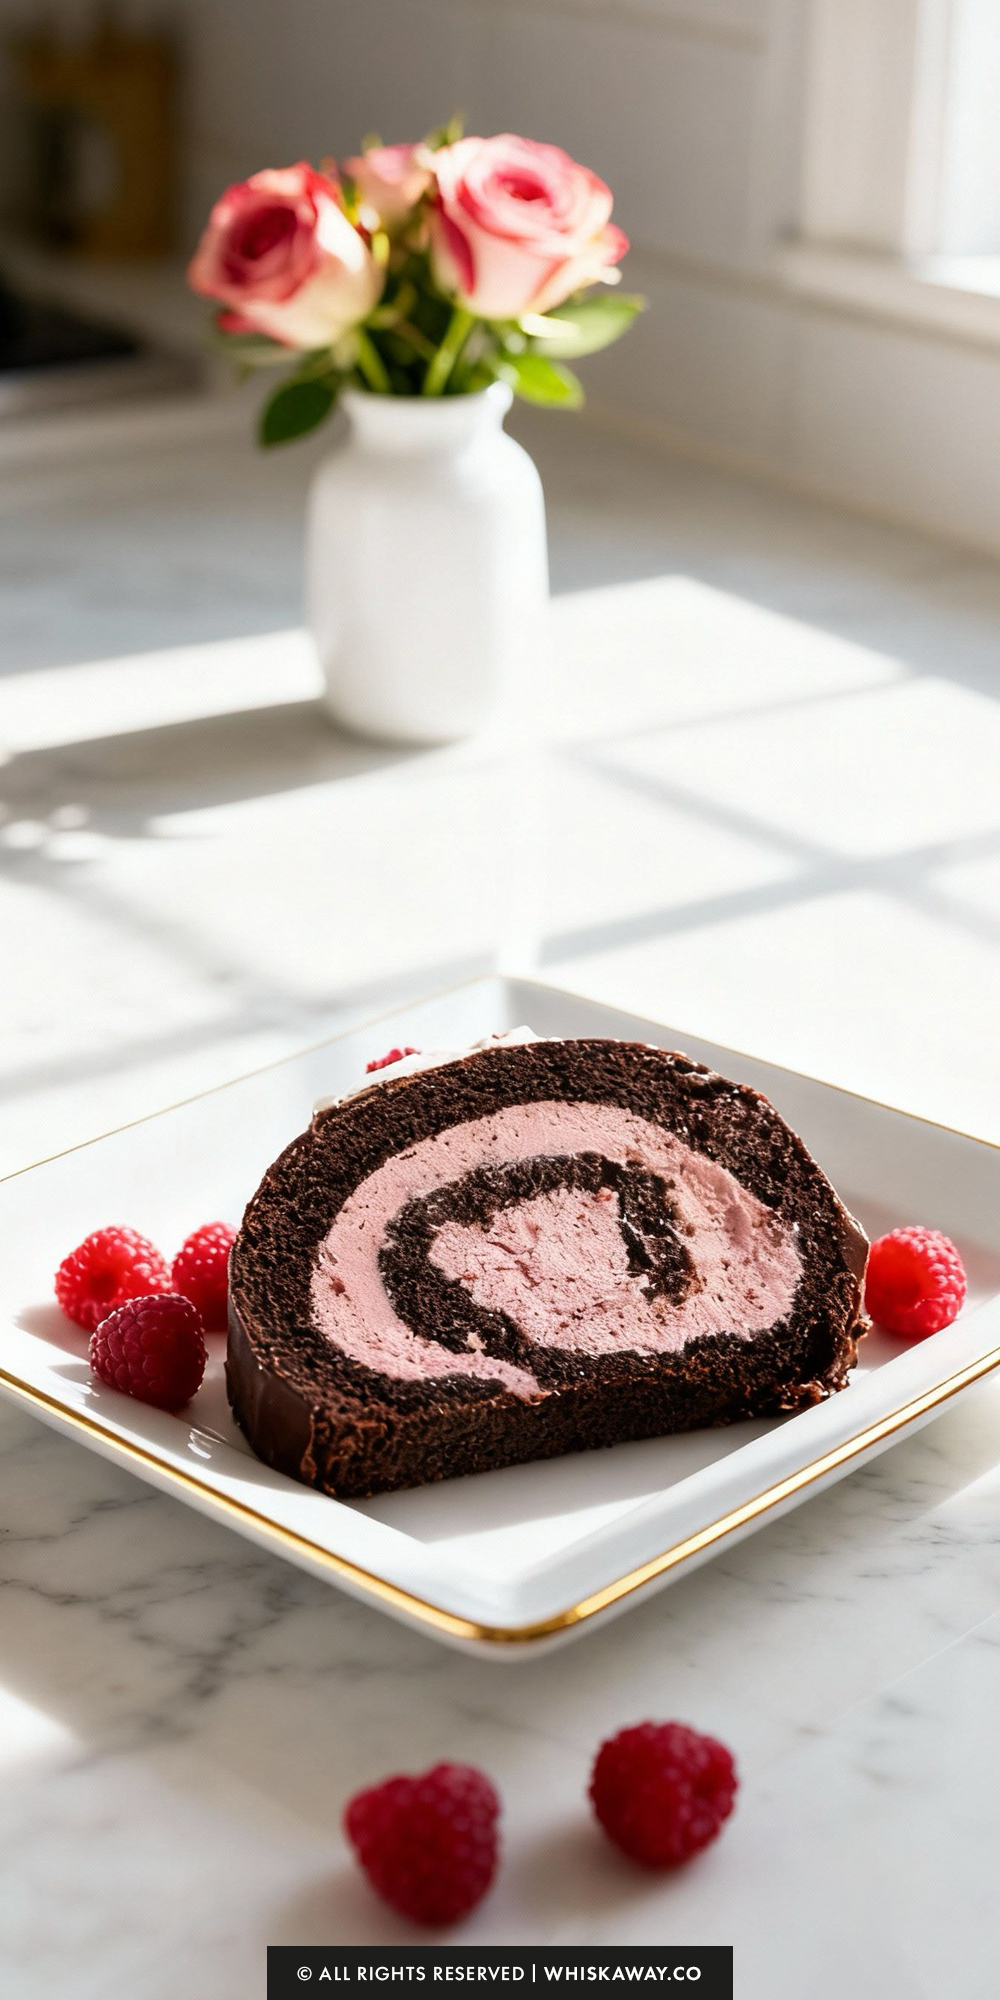
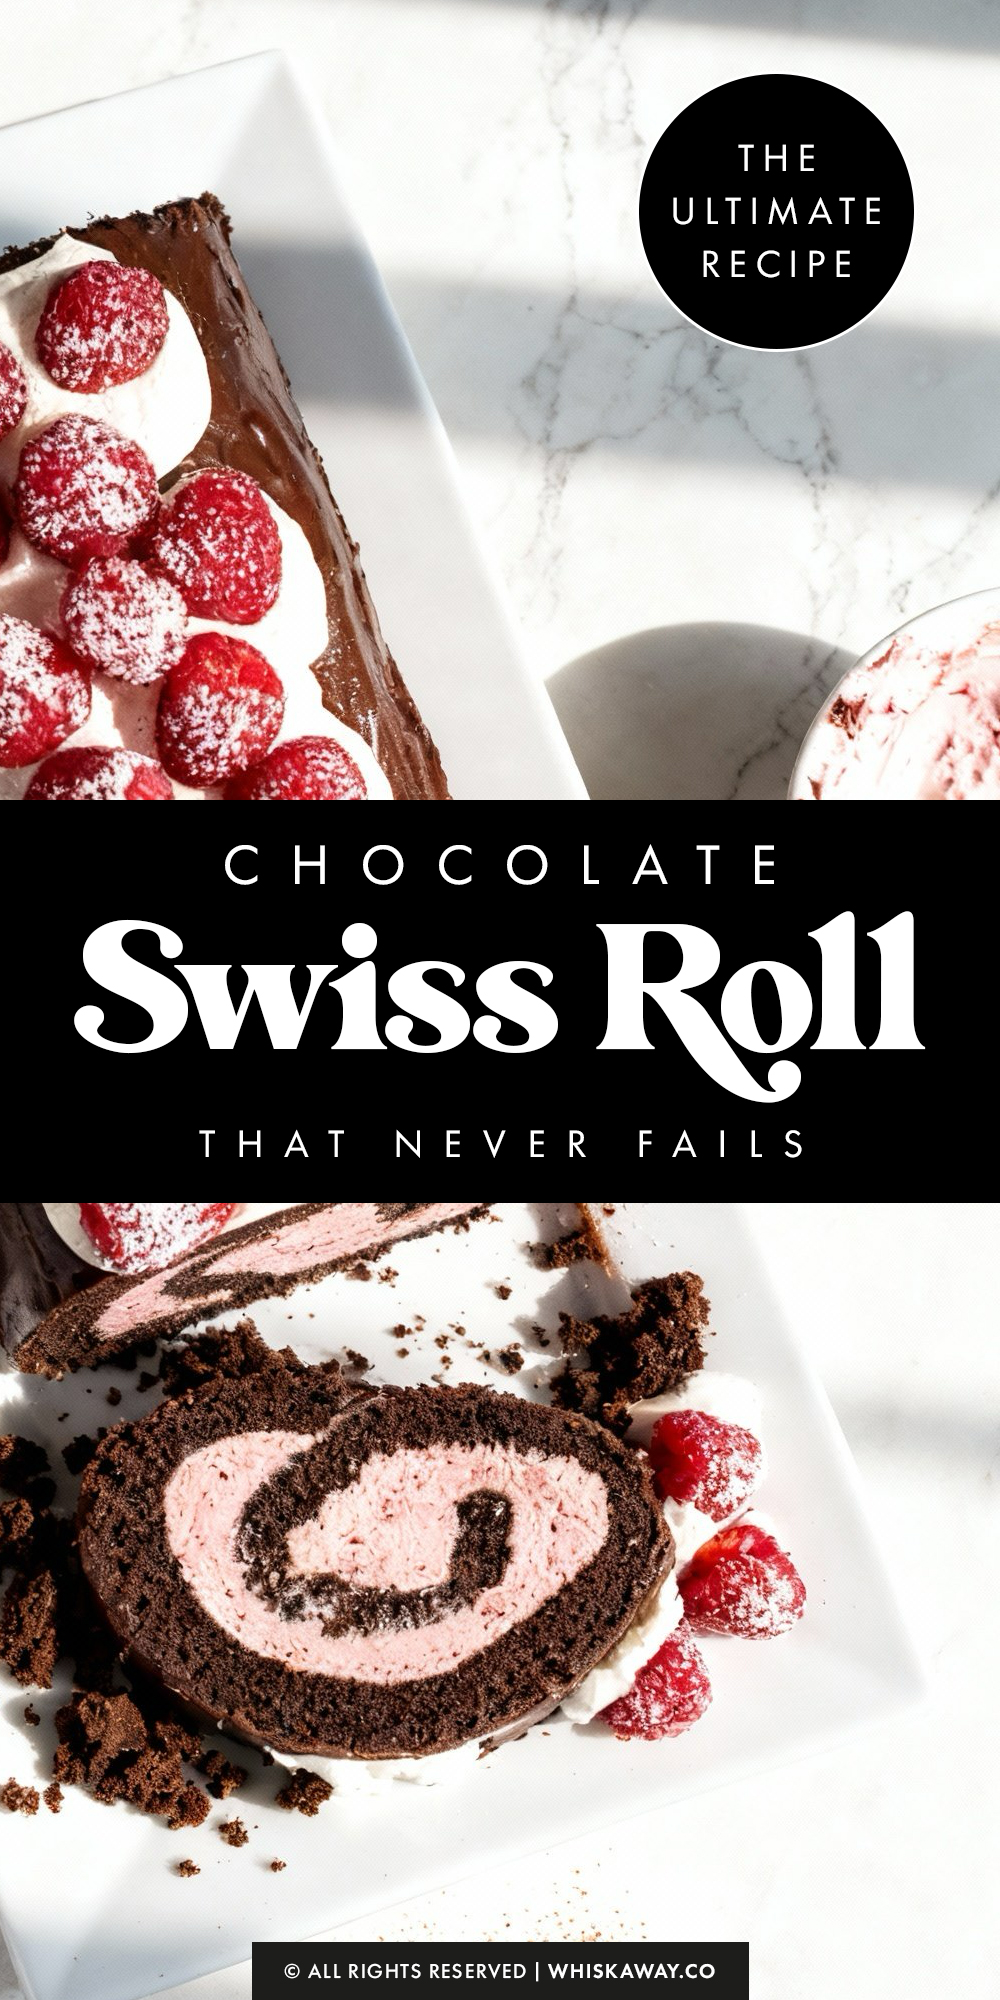
If there is one dessert that is guaranteed to elicit a collective “wow” when you bring it to the table, it is the Chocolate Swiss Roll.
With its hypnotic spiral of dark sponge and pink raspberry cream, it looks like something that took hours of delicate work in a professional patisserie.
But here is the secret: it is actually much easier to make than it looks.
I know what you’re thinking: “But won’t it crack when I roll it?” That is the number one fear with Swiss rolls! But don’t worry.
I’ve included a foolproof method (the “hot towel” trick) that keeps the cake flexible and ensures a perfect, crack-free spiral every single time.
Whether you are baking for a romantic Valentine’s Day dinner, a holiday gathering, or just want to conquer a baking bucket list item, this Chocolate Swiss Roll is the ultimate showstopper.
It’s elegant, it’s delicious, and best of all, it’s completely achievable in your own kitchen. Let’s get rolling!
Why You’ll Love This Recipe
Chocolate Swiss rolls are light, tender, and beautifully swirled with creamy chocolate filling.
They’re visually stunning, impressive to serve, and surprisingly easy for beginners to master with careful preparation.
Key Reasons to Love Them:
- Soft sponge with rich, creamy chocolate filling.
- Beautiful swirl pattern for an impressive presentation.
- Elegant dessert suitable for celebrations.
- Light texture makes it enjoyable in every bite.
- Teaches rolling and layering skills for beginner bakers.
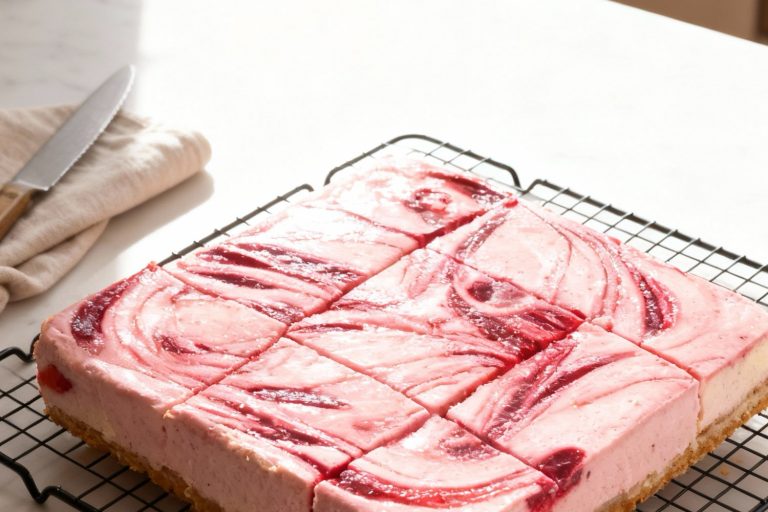
🔥 This chocolate swiss roll pairs wonderfully with raspberry chocolate mousse cake, indulgent red velvet brownies, or light meringue kisses for Valentine’s Day.
How to Get Your Chocolate Swiss Roll Just Right
Swiss rolls have a reputation for being the “divas” of the baking world because of the dreaded “crack.”
However, with a few specific techniques, you can achieve that perfect, bakery-style spiral without the stress.
1. The “Hot Roll” Rule
This is the single most critical step in the entire recipe. You cannot wait for the cake to cool before rolling it.
Sponge cake has “memory.” If you let it cool flat, it will “remember” that flat shape. When you try to roll it later, it will snap and crack.
Have your sugared towel laid out and ready before the timer goes off. Flip the cake, peel the paper, and roll it while it is still steaming hot.
This trains the flexible gluten strands to accept the spiral shape as they cool.
2. Master the “Fold”
This cake relies heavily on whipped egg whites for its airy, sponge-like texture.
When combining the chocolate batter with the egg whites, be gentle. Use a spatula to cut through the middle, scrape the bottom, and fold over the top.
Do not stir vigorously, or you will knock the air bubbles out, resulting in a rubbery, dense pancake that is difficult to roll.
3. The Towel Insurance
There is nothing worse than unrolling your cooled cake only to find the surface has peeled off onto the towel.
Be generous with the powdered sugar on your kitchen towel. If you want to keep the cake dark and chocolatey looking, you can swap the powdered sugar for cocoa powder.
This prevents sticking without leaving white streaks on the dark sponge.
4. Don’t Overbake the Sponge
Because the cake is thin, it goes from “perfect” to “dry cracker” very quickly.
The cake is done the second it springs back when you gently poke the center.
If you leave it in too long, the edges will become brittle, which guarantees cracking when you try to roll the initial tight spiral.
5. Chill Before You Cut
Once you have filled and re-rolled the cake, it will feel heavy and soft.
Do not skip the 3-hour refrigeration step. The cream cheese filling acts as the “glue” that holds the spiral together.
If you cut it while the filling is soft, the weight of the knife will squash the circle into an oval, and the filling will squish out the sides.
6. The “Clean Cut” Secret
To get those distinct, clean layers of chocolate and pink raspberry cream visible in every slice:
Use a sharp chef’s knife, not a serrated bread knife.
Run the knife blade under hot water and wipe it dry before every single slice.
The hot blade melts through the ganache shell and glides through the filling without dragging crumbs across the cream.
7. Ganache Temperature Matters
Let your ganache sit for about 10 minutes after mixing. If you pour it while it’s piping hot, it will be too thin and will run right off the cake onto the plate.
You want it to be a pourable, thick consistency (like honey) so it coats the cake in a thick, glossy layer.
Easy Baking Tips That Have Worked for Me
Spreading chocolate filling over a soft, freshly baked sponge is a tactile and rewarding experience.
Carefully rolling the cake ensures tight, even layers without cracking the sponge.
Slicing the roll reveals neat swirls of chocolate that are visually appealing and inviting.
The soft sponge combined with the rich, smooth filling delivers a melt-in-your-mouth texture.
This dessert is both elegant and approachable, making it perfect for beginners who want a dramatic, impressive presentation.
Variation Tips
The chocolate sponge base of this Swiss roll is surprisingly versatile.
By swapping out the fruit or tweaking the filling, you can transform this dessert to match any season or craving
1. Mint Chocolate Chip
Omit the freeze-dried raspberries. Instead, add ½ teaspoon of peppermint extract and a few drops of green food coloring to the cream cheese mixture.
Fold in ½ cup of mini chocolate chips into the filling right before spreading it on the cake.
A refreshing, cool mint flavor that cuts through the rich chocolate sponge.
2. Strawberry & Cream
Simply replace the freeze-dried raspberries with freeze-dried strawberries.
Top the ganache with sliced fresh strawberries instead of raspberries. This is a sweeter, milder alternative that is often a bigger hit with children.
3. Mocha Java Roll
Dissolve 1 tablespoon of instant espresso powder into the hot water before adding it to the batter. This enhances the chocolate flavor and adds a coffee kick.
Add 1 teaspoon of coffee extract to the cream cheese mixture.
Top the finished roll with chocolate-covered espresso beans.
4. Black Forest Style
Omit the raspberry powder. Spread a thin layer of cherry preserves or finely chopped maraschino cherries (patted very dry) over the cream cheese filling before rolling.
Add a tiny splash (¼ teaspoon) of almond extract to the whipped cream filling to mimic the flavor of kirsch.
5. Hazelnut Crunch (Ferrero Rocher Style)
Once you pour the chocolate ganache over the log, immediately sprinkle it with ½ cup of toasted, chopped hazelnuts.
Swirl a tablespoon of Nutella into the cream cheese mixture for a subtle nutty undertone.
6. Dietary Adaptations
This sponge is very forgiving. You can substitute the all-purpose flour with a high-quality 1-to-1 Gluten-Free Baking Flour.
The texture remains light and fluffy because the structure relies heavily on the whipped eggs.
This recipe is naturally nut-free, but ensure your chocolate chips are processed in a nut-free facility if you are baking for someone with severe allergies.
7. White Chocolate “Snow” Roll
Instead of dark chocolate ganache, make a white chocolate ganache (use a 3:1 ratio of white chocolate to cream, as white chocolate is softer).
The stark white coating against the dark chocolate spiral looks stunning, especially for winter holidays.
Save for Later to Your Pinterest Board
How to Properly Store Your Chocolate Swiss Roll
Because this Swiss Roll is filled with fresh whipped cream and cream cheese, it is more perishable than a standard butter cake.
Proper storage is key to keeping the sponge soft and the filling safe to eat.
1. Refrigeration (Essential for Safety)
You must store this cake in the refrigerator. It cannot sit out on the counter due to the dairy in the filling.
Duration: The roll will stay fresh for 3–4 days.
- To keep the plastic wrap from sticking to your beautiful ganache glaze, poke a few toothpicks into the top of the roll.
- Drape the plastic wrap loosely over the toothpicks, then tuck it under the plate. This creates a protective shield that keeps the cake moist without ruining the decoration.
If you have a plastic cake carrier or a large Tupperware container, that is even better than plastic wrap as it prevents the sponge from absorbing fridge odors.
2. Freezing (Best for up to 3 Months)
Flash Freeze First: If you want to freeze the whole log, place it on a baking sheet uncovered in the freezer for 1 hour. This freezes the ganache hard so you can wrap it without smudging it.
Wrapping: Once the outside is hard, wrap the log tightly in two layers of plastic wrap, followed by a layer of aluminum foil.
Freezing Slices: For a quick treat later, slice the cake before freezing. Wrap each individual slice in plastic wrap and store them all in a freezer-safe bag.
Thawing: Move the cake (or slice) from the freezer to the fridge the night before you plan to eat it. Do not thaw it on the counter, as the temperature shock can make the ganache “sweat” and the filling runny.
3. Serving Temperature
While the cake must be stored cold, it tastes best if it sits at room temperature for about 15–20 minutes before serving. This allows the ganache to soften slightly and the sponge to relax, giving you a better texture.
Do not leave the cake out for more than 2 hours. After that, the filling may become too soft to hold the spiral shape, and the dairy can spoil.
4. Storage Mistakes to Avoid
The Microwave: Never try to “warm up” a slice in the microwave. The filling is essentially a mousse/cheesecake hybrid and will melt instantly into a soup, destroying the structure of the roll.
Uncovered Storage: The chocolate sponge is porous and dries out very fast in the cold air of a refrigerator. If you leave a cut end exposed, press a piece of plastic wrap directly against the cut surface to seal in the moisture.
FAQs
Why did my cake crack when I rolled it?
Cracking almost always happens because the cake cooled down too much before being rolled. The sponge must be rolled while it is hot and steaming right out of the oven. This heat keeps the gluten flexible. If you wait even a few minutes, the cake structure “sets” in a flat shape and will snap when you try to bend it.
Can I use fresh or frozen raspberries inside the filling instead of freeze-dried?
It is best not to mix fresh or frozen fruit directly into the cream cheese filling. Fresh berries contain too much water, which will cause the filling to curdle or become runny, making the cake impossible to slice cleanly. If you can’t find freeze-dried raspberries, you can omit them or swirl a thick raspberry jam into the filling instead. Save the fresh berries for the topping!
My sponge cake turned out rubbery. What went wrong?
A rubbery texture is usually the result of over-mixing the batter. When you add the flour mixture to the wet ingredients, mix only until the flour just disappears. If you beat it too vigorously, you over-develop the gluten. It can also happen if you bake it too long; the sponge should be springy, not hard.
Can I make this cake a day in advance?
Yes, actually, this cake benefits from being made ahead! It needs at least 3 hours in the fridge to set, but leaving it overnight allows the moisture from the filling to soften the sponge further, creating a melt-in-your-mouth texture. Just wait to pour the ganache and add fresh berries until the day you plan to serve it.
How do I stop the cake from sticking to the towel?
Be generous with your dusting! You need a solid layer of powdered sugar (or cocoa powder) on the towel to act as a barrier. If your climate is very humid, use even more than you think you need. Also, make sure you use a smooth-weave kitchen towel (like linen or flour sack) rather than a textured terry cloth towel, which can grab onto the cake surface.

Chocolate Swiss Roll
12
servings3
hours15
minutes30
minutesThis chocolate Swiss roll is light, fluffy, and filled with smooth cream. Definitely a timeless dessert that looks as good as it tastes.
Ingredients
- Batter
4 eggs divided
½ cup granulated sugar + ⅓ cup, divided
½ cup all-purpose flour
⅓ cup unsweetened cocoa powder
⅓ cup water
1 teaspoon vanilla extract
½ teaspoon baking powder
¼ teaspoon baking soda
⅛ teaspoon salt
- Filling
8 ounces cream cheese room temperature
1 cup powdered sugar divided
1 cup heavy whipping cream
½ cup freeze dried raspberries
½ teaspoon vanilla extract
1 pinch salt
- Ganache
3 ounces semi-sweet chocolate chips
6 tablespoons heavy whipping cream
- Topping
6 ounces raspberries fresh
Directions
- The Cake Base
- Preheat your oven to 350°F (175°C). Note: If you are using a dark-coated nonstick pan, reduce the temperature to 325°F.
- Line a 10×15-inch jelly roll pan with parchment paper and lightly mist it with cooking spray to ensure easy removal.
- In a medium bowl, beat the egg whites with an electric hand mixer until they form soft peaks.
- While continuing to beat, gradually pour in ½ cup of granulated sugar. Keep mixing until the whites hold glossy, stiff peaks. Set this aside.
- In the bowl of a stand mixer fitted with the whisk attachment, beat the egg yolks on medium speed for about 3 minutes until pale.
- Add the remaining ⅓ cup of sugar and the vanilla extract, beating for another 2 minutes.
- In a separate bowl, whisk together the flour, cocoa powder, baking powder, baking soda, and salt.
- Reduce the mixer speed and add the dry ingredients to the yolk mixture, alternating with the ⅓ cup of water.
- Scrape down the sides of the bowl to ensure everything is incorporated.
- Gently fold the chocolate batter into the stiff egg whites. Do this gradually to avoid deflating the air, mixing just until no white streaks remain.
- Spread the batter evenly into your prepared pan. Bake for 12–15 minutes; the cake is done when the top springs back when lightly pressed and a toothpick inserted in the center comes out clean.
- While the cake is in the oven, lay a clean kitchen towel flat on the counter and dust it generously with powdered sugar.
- As soon as the cake comes out of the oven, immediately flip it face-down onto the towel. Peel off the parchment paper.
- tarting at one of the short ends, roll the warm cake and the towel up together into a tight log. Let it cool completely in this rolled shape.
- The Filling
- Powder Pulse the freeze-dried raspberries in a blender or food processor until they turn into a fine powder. You should end up with about 2 tablespoons.
- Using the whisk attachment on your stand mixer, whip the heavy cream and ¼ cup of powdered sugar until stiff peaks form. Transfer this whipped cream to a separate bowl.
- In the empty mixer bowl (no need to wash it yet), switch to the paddle attachment and beat the cream cheese until smooth. Mix in the remaining ¾ cup of powdered sugar, the raspberry powder, vanilla, and salt.
- Gently fold about 1 ½ cups of the prepared whipped cream into the cream cheese mixture until uniform. Tip: Place the remaining whipped cream in the fridge to use for the topping later.
- Carefully unroll the cooled cake log. Spread the raspberry filling evenly over the surface, leaving a small border at the edges.
- Roll the cake back up (without the towel this time). Wrap the log in plastic wrap and refrigerate for at least 3 hours to set.
- Ganache & Assembly
- Microwave the 6 tablespoons of heavy cream for about 45 seconds until hot. Add the chocolate chips to the hot cream, cover the bowl, and let it sit for 2 minutes.
- Stir gently until the mixture is glossy and smooth. Let it sit at room temperature for 5–10 minutes to thicken slightly.
- Pour the ganache over the chilled cake roll and spread it to coat the top and sides. Let it set for about 5 minutes.
- If the reserved whipped cream has softened, give it a quick whisk to stiffen it up. Pipe or dollop the cream on top of the ganache, garnish with fresh raspberries, and dust with a little powdered sugar before slicing. Store any leftovers in the refrigerator.
There are no reviews yet. Share your thoughts above!